In cases where assay data is found to be unreliable, such as due to a bad batch of analytes or other issue, the user can exclude specific rows of data from later analysis.
This topic covers excluding data for Standard and File-based Assays. Some specialty assay types, such as
Luminex, support similar data exclusions.
Exclude Data
In order to exclude data, you must have Editor (or higher) permissions in the folder.
- Navigate to the Standard or file-based assay data of interest:
- In the Assay List web part on the main page of your folder, click the assay name.
- Click the AssayID for the run of interest.
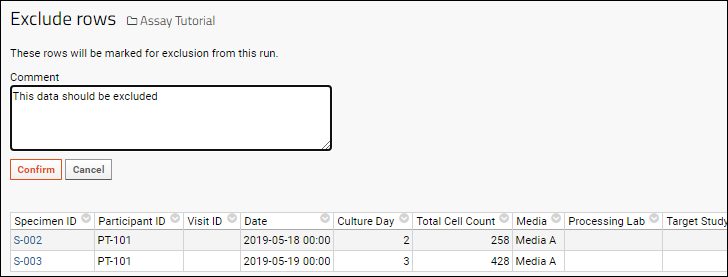
- Select the row(s) to exclude using the checkboxes.
- Click Exclude. (This link is only active when rows are selected.)

- Enter a comment about the reason for the exclusion.
- Click Confirm.

You will return to viewing the results grid. The excluded rows are still shown, but highlighted to indicate the exclusion.

All exclusion actions are audited and can be viewed by an administrator in the Assay/Experiment events audit log.
View Excluded Data
Excluded data rows are highlighted in the grid itself, and you can view a consolidated report grid of all excluded data.
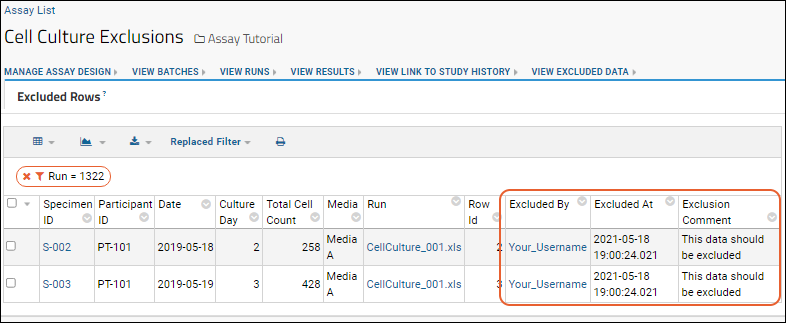
- Click View Excluded Data above the grid.

The
Excluded Rows grid shows the original data as well as when and by whom it was excluded, plus the comment entered (if any).

Filter Out Excluded Data
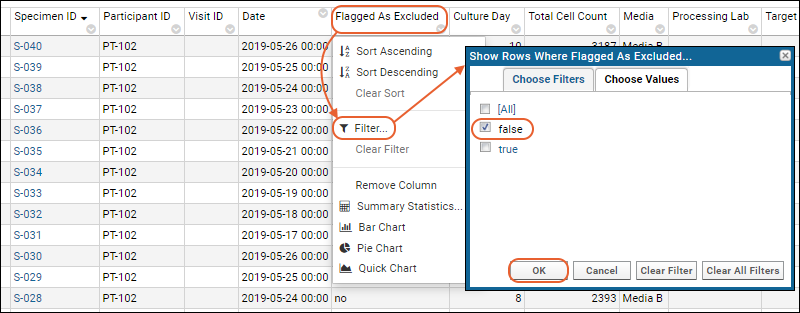
When you expose the "Flagged as Excluded" column, you can filter out this data prior to creating reports and visualizations.
- Click View Results or otherwise return to viewing the grid of data where you have made exclusions.
- Select (Grid Views) > Customize Grid.
- Scroll down and check the box for Flagged as Excluded.
- Drag it to where you would like it displayed on the list of Selected Columns.
- Click View Grid (or Save as a named grid).

- By filtering the values of this column, you can remove excluded data prior to graphing and reporting.

Reimporting after Exclusions
If you reimport assay data after making exclusions, you will be warned in the import UI. You can review the exclusion report using the provided link. There is no option to retain exclusions after the reimport.

Remove Exclusions
To remove an exclusion, it must be removed from the assayExclusion.Exclusions table by a user with access to the schema browser. Members of the
site group "Developers" have this access.
- Select (Admin) > Developer Links > Schema Browser.
- Select the assayExclusion schema.
- Choose the Exclusions table.
- Click View Data.
Exclusions are shown in "batches" in this table. All data result rows excluded in one action (with a shared comment) are listed as a single row here. Rather than remove an individual row exclusion, you must remove the entire exclusion action.
- Select the exclusion to remove and click (Delete).
Related Topics
 The Excluded Rows grid shows the original data as well as when and by whom it was excluded, plus the comment entered (if any).