If your experiment uses plate-based data, you can define a
Standard Assay design and configure it to import plate data and metadata alongside other run and result fields. A plate template defines the well layout and attributes of different well groups. In concert with a JSON file of plate metadata, plate data is interpreted and included in imported assay results. You can later build on the collected data and metadata to create reports and visualizations to represent your findings.
A single Standard assay design can be used with multiple plate templates. A user importing data selects the plate template to use and also uploads the corresponding plate metadata JSON file. The assay design domain is updated during the first import, and later as necessary, to include the superset of fields from all templates used. Once you have used a plate template you cannot edit it, but you can make a copy and use a modified version on subsequent data imports.
Parsing Graphical Plate Data
Note that standard plate-based assays assume that you have a normalized plate result file, like the following:
| WellLocation | Metric1 | Metric2 |
|---|
| A1 | 15 | 72.5 |
| A2 | 20.5 | 64 |
| A3 | 56 | 30 |
| A4 | 41.5 | 36 |
| A5 | 74 | 39 |
| A6 | 3 | 2 |
| A7 | 20.5 | 55 |
They
do not provide parsing for non-normalized, "graphical" instrument generated files that depict the wells of the plate like the following:
| | 1 | 2 | 3 | 4 | 5 | 6 | 7 | 8 | 9 | 10 | 11 | 12 |
|---|
| A | 0 | 5 | 2 | 2 | 1 | 0 | 689 | 641 | 726 | 746 | 621 | 727 |
| B | 765 | 725 | 766 | 714 | 864 | 676 | 934 | 902 | 985 | 901 | 0 | 0 |
| C | 0 | 2 | 2 | 2 | 1 | 3 | 498 | 496 | 456 | 479 | 440 | 373 |
| D | 330 | 316 | 307 | 354 | 400 | 381 | 1023 | 1021 | 1028 | 1063 | 0 | 0 |
| E | 13 | 23 | 19 | 10 | 24 | 18 | 373 | 380 | 370 | 381 | 432 | 430 |
| F | 523 | 591 | 603 | 621 | 589 | 594 | 875 | 870 | 869 | 893 | 0 | 0 |
| G | 1 | 14 | 6 | 1 | 2 | 1 | 203 | 249 | 223 | 224 | 227 | 197 |
| H | 566 | 582 | 257 | 639 | 573 | 114 | 736 | 923 | 449 | 557 | 3 | 0 |
To parse these sorts of "graphical" files use a
transform script or a
specialty plate-based assay design, if applicable.
Scoping and Permissions
Scoping and Locations
Before defining your assay designs and plate templates, determine where you want them to be available for users. Assay designs and templates can be:
- folder-scoped: Defined in a folder and available only in the local folder.
- project-scoped: Defined in a project and available in the project itself as well as all folders within it.
- site-scoped: Defined in the Shared folder and available anywhere on the site.
For example, if you want everyone using your site to be able to use an assay design and 3 possible plate template layouts, all should be defined in the Shared project.
Permissions
During the import process, if the plate metadata includes fields not already included in the assay design, the design will be
dynamically updated to add necessary fields. Note that this means that only administrators or users with the "Assay Designer" role can upload the first run, and later runs with any new plate data or metadata fields. If a user without this access attempts to import a run which would change the plate domain, the import will fail.
If an administrator wants to ensure that users without this access can use a given plate template, they should upload a first run using it to ensure the plate data fields are created correctly.
Define Plate Template(s)
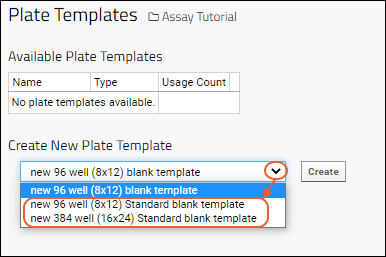
There are two blank templates that can be used to create Standard plate-based assay templates: One for a 96 well plate and another for a 384 well plate.
To create a plate template:
- Navigate to the location where it will be available in the desired scope.
- Select (Admin) > Manage Assays.
- Click Configure Plate Templates.
- Choose the Standard template for the number of wells on your plate(s).
- Do not use the default "blank" template that is not labelled Standard. Only the two plate templates specifically named "Standard" can be used with a Standard (GPAT) assay.
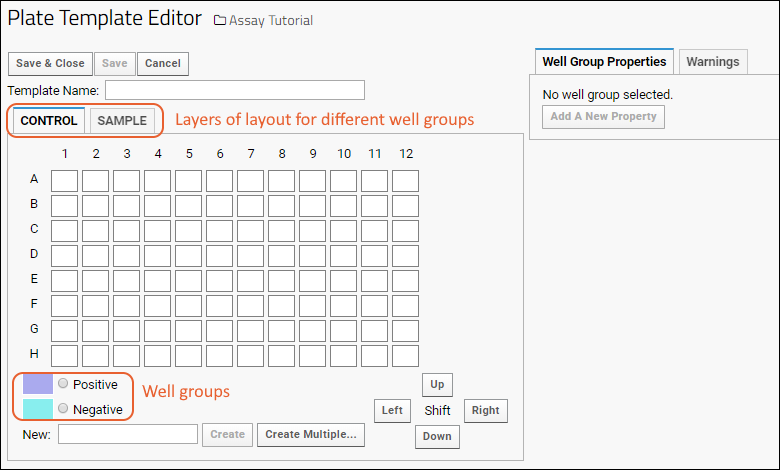
Each template offers a
layer (tab) for both
Control and
Sample wells. Each layer has distinct sets of well groups, assigned a color and shown beneath the grid. You can define new well groups for any layer within the interface by entering the well group name in the
New box below the grid and clicking
Create.
Select a group and click or drag to 'paint' wells with it, indicating where that group is located on the plate.
Using the blank representing the physical size of your plate, customize your template(s) using the instructions in this topic:
Admins can define multiple templates to capture data from different plate layouts and use them in the same assay design. Keep in mind that the design will include the superset of all plate data properties you define. Each template you create needs a unique name in the context in which it will be used.
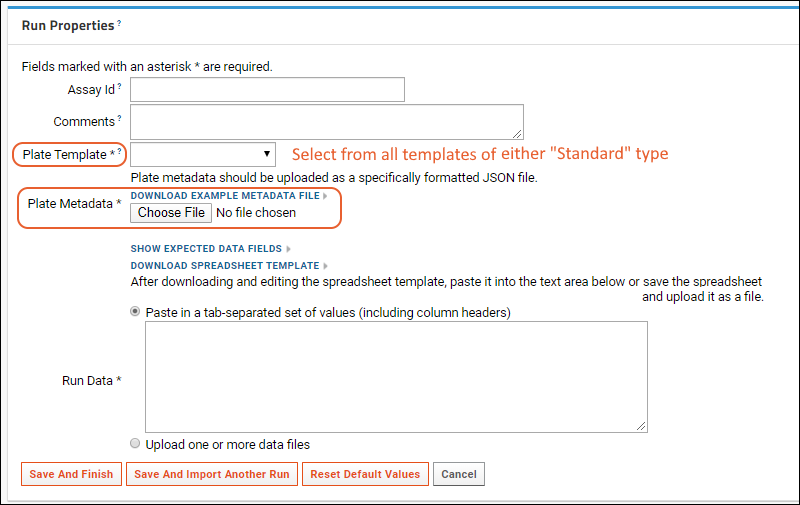
The user will select the plate template at the time of upload, and also upload a corresponding
metadata file. The dropdown will offer
all plate templates that have been designed using any "general" blank. It is good practice to name your templates in a way that users can easily identify the appropriate template and matching json.
Create Plate Metadata JSON File
The metadata for plate layouts is provided in a specially formatted JSON file.
When you are importing data you first select the template you want to use, then have the option to
Download Example Metadata File that will incorporate the well groups and properties you included in the template you defined.
Note that the downloaded example cannot be used as delivered, but is an example of the required structure. You must delete the --comments to make it valid JSON itself.
For example, a basic template might look like the following. Use it as a starting place for creating the metadata file(s) you need.
{
    -- each layer in the plate template can be matched by name
    -- with a JSON object, in this example both control and specimen
    -- are defined in the plate template that will be selected in
    -- the run properties during import
    "control" : {
      -- each well group in the layer can be matched by name
      -- with a JSON object, in this case POSITIVE and NEGATIVE well group names
      "POSITIVE" : {"dilution":  0.5},
      "NEGATIVE" : {"dilution":  5.0}
    },
    "sample" : {
      -- arbitrary properties can be associated with the
      -- well group, these will be imported into the results grid
      -- as columns for example : dilution and ID fields
      "SA01" : {"dilution": 1.0, "ID" : 111},
      "SA02" : {"dilution": 2.0, "ID" : 222},
      "SA03" : {"dilution": 3.0, "ID" : 333},
      "SA04" : {"dilution": 4.0, "ID" : 444}
    }
}
Some terminology to help with interpreting metadata files:
- layer: Each tab in the plate template editor (Control and Sample in the general plate templates) corresponds to a layer that is shown as a named grouping of well definitions in the above.
- grouping: The well group names on each tab are repeated in the metadata file as JSON objects. Shown above, Positive, Negative, SA01, etc. are all well group names.
- properties: Plate data properties are identified in the JSON object as name:value pairs. Shown above, "Dilution" and "ID" are both properties.
Design Standard Plate Based Assay
When you define a Standard Assay design to use plate information you
do not include the fields that will be provided by plate information. Include batch, run, and results fields as for
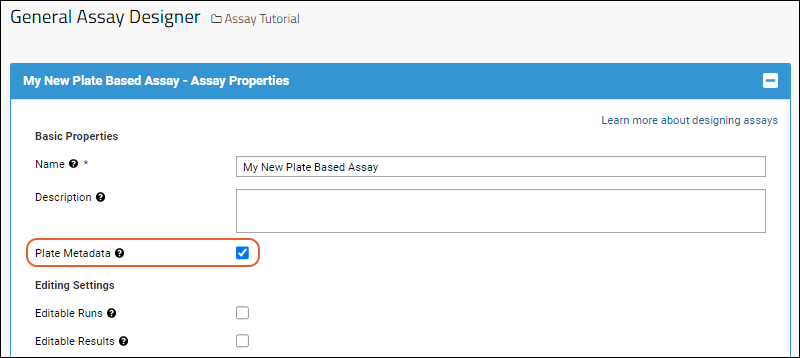
Standard Assays that do not use plates. The functionality of requesting and interpreting plate data is triggered by a single checkbox during assay design creation:
- From the Assay List, click New Assay Design.
- Stay on the Standard Assay tab and choose the Assay Location.
- Click Choose Standard Assay.
- Name the assay design (required).
- Check the Plate Metadata box.
- Continue to define the rest of the assay as usual. You will define Batch, Run, and Result Fields.
- You will not define any fields that will be provided with the plate data.
- Click Save
Use Standard Plate Based Assay
When a user imports data using a Plate-Based Standard Assay, during entry of
Run Properties, they provide a run file, plate template, and metadata JSON file.
The
first time a given plate template and metadata JSON file are used, the assay design will be updated to add new fields to hold the plate metadata. This means that the first time importer must be an administrator or have the "Assay Designer" role, otherwise the import will fail.
Subsequent imports using the
same template and metadata can be performed by users without this permission. Subsequent imports using
new templates or metadata that add fields to the plate data domain must also be performed by an administrator or assay designer.
After uploading the first run using the new assay design, the admin or assay designer can reopen the design to see the new fields that have been added by the upload of plate data and metadata.
- Click the assay name in the Assay List.
- Select Manage assay design > Edit assay design.
- Open the Run Fields section to see the PlateTemplate lookup field.
- Open the Results Fields section to see the WellLocation text field.
- Scroll down and open the PlateDataDomain added during upload. The fields included depend on the information in the metadata JSON file. This image corresponds to the sample json shown above.
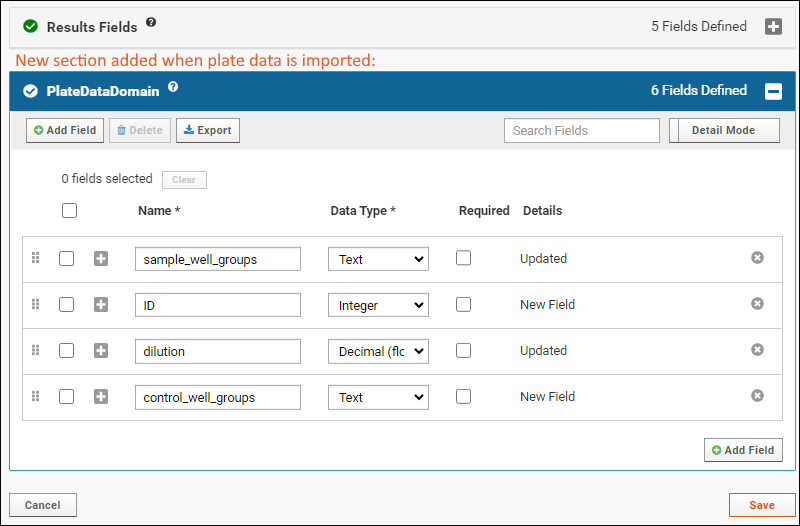
Subsequent data imports that use the
same template and metadata will not add new fields, and can thus be performed by users with upload access. If you need to change the plate template, plate metadata, or add a second plate template that includes additional fields or properties, an administrator or assay designer must perform the first import of run data with the new plate metadata in order to dynamically update the assay design.
An admin or assay designer may also add new plate metadata fields directly to the
PlateDataDomain once it has been created. You do not always need to edit template in the user interface add new metadata fields for the data and metadata you use.
View Result and Plate Data
Imported assay data will include a combination of fields from both the assay design (Run/Batch/Results Fields) and plate data. Use the
(Grid views) > Customize grid to adjust the fields shown.
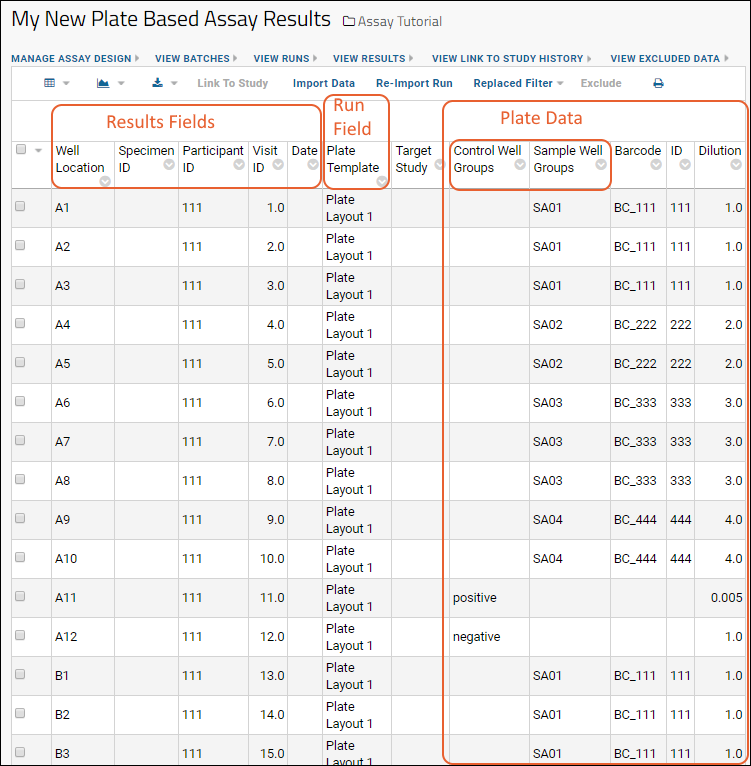
Once imported, you can use the results to generate new reports and visualizations that meet your needs, just as if the fields had been defined as ordinary assay result fields.
Related Topics