In this first step of the ELISpot tutorial, we create a workspace, design a plate template, create an assay design, and then import some ELISpot data. This tutorial uses the defaults built in to LabKey Server. In actual use, you can customize both template and design to suit your experimental data.
Upload Sample Data
- Log in to your server and navigate to your "Tutorials" project. Create it if necessary.
- If you don't already have a server to work on where you can create projects, start here.
- If you don't know how to create projects and folders, review this topic.
- Create a new subfolder named "ELISpot Tutorial". Choose the folder type "Assay."
- In the new folder, add a Files web part on the left.
- Drag and drop the unzipped LabKeyDemoFiles directory into the upload area of the Files web part.
Configure an ELISpot Plate Template
- Select (Admin) > Manage Assays.
- Click Configure Plate Templates.
- Select new 96 well (8x12) ELISpot default template from the dropdown.
- Click Create to open the Plate Template Editor, which allows you to configure the layouts of specimens and antigens on the plate.
- Enter Template name: "Tutorial ELISpot Template"
- Explore the template editor. On the Specimen tab, you will see the layout for specimens:

- Click the Antigen tab. You will see the layout for antigens.
- The Control tab can be used for defining additional well groups. For instance, if you are interested in subtracting background wells, see Background Subtraction for how to define a set of background wells.
- For this tutorial, we will simply use the default template. For customization instructions, see Customize Plate Templates.
- Click Save & Close.
You now have a new ELISpot plate template that you can use as a basis for creating new assay designs.
Create a New Assay Design Based on the Template
- Select (Admin) > Manage Assays.
- Click New Assay Design.
- Click the Specialty Assays tab.
- Under Use Instrument Specific Data Format, choose ELISpot.
- Under Assay Location, choose "Current Folder (ELISpot Tutorial)".
- Click Choose ELISpot Assay.
- In the Assay Properties section, enter:
- Name: "Tutorial ELISpot Design".
- Plate Template: choose your new "Tutorial ELISpot Template" if it is not already selected.
- Detection Method: choose "colorimetric" if it is not already selected.
- Review (but do not change) the fields in the other sections, click the headings to open.
- Click Save when finished.
Import ELISpot Runs
- Click the ELISpot Tutorial link to return to the main page.
- In the Files web part, click the icon to show the folder tree.
- Open LabKeyDemoFiles > Assays > Elispot.
- Select Zeiss_datafile.txt.
- Click Import Data.

- In the pop-up, select Use Tutorial ELISpot Design (the one you just created) and click Import.
Batch Properties:
- For Participant/Visit, select Specimen/sample id. (Do not check the box for "I will also provide participant id and visit id".)
- Click Next.
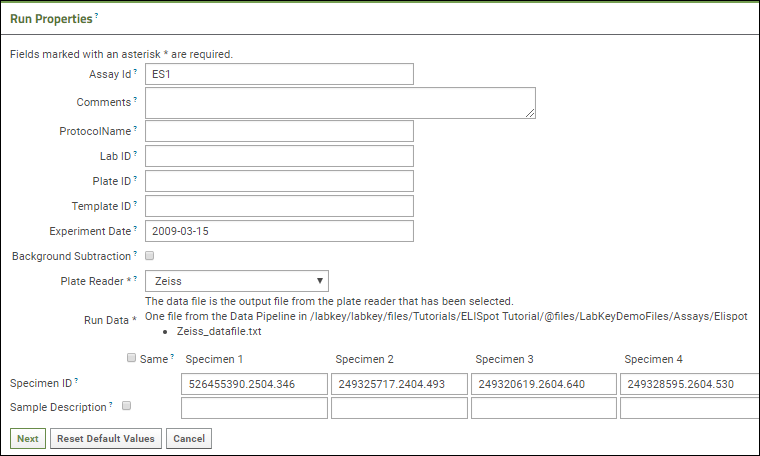
Run Properties: Enter the following:
- AssayID: ES1
- Experiment Date: 2009-03-15
- Plate Reader: Select "Zeiss" from the pulldown list.
- Specimen IDs:
- Specimen id values are often barcoded on labels attached to the plates. Enter these sample barcodes (They are taken from the file "LabKeyDemoFiles\Specimens\Specimen Barcodes.pdf" you downloaded earlier. They will integrate with specimens in our demo study.):
- 526455390.2504.346
- 249325717.2404.493
- 249320619.2604.640
- 249328595.2604.530
 Antigen Properties
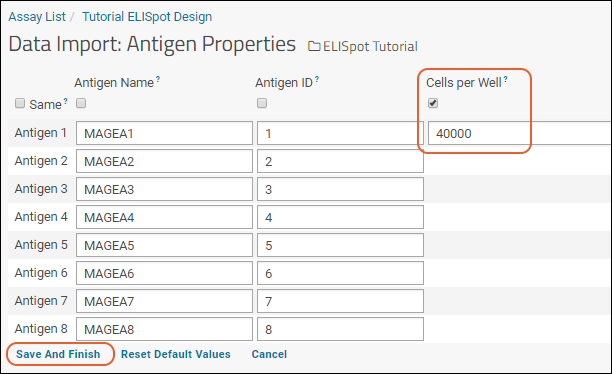
- Fill out the antigen properties according to the screenshot below.
- The cells/well applies to all antigens, so you can just fill in the first box in this column with "40000" and click the "Same" checkbox above the column.
- The antigen names shown are examples to match our tutorial screenshots; you could enter any values here appropriate to your research.

- Click Save and Finish when you are done.
Explore Imported Data
You will see a list of runs for the assay design. See
Review ELISpot Data for a walkthrough of the results and description of features for working with this data.
Link Assay Data to the Demo Study (Optional Step)
You can integrate this tutorial ELISpot data into a target study following steps described in the topic:
Link Assay Data into a Study. If you have entered matching participant and specimen IDs, you may simply select all rows to link.
When the linking is complete, you will see the dataset in the target study. It will look similar to this
online example in the demo study on our LabKey Support site.
