7: Response Server Setup |
2024-04-19 |
This topic explains how to set up the response server to begin collecting data from the mobile apps. This is section 7 of the overall setup process covered in: FDA MyStudies: Technical Setup Document.
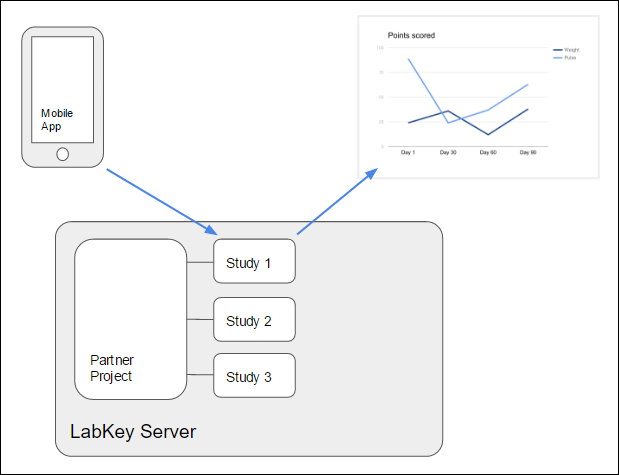 Enrollment is accomplished by the use of enrollment tokens. A set of enrollment tokens are generated for a given study and distributed to prospective participants as tickets for enrollment in that study. Upon successful enrollment, the server provides the mobile client with a globally unique application token, which the server uses to identify the appropriate study folder and participant on all subsequence communications.

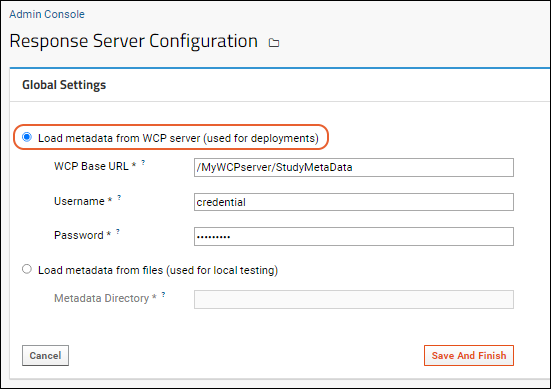 Configure how to load metadata. An option to load metadata from files is provided for local testing. For operational servers, you'll use Load metadata from WCP server.

- 7.1 Create a Project
- 7.2 Create a Subfolder
- 7.3 Response Server Site Settings
- 7.4 Study Configuration
- 7.5 Assign Permission Roles to Users
- 7.6 Generate Tokens
- 7.7 Enrollment Test
 Enrollment is accomplished by the use of enrollment tokens. A set of enrollment tokens are generated for a given study and distributed to prospective participants as tickets for enrollment in that study. Upon successful enrollment, the server provides the mobile client with a globally unique application token, which the server uses to identify the appropriate study folder and participant on all subsequence communications.
Create a Project
If you are adding a study to an existing project, navigate to that location. A site administrator can create a new project, typically named for the app or organization performing the studies.- Create a new project on the server. The project will serve as the parent container for the study subfolders.
- Choose folder type "Collaboration".
- For now, leave the permissions limited to your own user ID until you have correctly configured the folder. See below for how to add additional authorized users.
Create a Subfolder
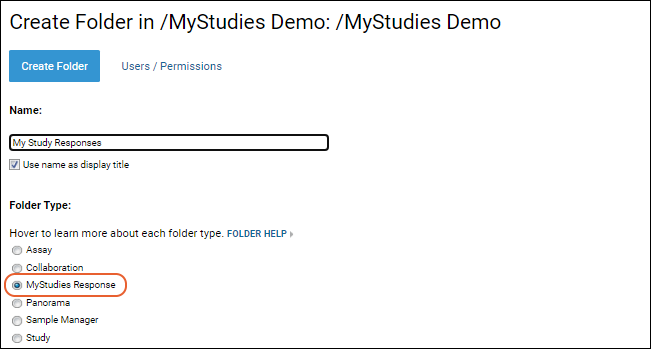
Within the project:- Create a new folder of type "MyStudies Response".
- For now, leave the permissions limited to your own user ID until you have correctly configured the folder. See below for how to add additional authorized users.
If instead you see a "Mobile App Study" folder type, STOP and use the older-interface documentation for this section here: Previous UI for Response Server Setup
In your new folder, you will see the MyStudies Response Server panel, which will guide you in setting up your study, then provide a quick view dashboard of the configuration to others.
Response Server Site Settings
A one-time setup step for the Response Server is for a site administrator to connect it to the WCP, or otherwise provide metadata for testing. This configuration was previously done using module properties with similar names.If you see a message in the MyStudies Response Server panel like the following:Response Server Site Settings are not configured. Click here to configure them.
- Click the word "here" to configure.
- A site administrator can also directly access this page via (Admin) > Site > Admin Console > Configuration > Response Server Configuration.
- Provide:
- WCP Base URL: The base URL for the Activity Metadata service. Should be an absolute URL that ends with /StudyMetaData. Note that this URL must NOT end with a question mark.
- Username: The username to use to authenticate against the WCP server, NOT the Response Server.
- Password: The password for that username on the WCP.
- Click Save And Finish.
Local Testing File Option
If you want to use the Load metadata from files (used for local testing) option, provide the directory on the server that holds the survey design metadata files. These metadata files should be of the form <studyId>_<activityId>_<version>.txt.Study Setup
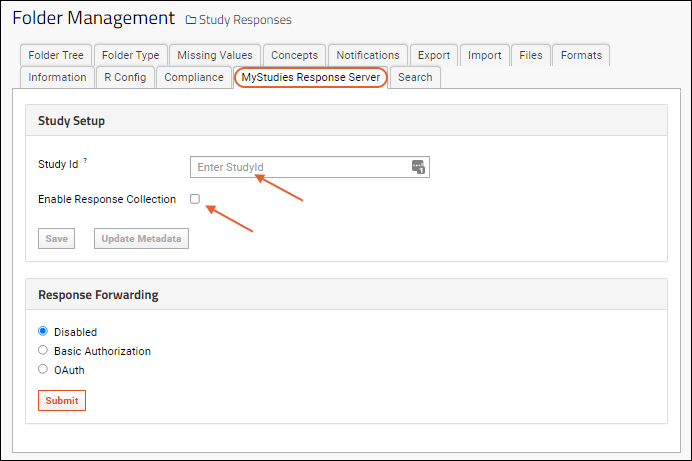
Once the site settings are configured, you can configure the study folder itself to collect the correct responses.Set Study ID
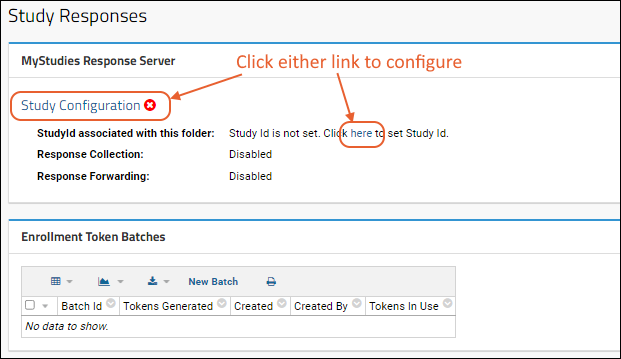
- In the MyStudies Response Server panel, you'll see a red indicating the study needs to be configured. Click either "Study Configuration" or the word "here" in the message to configure it.
- You will now be on the MyStudies Response Server tab of the (Admin) > Folder > Manage page.
- Enter the StudyID value exactly as it appears on the WCP. In concert with the site settings you entered above, this will route the expected responses for this study to this folder.
- Check the box for Enable Response Collection. This makes the study open for enrollment and able to store response data.
- Click Save.
Update Metadata
Click Update Metadata on the Study Setup panel (shown above) to proactively create or update the response schema based on the latest study metadata in the WCP. Note that this step is not required for successful response submission (the response schema is updated automatically when a response indicates a newer version is available), but can assist administrators who wish to pre-populate participant properties or create queries and reports before response data is submitted.Assign Permission Roles to Users
LabKey uses a role-based system for assigning individual permissions at different levels. Some important roles for the MyStudies system:- Site or Project Admin: Can create new users and assign permissions.
- Folder Administrator: Can generate and view tokens, make changes to folder permissions, add webparts to pages, plus all actions an Editor can do.
- MyStudies Coordinator: (Coming soon with LabKey release 20.11) This role can be added onto a Reader or Editor role and gives permission to create and view tokens, but none of the other additional permission granted to folder administrators.
- Editor: Can read/insert/update response data and create new grid views to share with others.
- Reader: Can read response data and create new grid views for themselves, but not to share.
Generate Tokens
The data partners distribute enrollment tokens to potential participants.
Permissions required:
Enrollment tokens are specific to the container in which they are generated. A mobile app attempting to enroll using a token from a different study will not be successful and will receive an error message from the server.
- Currently, the role "Folder Administrator" or higher is required to generate tokens.
- Beginning with version 20.11 of LabKey Server, users with "Reader" or higher PLUS the new role "MyStudies Coordinator" will be able to generate tokens.
- In the panel Enrollment Token Batches click New Batch.
- Note that if you do not have "MyStudies Coordinator" or admin permission, this action will not succeed.
- In the Generate Tokens pop up dialog, specify the number of tokens to generate. Base your selection on the number participants you expect to enroll. Options:
- 100
- 1,000
- 10,000
- Other <enter custom number of tokens>
- Click Submit.