Table of Contents |
guest 2025-07-15 |
Tutorial: Extract-Transform-Load (ETL)
ETL Tutorial: Set Up
ETL Tutorial: Run an ETL Process
ETL Tutorial: Create a New ETL Process
ETL: User Interface
ETL: Configuration and Schedules
ETL: Column Mapping
ETL: Queuing ETL Processes
ETL: Stored Procedures
ETL: Stored Procedures in MS SQL Server
ETL: Functions in PostgreSQL
ETL: Check For Work From a Stored Procedure
ETL: SQL Scripts
ETL: Remote Connections
ETL: Logs and Error Handling
ETL: All Jobs History
ETL: Examples
ETL: Reference
Modules: ETLs
[ Video Update: ETL Enhancements in LabKey Server v15.1 ]
Extract-Transform-Load functionality lets you encapsulate some of the most common database tasks, especially (1) extracting data from a database, (2) transforming it, and finally (3) loading it into another database. LabKey Server ETL modules let you:
- Assemble data warehouses that integrate data from multiple data sources.
- Normalize data from different systems.
- Move data in scheduled increments.
- Log and audit migration processes.
- Tutorial: Extract-Transform-Load (ETL) - Develop an ETL module.
- ETL: Configuration and Schedules - Configure the refresh schedule.
- ETL: Column Mapping - Transform columns in an ETL process.
- ETL: Stored Procedures - Use a stored procedure as a transformation.
- ETL: SQL Scripts - Create table schemas with sql scripts.
- ETL: Logs and Error Handling - Logging and error reporting.
- ETL: Remote Connections - Extract data via a remote connection.
- ETL: Examples - Example ETL modules.
- ETL: Reference - File references, directory structure.
Related Topics
Tutorial: Extract-Transform-Load (ETL)
Data Warehouse
This tutorial shows you how to create a simple ETL as a starting point for further development.
As you go through the tutorial, imagine you are a researcher who wants to collect a group of participants for a research study. The participants must meet certain criteria to be included in the study, such as having a certain condition or diagnosis. You already have the following in place:
- You have a running installation of LabKey Server.
- You already have access to a large database of Demographic information of candidate participants. This database is continually being updated with new data and new candidates for your study.
- You have an empty table called "Patients" on your LabKey Server which is designed to hold the study candidates.
Tutorial Steps
- ETL Tutorial: Set Up - Set up a sample ETL workspace.
- ETL Tutorial: Run an ETL Process - Run an ETL.
- ETL Tutorial: Create a New ETL Process - Add a New ETL for a New Query.
First Step
ETL Tutorial: Set Up
- a basic workspace for working with ETL processes
- a working ETL module that can move data from the source database into the Patients table on your system.
Download
- Download the folder archive:
- ETLWorkspace.folder.zip (Don't unzip. This archive contains an ETL workspace and sample data to work with.)
- Download the server module:
Set Up ETL Workspace
In this step you will import a pre-configured workspace in which to develop ETL processes. (Note that there is nothing mandatory about the way this workspace has been put together -- your own ETL workspace may be different, depending on the needs of your project. This particular workspace has been configured especially for this tutorial as a shortcut to avoid many set up steps, steps such as connecting to source datasets, adding an empty dataset to use as the target of ETL scripts, and adding ETL-related web parts.)
- Go the LabKey Server Home project (or any project convenient for you).
- Create a subfolder of type Study to use as a workspace:
- Go to Admin > Folder > Management.
- Click Create Subfolder.
- On the Create Folder page, enter the Name "ETL Workspace".
- Under Folder Type, select Study.
- Click Next.
- On the Users/Permissions page, click Finish.
- Import ETLWorkspace.folder.zip into the folder:
- In the Study Overview panel, click Import Study.
- On the Folder Management page, confirm Local zip archive is selected and click Choose File.
- Select the folder archive that you have already downloaded: ETLWorkspace.folder.zip.
- Click Import Folder.
- When the import is complete, click ETL Workspace to see the workspace.
You now have a workspace where you can develop ETL scripts. It includes:
- A LabKey Study with various datasets to use as data sources
- An empty dataset named Patients to use as a target destination
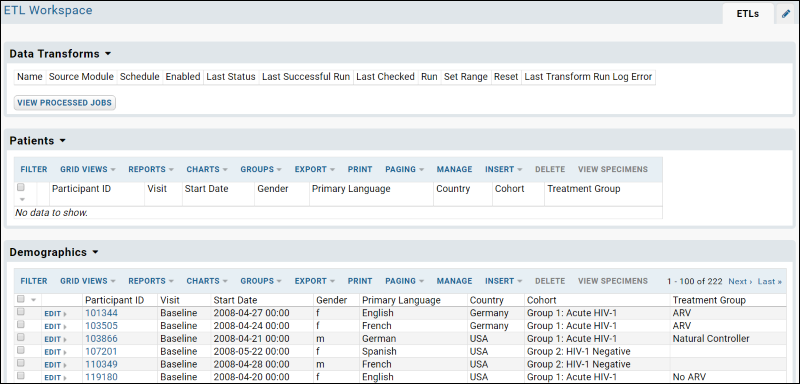
- The ETLs tab provides an area to manage and run your ETL processes. Notice that this tab contains three panels/"web parts":
- Data Transforms shows the available ETL processes. Currently it is empty because there are none defined.
- The Patients dataset (the target dataset for the process) is displayed, also empty because no ETL process has been run yet. When you run an ETL process in the next step the the empty Patients dataset will begin to fill with data.
- The Demographics dataset (the source dataset for this tutorial) is displayed with more than 200 records.
Add the ETL Module
ETL processes are added to LabKey Server as part of a "module". Modules are packets of functionality that are easy to distribute to other LabKey Servers. Modules can contain a wide range of functionality, not just ETL-related functionality. For example, they can include HTML pages, SQL queries, R script reports, and more. Module resources are for the most part "file-based", that is, they contain files such as .HTML, .SQL, and .R files which are deployed to the server and surfaced in various places in the user interface where users can interact with them. For deployment to the server, the module files are zipped up into a .zip archive, which is renamed as a ".module" file. In this case, the module you will deploy contains two resources:
- An ETL configuration file (called "FemaleARV.xml") which defines how the ETL process works
- A SQL query which defines the source data for the ETL process
- If you are a developer working with the LabKey Server source code directly, then:
- Copy the file etlModule.module to the directory /build/deploy/modules and restart the server.
- If you are working with an installer-based version of LabKey Server, then:
- Copy the file etlModule.module to the directory LABKEY_HOME/externalModules and restart the server. (On Windows you can restart the server using the Services panel.)
- Enable the module in your workspace folder:
- In the "ETL Workspace" folder, go to Admin > Folder > Management. (You need to be logged in as an admin to complete this step.)
- Click the Folder Type tab.
- In the Modules list (on the right) place a checkmark next to ETLModule.
- Click Update Folder.
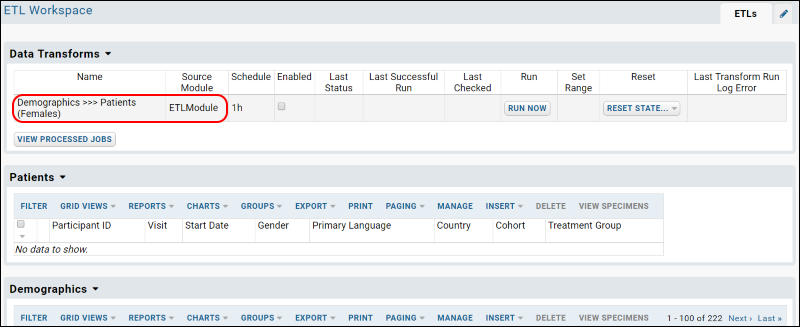
- The ETL script is now ready to run. Notice it has been added to the list under Data Transforms.
Start Over | Next Step
ETL Tutorial: Run an ETL Process
ETL User Interface
The web part Data Transforms lists all of the ETL processes that are available in the current folder. It lets you review current status at a glance, and run any transform manually or on a set schedule. You can also reset state after a test run.

For details on the ETL user interface, see ETL: User Interface.
Run the ETL Process
- If necessary, click the ETLs tab, to return to the main page including the Data Transforms web part.
- Click Run Now for the "Demographics >>> Patients" row to transfer the data to the Patients table.
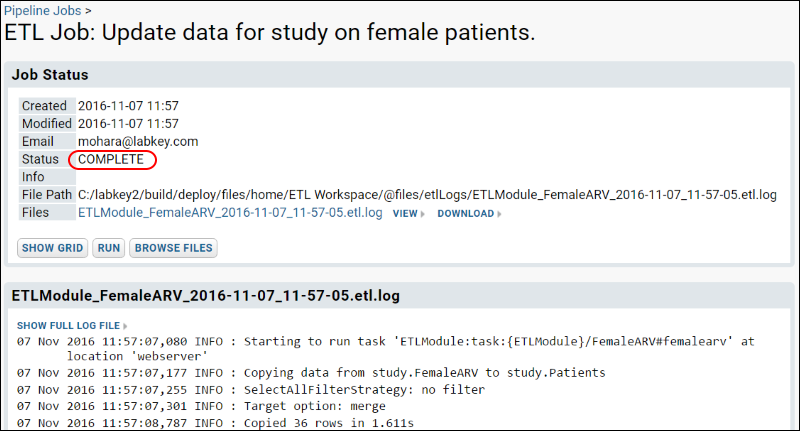
- You will be taken to the ETL Job page, which provides updates on the status of the running job.
- Refresh your browser until you see the Status field shows the value COMPLETE
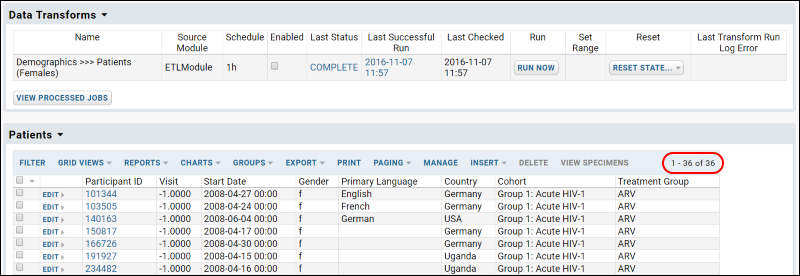
- Click the ETLs tab to see the records that have been added to the Patients table. Notice that 36 records (out of over 200 in the source Demographics query) have been copied into the Patients query. The ETL process is filtering to show female members of the ARV treatment group.
Experiment with ETL Runs
Now that you have a working ETL process, you can experiment with different scenarios.
- First, roll back the rows added to the target table (that is, delete the rows and return the target table to its original state) by selecting Reset State > Truncate and Reset.

- Confirm the deletion in the popup window.
- Rerun the ETL process by clicking Run Now.
- The results are the same because we did not in fact change any source data yet. Next you can actually make some changes to show that they will be reflected.
- Edit the data in the source table Demographics:
- Click the ETLs tab.
- Scroll down to the Demographics dataset - remember this is our source data.
- Click Edit next to a record where the Gender is M and the Treatment Group is ARV. You could also apply column filters to find this set of records.
- Change the Gender to "F" and save.
- Rerun the ETL process by first selecting Reset > Truncate and Reset, then click Run Now.
- The resulting Patients table will now contain the additional matching row for a total count of 37 matching records.
Previous Step | Next Step
ETL Tutorial: Create a New ETL Process
To do this, we add a SQL query that returns a selection of records from the Demographics table, in particular all Male participants who are Natural Controllers.
And we'll create a new ETL process from scratch, drawing on the new SQL query.
Create a New Source Query
- Locate the source code for the ETL module. Depending on where you deployed it, go to either LABKEY_HOME/externalModules/etlmodule or build/deploy/modules/etlmodule.
- Go to the directory etlmodule/queries/study.
- In that directory, create a file named "MaleNC.sql".
- Open the file in a text editor and copy and paste the following code into the file:
SELECT Demographics.ParticipantId,
Demographics.StartDate,
Demographics.Gender,
Demographics.PrimaryLanguage,
Demographics.Country,
Demographics.Cohort,
Demographics.TreatmentGroup
FROM Demographics
WHERE Demographics.Gender = 'm' AND Demographics.TreatmentGroup = 'Natural Controller'
- Save the file.
- Restart the server.
Create a New ETL Process
ETL processes are defined by XML configuration files that specify the data source, the data target, and other properties. Here we create a new configuration that draws from the query we just created above.
- In the etlmodule/etls directory, create a new XML file called "MaleNC.xml".
- Copy the following into MaleNC.xml, and save.
<?xml version="1.0" encoding="UTF-8"?>
<etl xmlns="http://labkey.org/etl/xml">
    <name>Demographics >>> Patients (Males)</name>
    <description>Update data for study on male patients.</description>
    <transforms>
        <transform id="males">
            <source schemaName="study" queryName="MaleNC"/>
            <destination schemaName="study" queryName="Patients" targetOption="merge"/>
        </transform>
    </transforms>
    <schedule>
        <poll interval="1h"/>
    </schedule>
</etl>
- Notice that this configuration file has our query (MaleNC) as its source, and the Patients query as its target.
- Refresh the browser. Notice that the system will add your new module to the server. Click Next if necessary to complete the update.
- In the "ETL Workspace" folder, notice our new ETL process is now listed in the Data Transforms web part.
Run the ETL Process
- Click Run Now next to the new process name. You will need to sign in to see this button.
- Refresh in the pipeline window until the job completes, then click the ETLs tab.
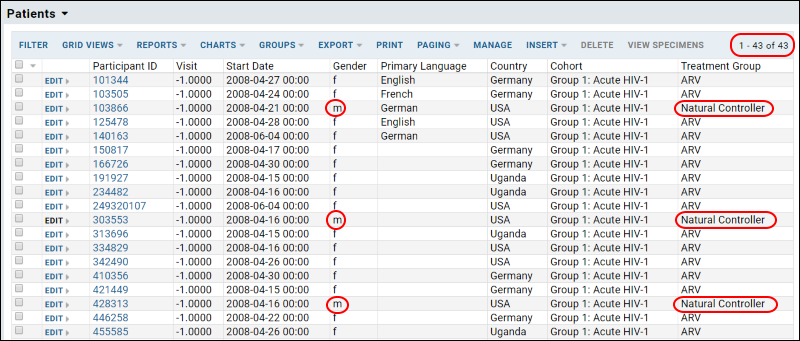
- New records will have been copied to the Patients table, making a total of 43 records (42 if you skipped the step of changing the gender of a participant in the previous tutorial step).
Previous Step
ETL: User Interface
ETL User Interface
The web part Data Transforms lists all of the ETL processes that are available in the current folder.
- Columns:
- Name - This column displays the name of the process.
- Source Module - This column tells you module where the configuration file resides.
- Schedule - This column shows you the reload schedule. In this case the ETL process is configured to run once every hour.
- Enabled - This checkbox controls whether the automated schedule is enabled: when unchecked, the ETL process must be run manually.
- Last Status, Successful Run, Checked - These columns record the latest run of the ETL process.
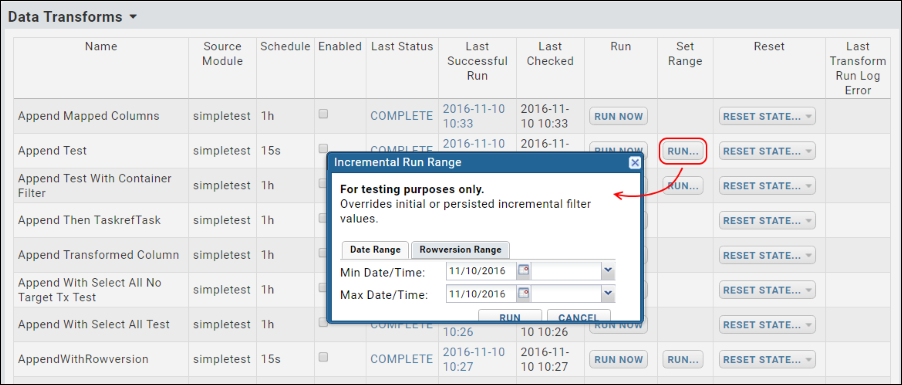
- Set Range - (Available only in devMode) The Set Range column is displayed only in dev mode and is intended for testing purposes during ETL module development. The Run button is only displayed for ETL processes with a filter strategy of RunFilterStrategy or ModifiedSinceFilterStrategy; the button is not displayed for the filter strategy SelectAllFilterStrategy. Click Run to set a date or row version window range to use for incremental ETL filters, overriding any persisted or initial values.
- Last Transform Run Log Error - Shows the last error logged, if any exists.
- Buttons:
- Run Now - This button immediately activates the ETL process.
- Reset State - This button returns the ETL process to its original state, deleting its internal history of which records are, and are not, up to date. There are two options:
- Reset
- Truncate and Reset
- View Processed Jobs - This button shows you a log of all previously run ETL jobs, and their status.
Run an ETL Process Manually
The Data Transforms web part lets you:
- Run jobs manually. (Click Run Now.)
- Enable/disable the recurring run schedule, if such a schedule has been configured in the ETL module. (Check or uncheck the column Enabled.)
- Reset state. (Select Reset State > Reset resets an ETL transform to its initial state, as if it has never been run.)
- See the latest error raised in the Last Transform Run Log Error column.
Cancel and Roll Back Jobs
While a job is running you can cancel and roll back the changes made by the current step by pressing the Cancel button.
The Cancel button is available on the Job Status panel for a particular job, as show below:

To roll back a run and delete the rows added to the target by the previous run, view the Data Transforms webpart, then select Reset State > Truncate and Reset. Note that rolling back an ETL which outputs to a file will have no effect, that is, the file will not be deleted or changed.

See Run History
The Data Transform Jobs web part provides a detailed history of all executed ETL runs, including the job name, the date and time when it was executed, the number of records processed, the amount of time spent to execute, and links to the log files.
To add this web part to your page, scroll down to the bottom of the page and click the dropdown <Select Web Part>, select Data Transform Jobs, and click Add. When added to the page, the web part appears with a different title: "Processed Data Transforms".

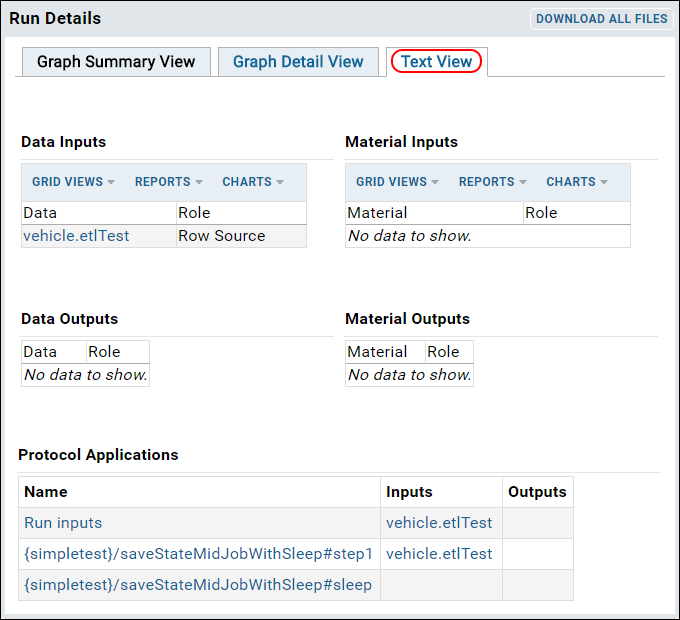
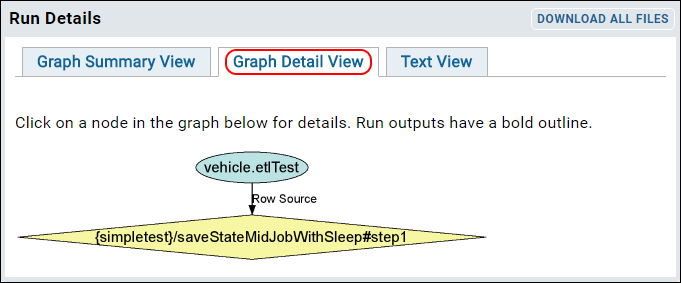
Click Run Details for fine-grained details about each run, including a graphical representation of the run.
ETL: Configuration and Schedules
Schedules
You can set a polling schedule to check the source database for new data and automatically run the ETL process when new data is found. The schedule below checks every hour for new data:
<schedule><poll interval="1h" /></schedule>Another automatic scheduling option is to set a time each day to run the job.
<!-- run at 10:15 every day -->
<schedule><cron expression="0 15 10 ? * *"/></schedule>
<!-- run at 3:30am every day -->
<schedule><cron expression="0 30 3 * * ?"/></schedule>
Use an cron expression builder for the Quartz cron format, for example: http://www.cronmaker.com/
See quartz documentation for more examples.
Target Options
When the data is loaded into the destination database, there are three options for handling cases when the source query returns key values that already exist in the destination:
- Append: Appends new rows to the end of the existing table. Fails on duplicate primary key values.
- Merge: Merges data into the destination table. Matches primary key values to determine insert or update. Target tables must have a primary key.
- Truncate: Deletes the contents of the destination table before inserting the selected data.
<destination schemaName="vehicle" queryName="targetQuery" targetOption="merge" />
Note: Merge and truncate are only supported for datasets, not lists.
Filter Strategy
The filter strategy, defined in the incrementalFilter tag, is how the ETL process identifies new rows in the source database. The strategy allows a special value on the destination table to be compared to the source and only pulls over new rows based on that value. Using an incrementalFilter allows you to use the append option to add new rows to your target table and not accidentally run into any duplicate record conflicts. There are three options:
- SelectAllFilterStrategy: Apply no further filter to the source; simply transform/transfer all rows returned by the query.
- RunFilterStrategy: Check a specified column, typically an increasing integer column (e.g. Run ID), against a given or stored value. For instance, any rows with a higher value than when the ETL process was last run are transformed.
- ModifiedSinceFilterStrategy: Use a specified date/timestamp column (timeStampColumnName) to identify the new records. Rows changed since the last run will be transformed.
<incrementalFilter className="ModifiedSinceFilterStrategy" timestampColumnName="Date" />
Incremental Deletion of Target Rows
When incrementally deleting rows based on a selective filter strategy, use the element deletedRowsSource to correctly track the filtered values for deletion independently of the main query. Even if there are no new rows in the source query, any new records in the "deleteRowsSource" will still be found and deleted from the source. Using this method, the non-deleted rows will keep their row ids, maintaining any links to other objects in the target table.
File Targets
An ETL process can load data to a file, such as a comma separated file (CSV), instead of loading data into a database table. For example, the following ETL configuration element directs outputs to a tab separated file named "report.tsv". rowDelimiter and columnDelimiter are optional, if omitted you get a standard TSV file.
<destination type="file" dir="etlOut" fileBaseName="report" fileExtension="tsv" />
Transaction Options
Note that these settings risk leaving the destination or target table in an intermediate state if an error occurs during ETL processing.
ETL jobs are, by default, run as transactions. To turn off transactions when running an ETL process, set useTransaction to false on the destination, as shown below:
<destination schemaName="study" queryName="demographics" useTransaction="false" />
By default an single ETL job will be run as a single transaction, no matter how many rows are processed. You can change the default behavior by specifying that a new transaction be committed for every given number of rows processed. In the example below, a new transaction will be committed for every 500 rows processed:
<destination schemaName="study" queryName="demographics" bulkLoad="true" batchSize="500" />
Command Tasks
Once a command task has been registered in a pipeline task xml file, you can specify the task as an ETL step.
<transform id="ProcessingEngine" type="ExternalPipelineTask"
        externalTaskId="org.labkey.api.pipeline.cmd.CommandTask:myEngineCommand"/>
ETL: Column Mapping
- Column Mapping
- Constants
- Creation and Modification Columns
- Data Integration Columns
- Transformation Java Classes
Column Mapping
If your source and target tables have different column names, you can configure a mapping between the columns, such that data from one column will be loaded into the mapped column, even if it has a different name. For example, suppose you are working with the following tables:
| Source Table Columns | Target Table Columns |
|---|---|
| ParticipantId | SubjectId |
| StartDate | Date |
| Gender | Sex |
| TreatmentGroup | Treatment |
| Cohort | Group |
Below we add a mapping such that data from "ParticipantId" is loaded into the column "SubjectId". Add column mappings to your ETL configuration using a <columnTransforms> element, with <column> elements to define each name mapping. For example:
<transform id="transform1">
    <source schemaName="study" queryName="Participants"/>
    <destination schemaName="study" queryName="Subjects" targetOption="merge">
        <columnTransforms>
            <column source="ParticipantId" target="SubjectId"/>
            <column source="StartDate" target="Date"/>
            <column source="Gender" target="Sex"/>
            <column source="TreatmentGroup" target="Treatment"/>
            <column source="Cohort" target="Group"/>
        </columnTransforms>
    </destination>
</transform>
Column mapping is supported for both query and file destinations. Mapping one source column onto many destination columns is not supported.
Container Columns
Container columns can be used to integrate data across different containers within LabKey Server. For example, data gathered in one project can be referenced from other locations as if it were available locally. However, ETL processes are limited to running within a single container. You cannot map a target container column to anything other than the container in which the ETL process is run.
Constants
To assign a constant value to a given target column, use a constant in your ETL configuration .xml file. For example, this sample would write "schema1.0" into the sourceVersion column of every row processed:
<constants>
   <column name="sourceVersion" type="VARCHAR" value="schema1.0"/>
</constants>
If a column named "sourceVersion" exists in the source query, the constant value specified in your ETL xml file is used instead.
Constants can be set at both:
- The top level of your ETL xml: the constant is applied for every step in the ETL process.
- At an individual transform step level: the constant is only applied for that step and overrides any global constant that may have been set.
<destination schemaName="vehicle" queryName="etl_target">
   <constants>
       <column name="sourceVersion" type="VARCHAR" value="myStepValue"/>
   </constants>
</destination>
Creation and Modification Columns
If the source table includes the following columns, they will be populated in the target table with the same names:
- EntityId
- Created
- CreatedBy
- Modified
- ModifiedBy
If no data is provided for these columns, they will be populated with the time and user information from the running of the ETL process.
DataIntegration Columns
Adding the following data integration ('di') columns to your target table will enable integration with other related data and log information.
| Column Name | PostresSQL Type | MS SQL Server Type | Notes |
|---|---|---|---|
| diTransformRunId | INT | INT | |
| diRowVersion | TIMESTAMP | DATETIME | |
| diModified | TIMESTAMP | DATETIME | Values here may be updated in later data mergers. |
| diModifiedBy | USERID | USERID | Values here may be updated in later data mergers. |
| diCreated | TIMESTAMP | DATETIME | Values here are set when the row is first inserted via a ETL process, and never updated afterwards |
| diCreatedBy | USERID | USERID | Values here are set when the row is first inserted via a ETL process, and never updated afterwards |
The value written to diTransformRunId will match the value written to the TransformRunId column in the table dataintegration.transformrun, indicating which ETL run was responsible for adding which rows of data to your target table.
Transformation Java Classes
The ETL pipeline allows Java developers to add a transformation java class to a particular column. This Java class can validate, transform or perform some other action on the data values in the column. For details and an example, see ETL: Examples
Reference
ETL: Queuing ETL Processes
Reference the ETL process you wish to queue up by module name and file name, using the pattern "{MODULE_NAME}/FILE_NAME". For example, to queue up the process MaleNC.xml in the module etlmodule, use the following:
<transforms>
    ...
    <transform id="QueueTail" type="TaskrefTransformStep">
        <taskref ref="org.labkey.di.steps.QueueJobTask">
            <settings>
                <setting name="transformId" value="{MODULE-NAME}/MaleNC"/>
            </settings>
        </taskref>
    </transform>
    ...
</transforms>
An ETL process can also queue itself by omitting the <setting> element:
<transform id="requeueNlpTransfer" type="TaskrefTransformStep">
    <taskref ref="org.labkey.di.steps.QueueJobTask"/>
</transform>
Handling Generated Files
If file outputs are involved (for example, if one ETL process outputs a file, and then queues another process that expects to use the file in a pipeline task), all ETL configurations in the chain must have the attribute loadReferencedFile="true” in order for the runs to link up properly.
<etl xmlns="http://labkey.org/etl/xml" loadReferencedFiles="true">
    ...
</etl>
Standalone vs. Component ETL Processes
ETL processes can be set as either "standalone" or "sub-component":
- Standalone ETL processes:
- Appear in the Data Transforms web part
- Can be run directly via the user or via another ETL
- Sub-Component ETL processes or tasks:
- Not shown in the Data Transforms web part
- Cannot be run directly by the user, but can be run only by another ETL process, as a sub-component of a wider job.
- Cannot be enabled or run directly via an API call.
<transform id="MySubComponent" standalone="false">
    ...
</transform>
ETL: Stored Procedures
Stored Procedures as Source Queries
Instead of extracting data directly from a source query and loading it into a target query, an ETL process can call one or more stored procedures that themselves move data from the source to the target (or the procedures can transform the data in some other way). For example, the following ETL process runs a stored procedure to populate the Patients table.
<?xml version="1.0" encoding="UTF-8"?>
<etl xmlns="http://labkey.org/etl/xml">
    <name>Populate Patient Table</name>
    <description>Populate Patients table with calculated and converted values.</description>
    <transforms>
        <transform id="ExtendedPatients" type="StoredProcedure">
            <description>Calculates date of death or last contact for a patient, and patient ages at events of interest</description>
            <procedure schemaName="patient" procedureName="PopulateExtendedPatients" useTransaction="true">
            </procedure>
        </transform>
    </transforms>
    <!-- run at 3:30am every day -->
    <schedule><cron expression="0 30 3 * * ?"/></schedule>
</etl>
Special Behavior for Different Database Implementations
ETL: Stored Procedures in MS SQL Server
Example - Normalize Data
The following ETL process uses the stored procedure normalizePatientData to modify the source data.
<?xml version="1.0" encoding="UTF-8"?>
<etl xmlns="http://labkey.org/etl/xml">
    <name>Target #1 (Normalize Gender Values - Stored Procedure)</name>
    <description>Runs a stored procedure.</description>
    <transforms>
        <transform id="storedproc" type="StoredProcedure">
            <description>Runs a stored procedure to normalize values in the Gender column.</description>
            <procedure schemaName="target1" procedureName="normalizePatientData">
            </procedure>
        </transform>
    </transforms>
</etl>
The stored procedure is shown below.
CREATE procedure [target1].[normalizePatientData] (@transformRunId integer)
as
begin
  UPDATE Patients SET Gender='Female' WHERE (Gender='f' OR Gender='F');
  UPDATE Patients SET Gender='Male' WHERE (Gender='m' OR Gender='M');
end
GO
Parameters
The <procedure> element can have <parameter> child elements that specify the initial seed values passed in as input/output parameters. Note that The "@" sign prefix for parameter names in the ETL xml configuration is optional.
<procedure … >
  <parameter name="@param1" value="100" override="false"/>
  <parameter name="@param2" value="200" override="false"/>
</procedure>
The output values of all input/output parameters are persisted in the database, and are used as input values for the next pass. These values take precedence over the initial seed values specified in the xml file. To reset and force the use of the value from the xml file, set the optional override attribute to "true".
<procedure schemaName="external" procedureName="etlTestRunBased">
  <parameter name="@femaleGenderName" value="Female" override="false"/>
  <parameter name="@maleGenderName" value="Male" override="false"/>
</procedure>
CREATE procedure [target1].[normalizePatientData] (@transformRunId integer,
 @maleGenderName VARCHAR(25),
 @femaleGenderName VARCHAR(25))
as
begin
  UPDATE Patients SET Gender=@femaleGenderName WHERE (Gender='f' OR Gender='F');
  UPDATE Patients SET Gender=@maleGenderName WHERE (Gender='m' OR Gender='M');
end
GO
Parameters - Special Processing
The following parameters are given special processing.
| Name | Direction | Datatype | Notes |
|---|---|---|---|
| @transformRunId | Input | int | Assigned the value of the current transform run id. |
| @filterRunId | Input or Input/Output | int | For RunFilterStrategy, assigned the value of the new transfer/transform to find records for. This is identical to SimpleQueryTransformStep’s processing. For any other filter strategy, this parameter is available and persisted for stored procedure to use otherwise. On first run, will be set to -1. |
| @filterStartTimestamp | Input or Input/Output | datetime | For ModifiedSinceFilterStrategy with a source query, this is populated with the IncrementalStartTimestamp value to use for filtering. This is the same as SimpleQueryTransformStep. For any other filter strategy, this parameter is available and persisted for stored procedure to use otherwise. On first run, will be set to NULL. |
| @filterEndTimestamp | Input or Input/Output | datetime | For ModifiedSinceFilterStrategy with a source query, this is populated with the IncrementalEndTimestamp value to use for filtering. This is the same as SimpleQueryTransformStep. For any other filter strategy, this parameter is available and persisted for stored procedure to use otherwise. On first run, will be set to NULL. |
| @containerId | Input | GUID/Entity ID | If present, will always be set to the id for the container in which the job is run. |
| @rowsInserted | Input/Output | int | Should be set within the stored procedure, and will be recorded as for SimpleQueryTransformStep. Initialized to -1. Note: The TransformRun.RecordCount is the sum of rows inserted, deleted, and modified. |
| @rowsDeleted | Input/Output | int | Should be set within the stored procedure, and will be recorded as for SimpleQueryTransformStep. Initialized to -1. Note: The TransformRun.RecordCount is the sum of rows inserted, deleted, and modified. |
| @rowsModified | Input/Output | int | Should be set within the stored procedure, and will be recorded as for SimpleQueryTransformStep. Initialized to -1. Note: The TransformRun.RecordCount is the sum of rows inserted, deleted, and modified. |
| @returnMsg | Input/Output | varchar | If output value is not empty or null, the string value will be written into the output log. |
| @debug | Input | bit | Convenience to specify any special debug processing within the stored procedure. May consider setting this automatically from the Verbose flag. |
| Return Code | special | int | All stored procedures must return an integer value on exit. “0” indicates correct processing. Any other value will indicate an error condition and the run will be aborted. |
To write to the ETL log file, use a 'print' statement inside the procedure.
Log Rows Modified
Use special parameters to log the number of rows inserted, changed, etc. as follows:
CREATE procedure [target1].[normalizePatientData] (@transformRunId integer
, @parm1 varchar(25) OUTPUT
, @gender varchar(25) OUTPUT
, @rowsInserted integer OUTPUT
, @rowCount integer OUTPUT
, @rowsDeleted integer OUTPUT
, @rowsModified integer OUTPUT
, @filterStartTimestamp datetime OUTPUT)
as
begin
SET @rowsModified = 0
UPDATE Patients SET Gender='Female' WHERE (Gender='f' OR Gender='F');
SET @rowsModified = @@ROWCOUNT
UPDATE Patients SET Gender='Male' WHERE (Gender='m' OR Gender='M');
SET @rowsModified += @@ROWCOUNT
end
Optional Source
An optional source must be used in combination with the RunFilterStrategy or ModifiedSinceFilterStrategy filter strategies.
<transforms>
	<transform id="storedproc" type="StoredProcedure">
		<description>
			Runs a stored procedure to normalize values in the Gender column.
		</description>
		<!-- Optional source element                                    -->
		<!-- <source schemaName="study" queryName="PatientsWarehouse"/> -->
		<procedure schemaName="target1" procedureName="normalizePatientData">
		</procedure>
	</transform>
</transforms>
Transactions
By default all stored procedures are wrapped as transactions, so that if any part of the procedure fails, any changes already made are rolled back. For debugging purposed, turn off the transaction wrapper setting useTransaction to "false":
<procedure schemaName="target1" procedureName="normalizePatientData" useTransaction="false">
</procedure>
ETL: Functions in PostgreSQL
To call a PostgreSQL function from an ETL process, refer to the function in a transform element of the ETL configuration file. For example, the following ETL process calls "postgresFunction" in the patient schema.
ETL XML Configuration File
<?xml version="1.0" encoding="UTF-8"?>
<etl xmlns="http://labkey.org/etl/xml">
    <name>Stored Proc Normal Operation</name>
    <description>Normal operation</description>
    <transforms>
        <transform id="callfunction" type="StoredProcedure">
            <procedure schemaName="patient" procedureName="postgresFunction" useTransaction="false">
                <parameter name="inoutparam" value="before"/>
            </procedure>
        </transform>
    </transforms>
</etl>
Function and Parameter Requirements
PostgreSQL functions called by an ETL process must meet the following requirements:
- The Postgres function must be of return type record.
- Parameter names, including the Special Processing parameters (see table below), are case-insensitive.
- There can be an arbitrary number of custom INPUT and/or INPUT/OUTPUT parameters defined for the function.
- There can be at most one pure OUTPUT parameter. This OUTPUT parameter must be named "return_status" and must be of type INTEGER. If present, the return_status parameter must be assigned a value of 0 for successful operation. Values > 0 are interpreted as error conditions.
- Function overloading of differing parameter counts is not currently supported. There can be only one function (procedure) in the Postgres database with the given schema & name combination.
- Optional parameters in PostgreSQL are not currently supported. An ETL process using a given function must provide a value for every custom parameter defined in the function.
- Postgres does not have a "print" statement. Writing to the ETL log can be accomplished with a "RAISE NOTICE" statement, for example:
RAISE NOTICE '%', 'Test print statement logging';
- The "@" sign prefix for parameter names in the ETL configuration xml is optional (for both SQL Server and Postgres). When IN/OUT parameters are persisted in the dataintegration.transformConfiguration.transformState field, their names are consistent with their native dialect (an "@" prefix for SQL Server, no prefix for Postgres).
Parameters - Special Processing
The following parameters are given special processing.
Note that the output values of INOUT's are persisted to be used as inputs on the next run.
| Name | Direction | Datatype | Notes |
|---|---|---|---|
| transformRunId | Input | int | Assigned the value of the current transform run id. |
| filterRunId | Input or Input/Output | int | For RunFilterStrategy, assigned the value of the new transfer/transform to find records for. This is identical to SimpleQueryTransformStep's processing. For any other filter strategy, this parameter is available and persisted for functions to use otherwise. On first run, will be set to -1. |
| filterStartTimestamp | Input or Input/Output | datetime | For ModifiedSinceFilterStrategy with a source query, this is populated with the IncrementalStartTimestamp value to use for filtering. This is the same as SimpleQueryTransformStep. For any other filter strategy, this parameter is available and persisted for functions to use otherwise. On first run, will be set to NULL. |
| filterEndTimestamp | Input or Input/Output | datetime | For ModifiedSinceFilterStrategy with a source query, this is populated with the IncrementalEndTimestamp value to use for filtering. This is the same as SimpleQueryTransformStep. For any other filter strategy, this parameter is available and persisted for functions to use otherwise. On first run, will be set to NULL. |
| containerId | Input | GUID/Entity ID | If present, will always be set to the id for the container in which the job is run. |
| rowsInserted | Input/Output | int | Should be set within the function, and will be recorded as for SimpleQueryTransformStep. Initialized to -1. Note: The TransformRun.RecordCount is the sum of rows inserted, deleted, and modified. |
| rowsDeleted | Input/Output | int | Should be set within the functions, and will be recorded as for SimpleQueryTransformStep. Initialized to -1. Note: The TransformRun.RecordCount is the sum of rows inserted, deleted, and modified. |
| rowsModified | Input/Output | int | Should be set within the functions, and will be recorded as for SimpleQueryTransformStep. Initialized to -1. Note: The TransformRun.RecordCount is the sum of rows inserted, deleted, and modified. |
| returnMsg | Input/Output | varchar | If output value is not empty or null, the string value will be written into the output log. |
| debug | Input | bit | Convenience to specify any special debug processing within the stored procedure. |
| return_status | special | int | All functions must return an integer value on exit. “0” indicates correct processing. Any other value will indicate an error condition and the run will be aborted. |
Example Postgres Function
CREATE OR REPLACE FUNCTION patient.postgresFunction
(IN transformrunid integer
, INOUT rowsinserted integer DEFAULT 0
, INOUT rowsdeleted integer DEFAULT 0
, INOUT rowsmodified integer DEFAULT 0
, INOUT returnmsg character varying DEFAULT 'default message'::character varying
, IN filterrunid integer DEFAULT NULL::integer
, INOUT filterstarttimestamp timestamp without time zone DEFAULT NULL::timestamp without time zone
, INOUT filterendtimestamp timestamp without time zone DEFAULT NULL::timestamp without time zone
, INOUT runcount integer DEFAULT 1
, INOUT inoutparam character varying DEFAULT ''::character varying
, OUT return_status integer)
  RETURNS record AS
$BODY$

BEGIN

/*
 *
 *  Function logic here
 *
 */

RETURN;

END;
$BODY$
  LANGUAGE plpgsql;
ETL: Check For Work From a Stored Procedure
<transform id="checkToRun" type="StoredProcedure">
    <procedure schemaName="patient" procedureName="workcheck" useTransaction="false">
        <parameter name="StagingControl" value="1" noWorkValue="-1"/>
    </procedure>
</transform>
<transform id="queuedJob">
    <source schemaName="patient_source" queryName="etl_source" />
    <destination schemaName="patient_target" queryName="Patients" targetOption="merge"/>
</transform>
The noWorkValue can either be a hard-coded string (for example, "-1", shown above), or you can use a substitution syntax to indicate a comparison should be against the input value of a certain parameter.
For example, the following parameter indicates there is no work for the ETL job if the output batchId is the same as the output parameter persisted from the previous run.
<parameter name="batchId" noWorkValue="${batchId}"/>
Example
In the ETL transform below, the gating procedure checks if there is a new ClientStagingControlID to process. If there is, the ETL job goes into the queue. When the job starts, the procedure is run again in the normal job context; the new ClientStagingControlID is returned again. The second time around, the output value is persisted into the global space, so further procedures can use the new value. Because the gating procedure is run twice, don’t use this with stored procedures that have other data manipulation effects! There can be multiple gating procedures, and each procedure can have multiple gating params, but during the check for work, modified global output param values are not shared between procedures.
<transform id="CheckForWork" type="StoredProcedure">
   <description>Check for new batch</description>
   <procedure schemaName="patient" procedureName="GetNextClientStagingControlID">
       <parameter name="ClientStagingControlID" value="-1" scope="global" noWorkValue="${ClientStagingControlID}"/>
       <parameter name="ClientSystem" value="LabKey-nlp-01" scope="global"/>
       <parameter name="StagedTable" value="PathOBRX" scope="global"/>
   </procedure>
</transform>
ETL: SQL Scripts
Directory Structure
LabKey Server will automatically run SQL scripts that are packaged inside your module in the following directory structure:
MODULE_NAME config etls queries schemas dbscripts postgres SCRIPT_NAME.sql - Script for PostgreSQL. mssql SCRIPT_NAME.sql - Script for MS SQL Server.
SQL Script Names
Script names are formed from three components: (1) schema name, (2) previous module version, and (3) current module version, according to the following pattern:
SCHEMA-PREVIOUSVERSION-CURRENTVERSION.sql
where SCHEMA is the name of the schema to be generated by the script.
For an initially deployed module that hasn't existed on the server previously, an example script name would be:
patientSchema-0.0-1.0.sql
For more details on naming scripts, especially naming upgrade scripts, see Modules: SQL Scripts.
Schema XML File
LabKey will generate an XML schema file for a table schema by visiting a magic URL of the form:
http://<server>/labkey/admin/getSchemaXmlDoc.view?dbSchema=<schema-name>
Examples
This script creates a simple table and a stored procedure for MS SQL Server dialect.
CREATE SCHEMA target1;
GO

CREATE procedure [target1].[normalizePatientData] (@transformRunId integer)
as
begin
  UPDATE Patients SET Gender='Female' WHERE (Gender='f' OR Gender='F');
  UPDATE Patients SET Gender='Male' WHERE (Gender='m' OR Gender='M');
end
GO

CREATE TABLE target1.Patients
(
    RowId INT IDENTITY(1,1) NOT NULL,
    Container ENTITYID NOT NULL,
    CreatedBy USERID NOT NULL,
    Created DATETIME NOT NULL,
    ModifiedBy USERID NOT NULL,
    Modified DATETIME NOT NULL,

    PatientId INT NOT NULL,
    Date DATETIME NOT NULL,
    LastName VARCHAR(30),
    FirstName VARCHAR(30),
    MiddleName VARCHAR(30),
    DateVisit DATETIME,
    Gender VARCHAR(30),
    PrimaryLanguage VARCHAR(30),
    Email VARCHAR(30),
    Address VARCHAR(30),
    City VARCHAR(30),
    State VARCHAR(30),
    ZIP VARCHAR(30),
    Diagnosis VARCHAR(30),

    CONSTRAINT PatientId PRIMARY KEY (RowId)
);
These scripts are in Postgres SQL dialect.
---------------
--  schema1  --
---------------
DROP SCHEMA schema1 CASCADE;
CREATE SCHEMA schema1;

CREATE TABLE schema1.patients
(
  patientid character varying(32),
  date timestamp without time zone,
  startdate timestamp without time zone,
  country character varying(4000),
  language character varying(4000),
  gender character varying(4000),
  treatmentgroup character varying(4000),
  status character varying(4000),
  comments character varying(4000),
  CONSTRAINT patients_pk PRIMARY KEY (patientid)
);
CREATE OR REPLACE FUNCTION changecase(searchtext varchar(100), replacetext varchar(100)) RETURNS integer AS $$
    UPDATE schema1.patients
        SET gender = replacetext
        WHERE gender = searchtext;
    SELECT 1;
$$ LANGUAGE SQL;
Related Topics
- Tutorial: Extract-Transform-Load (ETL) - Other SQL scripts are included in the ETL samples at patientetl/schemas/dbscripts.
- Modules: SQL Scripts - Details on SQL scripts in modules.
ETL: Remote Connections
To set up a remote connection, see Manage Remote Connections.
To configure an ETL process to utilize a remote connection, specify the transform type and the remoteSource as shown below:
<transform type="RemoteQueryTransformStep" id="step1">
  <source remoteSource="EtlTest_RemoteConnection" schemaName="study" queryName="etl source" />
  ...
</transform>
A sample ETL configuration file is shown below:
<?xml version="1.0" encoding="UTF-8"?>
<etl xmlns="http://labkey.org/etl/xml">
<name>Remote Test</name>
<description>append rows from "remote" etl_source to etl_target</description>
<transforms>
    <transform type="RemoteQueryTransformStep" id="step1">
        <description>Copy to target</description>
        <source remoteSource="EtlTest_RemoteConnection" schemaName="study" queryName="etl source" />
        <destination schemaName="study" queryName="etl target" targetOption="truncate"/>
    </transform>
</transforms>
<incrementalFilter className="ModifiedSinceFilterStrategy" timestampColumnName="modified" />
</etl>
Related Topics
ETL: Logs and Error Handling
Logging
Messages and/or errors inside an ETL job are written to a log file named for that job, located at
LABKEY_HOME/files/PROJECT/FOLDER_PATH/@files/etlLogs/ETLNAME_DATE.etl.log
for example:
C:/labkey/files/MyProject/MyFolder/@files/etlLogs/myetl_2015-07-06_15-04-27.etl.log
Attempted/completed jobs and log locations are recorded in the table dataIntegration.TransformRun. For details on this table, see ETL: User Interface.
Log locations are also available from the Data Transform Jobs web part (named Processed Data Transforms by default). For the ETL job in question, click Job Details.

File Path shows the log location.
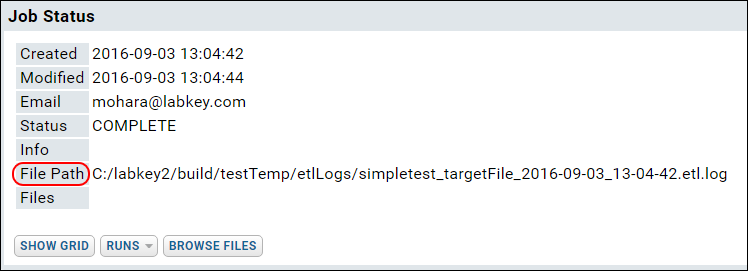
ETL processes check for work (= new data in the source) before running a job. Log files are only created when there is work. If, after checking for work, a job then runs, errors/exceptions throw a PipelineJobException. The UI shows only the error message; the log captures the stacktrace.
XSD/XML-related errors are written to the labkey.log file, located at TOMCAT_HOME/logs/labkey.log.
DataIntegration Columns
To record a connection between a log entry and rows of data in the target table, add the 'di' columns listed here to your target table.
Error Handling
If there were errors during the transform step of the ETL process, you will see the latest error in the Transform Run Log column.
- An error on any transform step within a job aborts the entire job. “Success” in the log is only reported if all steps were successful with no error.
- If the number of steps in a given ETL process has changed since the first time it was run in a given environment, the log will contain a number of DEBUG messages of the form: “Wrong number of steps in existing protocol”. This is an informational message and does not indicate anything was wrong with the job.
- Filter Strategy errors. A “Data Truncation” error may mean that the xml filename is too long. Current limit is module name length + filename length - 1, must be <= 100 characters.
- Stored Procedure errors. “Print” statements in the procedure appear as DEBUG messages in the log. Procedures should return 0 on successful completion. A return code > 0 is an error and aborts job.
- Known issue: When the @filterRunId parameter is specified in a stored procedure, a default value must be set. Use NULL or -1 as the default.
ETL: All Jobs History
The history includes the name of the job, the folder it was run in, the date and time it was run, and other information. Links to detailed views of each job are provided.

ETL: Examples
- Interval - 1 Hour
- Interval - 5 Minutes
- Cron - 1 Hour
- Merge
- Merge By Run ID
- Merge with Alternate Key
- Append with Two Targets
- Truncate
- Passing Parameters to a SQL Query
- Truncate the Target Query
- Java Transforms
Interval - 1 Hour
<?xml version="1.0" encoding="UTF-8"?>
<etl xmlns="http://labkey.org/etl/xml">
    <name>Patient - Merge</name>
    <description>Merges patient data to the target query.</description>
    <transforms>
        <transform id="1hour">
            <source schemaName="external" queryName="etl_source" />
            <destination schemaName="patient" queryName="etl_target" targetOption="merge"/>
        </transform>
    </transforms>
    <incrementalFilter className="ModifiedSinceFilterStrategy" timestampColumnName="modified" />
    <schedule><poll interval="1h"></poll></schedule>
</etl>
Interval - 5 Minutes
<schedule><poll interval="5m" /></schedule>
Cron - 1 Hour
Check at midnight every day.
<?xml version="1.0" encoding="UTF-8"?>
<etl xmlns="http://labkey.org/etl/xml">
    <name>Cron on the hour</name>
    <transforms>
        <transform id="eachHour">
            <description>valid</description>
            <source schemaName="external" queryName="etl_source" />
            <destination schemaName="patient" queryName="etl_target" targetOption="merge"/>
        </transform>
    </transforms>
    <incrementalFilter className="ModifiedSinceFilterStrategy" timestampColumnName="modified" />
    <schedule><cron expression="0 0 * * * ?" /></schedule>
</etl>
Merge
<?xml version="1.0" encoding="UTF-8"?>
<etl xmlns="http://labkey.org/etl/xml">
    <name>Merge</name>
    <description>Merge rows from etl_source to etl_target.</description>
    <transforms>
        <transform id="merge">
            <description>Merge to target.</description>
            <source schemaName="external" queryName="etl_source" />
            <destination schemaName="patient" queryName="etl_target" targetOption="merge"/>
        </transform>
    </transforms>
    <incrementalFilter className="ModifiedSinceFilterStrategy" timestampColumnName="modified" />
</etl>
Merge by Run ID
<?xml version="1.0" encoding="UTF-8"?>
<etl xmlns="http://labkey.org/etl/xml">
    <name>MergeByRunId</name>
    <description>Merge by run id.</description>
    <transforms>
        <transform id="step1">
            <description>Copy to target</description>
            <source schemaName="patient" queryName="etlsource" />
            <destination schemaName="target" queryName="etltarget" />
        </transform>
    </transforms>
    <incrementalFilter className="RunFilterStrategy" runTableSchema="patient"
      runTable="Transfer" pkColumnName="Rowid" fkColumnName="TransformRun" />
    <schedule>
        <poll interval="15s" />
    </schedule>
</etl>
Merge with Alternate Key
Specify an alternate key to use for merging when the primary key is not suitable, i.e. would cause duplicates or orphaned data.
<destination schemaName="vehicle" queryName="etl_target2" targetOption="merge">
      <alternateKeys>
          <!-- The pk of the target table is the "rowId" column. Use "id" as an alternate match key -->
          <column name="id"/>
      </alternateKeys>
</destination>
Append with Two Targets
For example, you might want to ensure that a given stored procedure is executed (step1) before loading the data into the destination (step2).
<?xml version="1.0" encoding="UTF-8"?>
<etl xmlns="http://labkey.org/etl/xml">
    <name>Append</name>
    <description>append rows from etl_source to etl_target and etl_target2</description>
    <transforms>
        <transform id="step1">
            <description>Copy to target</description>
            <source schemaName="external" queryName="etl_source" timestampcolumnname="modfiied" />
            <destination schemaName="patient" queryName="etl_target" />
        </transform>
        <transform id="step2">
            <description>Copy to target two</description>
            <source schemaName="external" queryName="etl_source" />
            <destination schemaName="patient" queryName="etl_target2" />
        </transform>
    </transforms>
    <incrementalFilter className="SelectAllFilterStrategy"/>
</etl>
Truncate
<?xml version="1.0" encoding="UTF-8"?>
<etl xmlns="http://labkey.org/etl/xml">
    <name>Truncate</name>
    <description>Clear target and append rows from etl_source.</description>
    <transforms>
        <transform id="step1">
            <description>Copy to target</description>
            <source schemaName="patient" queryName="etl_source" />
            <destination schemaName="patient" queryName="etl_target" targetOption="truncate"/>
        </transform>
    </transforms>
    <incrementalFilter className="ModifiedSinceFilterStrategy" timestampColumnName="modified" />
    <schedule>
        <poll interval="15s" />
    </schedule>
</etl>
Passing Parameters to a SQL Query
The following ETL process passes parameters (MinTemp=99 and MinWeight=150) into its source query (a parameterized query).
<?xml version="1.0" encoding="UTF-8" ?>
<etl xmlns="http://labkey.org/etl/xml">
    <name>PatientsToTreated</name>
    <description>Transfers from the Patients table to the Treated table.</description>
    <transforms>
        <transform id="step1">
            <description>Patients to Treated Table</description>
            <source queryName="Patients" schemaName="study"/>
            <destination schemaName="study" queryName="Treated"/>
        </transform>
    </transforms>
    <parameters>
        <parameter name="MinTemp" value="99" type="DECIMAL" />
        <parameter name="MinWeight" value="150" type="DECIMAL" />
    </parameters>
    <schedule>
        <poll interval="1h"/>
    </schedule>
</etl>
Truncate the Target Query
The following truncates the target table, without copying any data from a source query. Note the lack of a <source> element.
<?xml version="1.0" encoding="UTF-8"?>
<etl xmlns="http://labkey.org/etl/xml">
    <name>Truncate Patients Table</name>
    <description>Update data for study on male patients.</description>
    <transforms>
        <transform id="trunc">
            <destination schemaName="study" queryName="Patients" targetOption="truncate"/>
        </transform>
    </transforms>
    <schedule>
        <poll interval="1h"/>
    </schedule>
</etl>
Java Transforms
Java developers can add a Java class to handle the transformation step of an ETL process. The column to be transformed points to the Java class as follows:<columnTransforms>
<column source="columnToTransform" transformClass="org.labkey.di.columnTransforms.MyJavaClass"/>
</columnTransforms>
The Java class receives the values of the column one row at a time. The Java class can validate, transform or perform some other action on these values. What is returned from the doTransform method of this class is what gets inserted into the target table. See below for an example implementation. Also see the ColumnTransform interface for available setters, getters, and methods.
The ETL source below uses the Java class org.labkey.di.columnTransforms.TestColumnTransform to apply changes to data in the "name" column.
ETL.xml
<?xml version="1.0" encoding="UTF-8"?>
<etl xmlns="http://labkey.org/etl/xml">
<name>Append Transformed Column</name>
<description>Append rows from etl_source to etl_target, applying column transformation using a Java class.</description>
<transforms>
    <transform id="step1" type="org.labkey.di.pipeline.TransformTask">
        <description>Copy to target</description>
        <source schemaName="vehicle" queryName="etl_source" />
        <destination schemaName="vehicle" queryName="etl_target">
            <columnTransforms>
                <column source="name" transformClass="org.labkey.di.columnTransforms.TestColumnTransform"/>
            </columnTransforms>
            <constants>
                <column name="myConstant" type="varchar" value="aConstantValue"/>
            </constants>
        </destination>
    </transform>
</transforms>
<incrementalFilter className="SelectAllFilterStrategy" />
</etl>
The Java class below is used by the ETL process to apply transformations to the supplied column, in this case the "name" column.
TestColumnTransform.java
package org.labkey.di.columnTransforms;

import org.labkey.api.di.columnTransform.AbstractColumnTransform;

/**
 * An example of Java implementing a transform step.
 * Prepends the value of the "id" column of the source query
 * to the value of the source column specified in the ETL configuration xml,
 * then appends the value of the "myConstant" constant set in the xml.
 */
public class TestColumnTransform extends AbstractColumnTransform
{
    @Override
    protected Object doTransform(Object inputValue)
    {
        Object prefix = getInputValue("id");
        String prefixStr = null == prefix ? "" : prefix.toString();
        return prefixStr + "_" + inputValue + "_" + getConstant("myConstant");
    }
}
ETL: Reference
Directory Structure of an ETL Module
The directory structure for an ETL module is shown below. Note that the "queries" and "schemas" directories are optional, and not required for ETL functionality. Items shown in lowercase are literal values that should be preserved in the directory structure. Items shown in uppercase should be replaced with values that reflect the nature of your project.
MODULE_NAME
├───etls
│       ETL1.xml
│       ETL2.xml
│
├───queries
│   └───SCHEMA_NAME
│           QUERY_NAME.sql
│
└───schemas
    │   SCHEMA_NAME.xml
    │
    └───dbscripts
        ├───postgresql
        │       SCHEMA_NAME-X.XX-Y.YY.sql
        │
        └───sqlserver
                SCHEMA_NAME-X.XX-Y.YY.sql
Files and Directories
- ETL1.xml - The main config file for an ETL process. Defines the sources, targets, transformations, and schedules for the transfers. Any number of ETL processes and tasks can be added. For examples see ETL: Examples.
- QUERY_NAME.sql - SQL queries for data sources and targets.
- schemas - Optional database schemas. Optional sql scripts for bootstrapping a target database.
ETL Configuration Reference
For details see ETL XML Reference.
Reference Links
- etl.xml Reference - xml reference docs for ETL config files.
- etl.xsd - The XSD schema file on which the XML config files are based.