This topic reviews some details and built in features of the
Luminex Assay 200 design you uploaded in archive form during
the Luminex Level II tutorial.
Explore Lookups and Defaults in the Assay Design
Open the assay design and examine how lookups and default values are included as part of this assay design to simplify and standardize data entry:
- Select (Admin) > Manage Assays, then click Luminex Assay 200
- Click Manage Assay Design > Edit assay design.
- Click the heading to open the Run Fields section.
- Expand the Isotype field using the (expansion) icon to the right.
- Click Advanced Settings for the Isotype field.
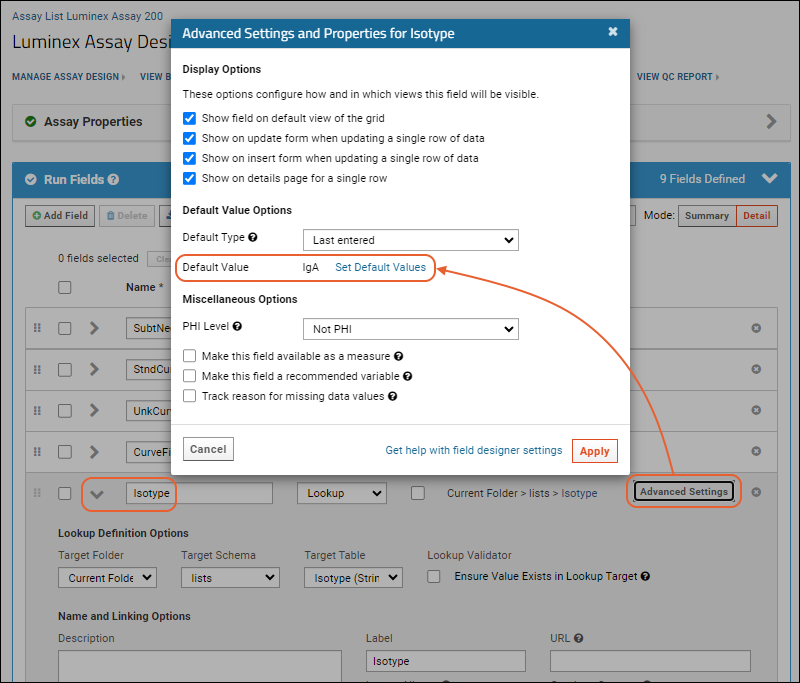
- Note the Default Value of "IgA" has been set for this lookup property.

- When finished reviewing, be sure to exit with Cancel to discard any changes you may have made.
Note the following in the above screenshot:
- Lookup Definition Options:
- The Data Type for Isotype is a lookup to the Isotype list.
- User-facing result: When importing runs, users will be shown a dropdown list of options for this field, not a free-form data entry box. The options will be the values on the Isotype list.
- Default value
- In the Advanced Settings and Properties popup, you can see that the initial Default value for the Isotype field has been set to IgA.
- User-facing result: When users first import runs, the list of dropdown options for Isotype will show a default of IgA. Choosing the default appropriately can speed data entry for the common case.
- Default Type
- In the Advanced Settings and Properties popup, you can also see that the Default Type for the Isotype field has been pre-set to Last entered
- User-facing result: When a user imports a run, the list of dropdown options will default to the user's "last-entered" value. If the user selected "IgB" for their first run, the next will default to "IgB" instead of the original default value of "IgA".
You can use steps similar to the ones above to explore other fields in the assay design (e.g.,
Conjugate) to see how lookups and/or defaults for these fields are pre-configured.
Review Assay Properties
While you have the assay design open, you may want to review in more detail the properties defined. See further details in
Luminex Properties. As with any assay design, an administrator may edit the default design's fields and defaults to suit the specific needs of their data and project. To do so, it is safest to make changes to a copy of the assay design if you want to still be able to use
the tutorial. To copy a design:
- Choose the assay you want to copy from the Assay List.
- Select Manage Assay Design > Copy assay design.
- Choose a destination folder or click Copy to Current Folder.
- Give the new copy a new name, change fields and properties as required.
- Click Save when finished.
The LabKey Luminex transform script requires certain fields to exist in the assay design in order for it to have locations to place its results. In
the tutorial we make a small edit to the base design to
configure the Transform Script, but avoid making other changes or the tutorial may not work.
For further information on setting up a custom assay that includes the fields used by the transform script, see:
For further information on how to customize an assay design, see: