This topic is under construction for the 24.3 (March 2024) release of LabKey Server. For current documentation of this feature, click here.
The LabKey Server code base includes extensive automated tests. These, combined with hands-on testing, ensure that the software continues to work reliably. There are three major categories of automated tests.
Unit Tests
Unit tests exercise a single unit of code, typically contained within a single Java class. They do not assume that they run inside of any particular execution context. They are written using the JUnit test framework. Unit tests can be run directly through IntelliJ by right clicking on the test class or a single test method (identified with an
@Test annotation) and selecting Run or Debug. They can also be run through the web application, as described below for integration tests. Unit tests are registered at runtime via the
Module.getUnitTests() method.
Run Server-side JUnit Tests:
Via command line:
./gradlew :server:test:uiTests -Psuite=UnitTests
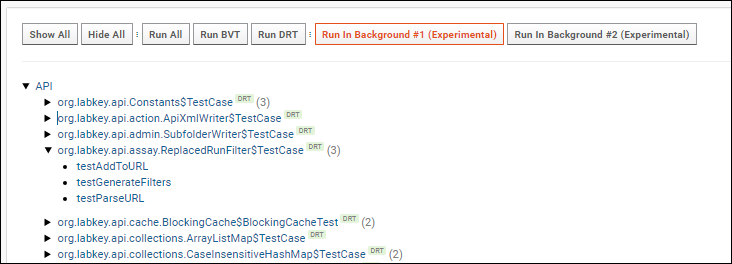
In the UI, access the
junit-begin.view by editing the URL. For example, on a local development machine:
You'll see a listing of tests available. Click
to expand sections or use the
Show All or Hide All buttons.

Click a single test name to run it, or use one of the
Run All/Run BVT/Run DRT buttons. You'll see results when the tests are complete.
Integration Tests
Integration tests exercise functionality that combines multiple units of code. They do not exercise the end-user interface. Integration tests are implemented using the JUnit test framework, like unit tests. They generally assume that they are running in a full web server execution context, where they have access to database connections and other resources.
They can be invoked in the UI by going to the same
junit-begin.view URL as unit tests. Ex:
Integration tests are registered at runtime via the
Module.getIntegrationTests() method.
Functional Tests
Functional tests exercise the full application functionality, typically from the perspective of an end-user or simulated client application. Most functional tests use the Selenium test framework to drive a web browser in the same way that an end user would interact with LabKey Server. Unlike unit and integration tests, functional tests treat the server as a black-box. They run independently and are built independently of LabKey Server (though some of them share source code repositories).
Functional tests are organized into various test suites, including the Developer Regression Tests (DRT), Build Verification Tests (BVT), Daily suites, and numerous module-specific suites. LabKey's
Continuous Integration system runs these suites at varying frequencies in response to code changes.
Test Properties
You can specify various properties to customize test execution. These properties are defined and described in
server/testAutomation/test.properties and can be overridden by modifying that file or adding
-Pprop=value to gradle commands. When
setting up a develop machine, the
ijConfigure gradle task will generate the "test.properties" file from "test.properties.template".
Before updating an existing enlistment to 21.10 (or later), backup your 'test.properties' to avoid losing existing customizations.
Install Test Browser(s)
Selenium tests are more reliable when run on a stable browser. We recommend using the latest ESR release of Firefox to avoid bugs or incompatibilities that the standard Firefox release might have. If you have multiple installations of Firefox, you should specify which to use in the test.properties file.
Note: Mac application bundling can make the executable tricky to find; the path will looks something like '/Applications/Firefox.app/Contents/MacOS/firefox'
Install Browser Driver(s)
Selenium should download browser drivers automatically. If you have problems with this or are working with an older LabKey release, you may need to install the browser drivers manually. In which case, you should either place them in your PATH or specify the locations in your test.properties file via the properties specified below.
- ChromeDriver is used to run tests on Google Chrome.
- Add to PATH or specify location in webdriver.chrome.driver in the test.properties file
- Set selenium.browser=chrome in the test.properties file
- geckodriver is used to run tests on Firefox.
- Add to PATH or specify location in webdriver.gecko.driver in the test.properties file
- Set selenium.browser=firefox in the test.properties file
Run Functional Tests
After
setting up your development machine, you should have the core test repository cloned to
<LK_ENLISTMENT>/server/testAutomation.
You have several options for running functional tests on a development machine where LabKey Server is running locally:
- Run tests from within IntelliJ by right-clicking the class or an '@Test' annotated method.
- Run tests from the command line, using the commands and options listed below.
- Use the Test Runner GUI app. Check boxes for tests and options to run.
The following are relevant Gradle tasks and command line options available:
- Set login to be used by UI tests (adds an entry to your .netrc file):
./gradlew :server:test:setPassword
- Displays the Test Runner GUI app to choose specific tests to run and set options using checkboxes:
./gradlew :server:test:uiTests
- Run tests from specific test classes. In this case, BasicTest:
./gradlew :server:test:uiTests -Ptest=BasicTest
- Run specific test methods:
./gradlew :server:test:uiTests -Ptest=BasicTest.testCredits.testScripts,IssuesTest.emailTest
- Run all tests in a particular suite. In this case the DRTs.
./gradlew :server:test:uiTests -Psuite=DRT
- Run the DRTs on Firefox:
./gradlew :server:test:uiTests -Psuite=DRT -Pselenium.browser=firefox
- Runs the BVTs with the legacy-lineage experimental feature enabled:
./gradlew :server:test:uiTests -Psuite=BVT -Pexperimental.legacy-lineage=true
- Disable post-test cleanup for passing tests in order to inspect the server state after a test:
./gradlew :server:test:uiTests -Ptest=LinePlotTest -Pclean=false
Run Tests for an Individual Module
Many modules define a test suite that can be run using the
suite parameter. (e.g.
./gradlew :server:test:uiTests -Psuite=targetedms). Alternatively, you can run tests based on their source code location.
Gradle brings with it the ability to do very targeted builds and tasks, thus we have the ability to run the tests for a particular module without using the test runner project.
Until we resolve the issue of making the test runner able to run tests from all modules while still allowing the individual tests to be run, you must set the project property enableUiTests in order to be able to run the tests for an individual module.For any module that has its own
test/src directory, there will be a `moduleUiTests` task so you can run only the tests for only that module. For example, you can run the tests for MS2 by using this command:
gradlew -PenableUiTests :server:modules:ms2:moduleUiTests
Note: It is still required that you have the :server:testAutomation project since that is the location of the test.properties file and the helper methods for running tests.
Debug Selenium Tests
Use the IntelliJ "Debug Selenium Tests" configuration to connect (instead of "LabKey Dev"). You can run tests from within IntelliJ, by right clicking the class or an '@Test' annotated method. This will ensure that the debugger will attach.
- To debug tests initiated from the command line, use this flag to pause test execution until a debugger is connected:
./gradlew :server:test:uiTests -PdebugSuspendSelenium=y
- To continue to run a series tests even if a failure occurs in one of them, add:
- It is sometimes useful to skip post-test cleanup, leaving the test data on the site. To skip cleanup, add:
Configure IntelliJ for Tests
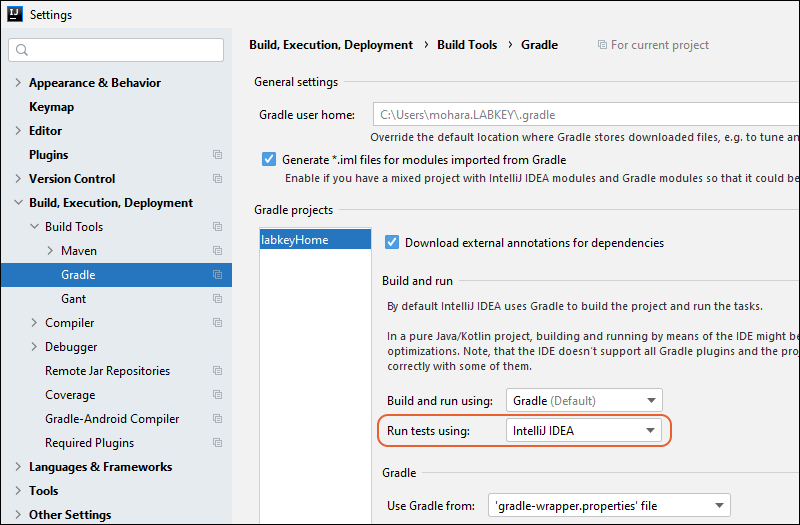
When setting up a new enlistment configure the test to run using the IntelliJ and not gradle. This setting should be applied by default with the IntelliJ config files checked into the enlistment. You can confirm by selecting
Settings/Preferences > Build, Execution Deployment > Build Tools > Gradle. The
Run test using: option should be "IntelliJ IDEA":

IntelliJ's auto-import can sometimes pick up the wrong Assert class:

- org.junit.Assert is the current, preferred class from JUnit 4
- junit.framework.Assert is a deprecated class from JUnit 3. There isn't much difference (it assumes that doubles are more precise than they really are), but we should avoid it.
- org.testng.Assert is from a different test framework. It is included in the standalone selenium jar for their internal testing. The parameter ordering convention for TestNG is different than JUnit; using these assert methods can produce confusing errors and might not compare what you expect.
To avoid this, configure IntelliJ to ignore the unwanted Assert classes. Select
Settings/Preferences > Editor > General > Auto Import.

Related Topics
 IntelliJ's auto-import can sometimes pick up the wrong Assert class:

