Accurate and consistent user entry is important to assay data, especially when it includes manual input of key metadata. For example, if an operator failed to enter a needed instrument setting, and later someone else wants to recreate an interesting result, it can be impossible to determine how that result was actually obtained. If an instrument's brand name is entered where a serial number is expected, results from different machines can be erroneously grouped as if they came from a single machine. If one machine is found to be faulty, you may be forced to throw out all data if you haven't accurately tracked where each run was done.
This topic demonstrates a few of the options available for data validation during upload:
Create an Assay Design
Set Up Validation
Here we add some validation to our GenericAssay design by modifying it. Remember that the assay design is like a map describing how to import and store data. When we change the map, any run data imported using the old design may no longer pass validation.
Since the assay design was created at the project level, and could be in use by other subfolders, let's make a copy in the current folder to modify.
Open the design for editing:
- Navigate to the Assay Tutorial folder.
- In the Assay List web part, click Cell Culture.
- Select Manage Assay Design > Copy assay design.
- Click Copy to Current Folder (or click the current folder name on the list).
- You will see the assay designer, with the same content as your original assay design.
- Enter the Name: "Cell Culture Modified".
Required Fields
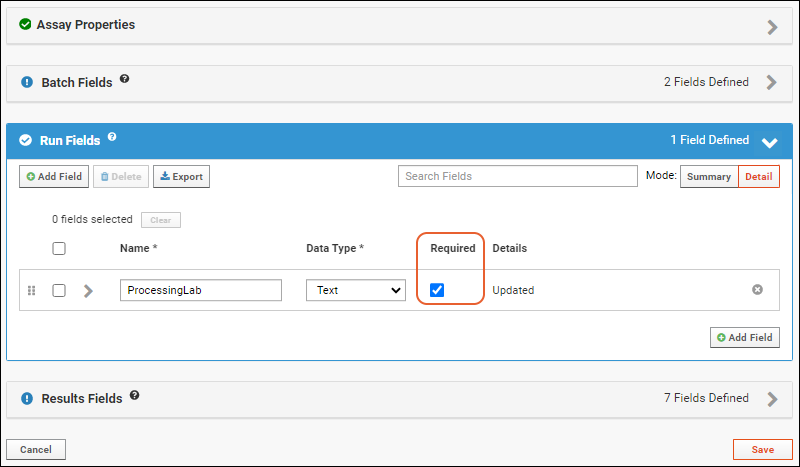
By default, any new field you add to an assay design is optional. If you wish, you can make one or more fields required, so that if an operator skips an entry, the upload fails.
- Click the Run Fields section.
- For the ProcessingLab field, check the Required checkbox.

Regular Expressions
Using a regular expression (RegEx) to check entered text is a flexible form of validation. You could compare text to an expected pattern, or in this example, we can check that special characters like angle brackets are not included in an email address (as could happen in a cut and paste of an email address from a contact list).
- Click Cell Culture Modified in the Assay List.
- Reopen Manage Assay Design > Edit assay design.
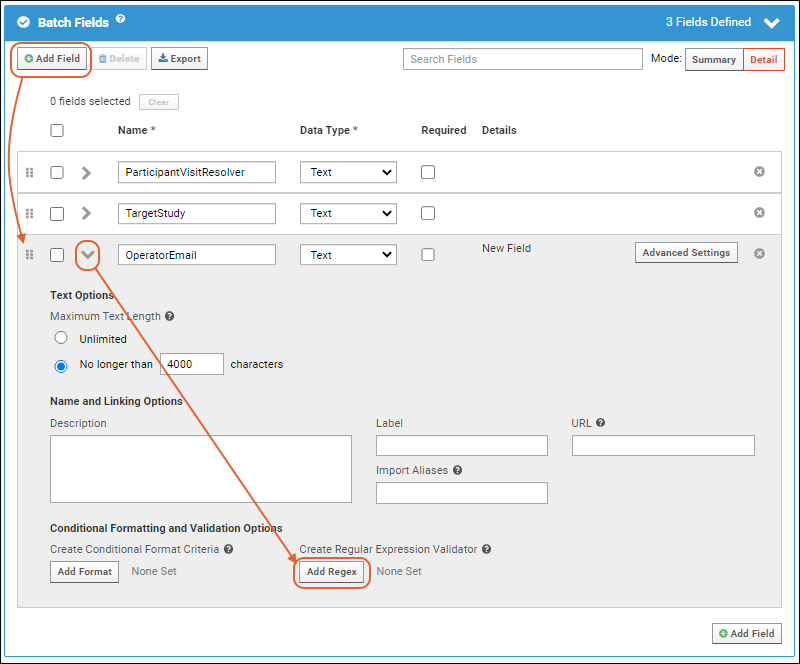
- Click the Batch Fields section.
- Click Add Field and enter the name "OperatorEmail" (no spaces).
- Expand the field details by clicking the icon.

- Under Conditional Formatting and Validation Options, click Add Regex.
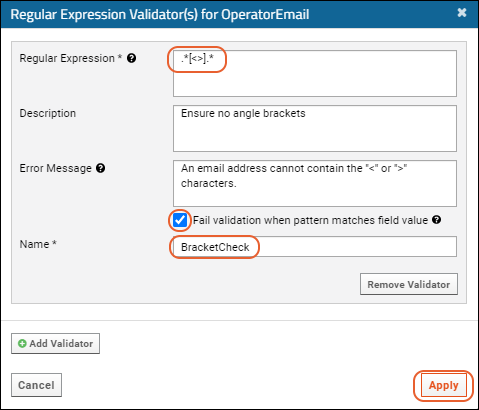
- Enter the following parameters:
- Regular Expression: .*[<>].*
- Note that regex patterns are matched on the entire string submitted, so including ".*" delimiters and enclosing the pattern with [ ] (square brackets) will find the regex pattern within any longer string.
- Description: Ensure no angle brackets.
- Error Message: An email address cannot contain the "<" or ">" characters.
- Check the box for Fail validation when pattern matches field value. Otherwise, you would be requiring that emails contained the offending characters.
- Name: BracketCheck
- Click Apply.

For more information on regular expressions, see:
Range Validators
By checking that a given numeric value falls within a given range, you can catch some bad runs at the very beginning of the import process.
- Click Results Fields to open the section.
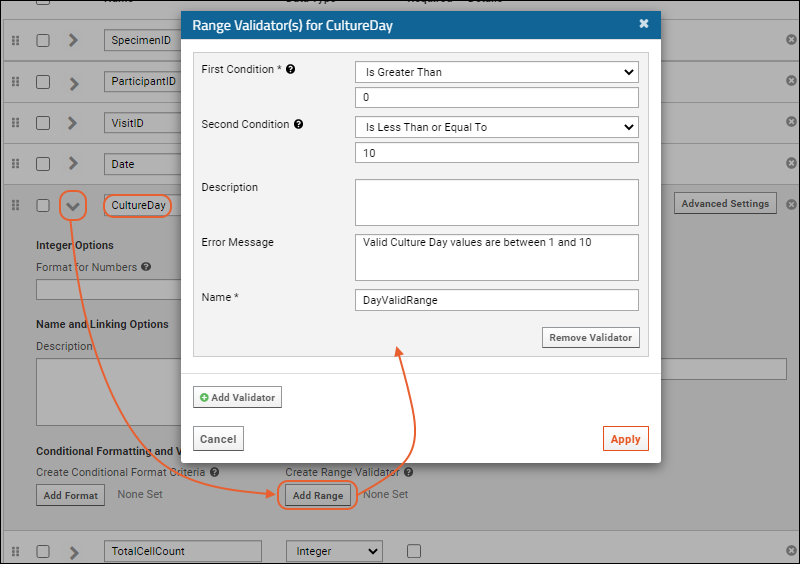
- Find the CultureDay field. Click the (expansion icon) on the right to open the details panel.
- Under Conditional Formatting and Validation Options, click Add Range.
- Enter the following parameters:
- First Condition: Select Is Greater Than: 0
- Second Condition: Select Is Less Than or Equal To: 10
- Error Message: Valid Culture Day values are between 1 and 10.
- Name: DayValidRange

- Click Apply.
- Scroll down and click Save when finished editing the assay design.
Observe Validation in Action
To see how data validation would screen for these issues, we'll intentionally upload some "bad" data which will fail the validation steps we just added.
- Click Assay Tutorial to return to the main folder page.
- Download this data file:
- Drag it into the Files web part, then select it.
- Click Import Data.
- Select Use Cell Culture Modified and click Import.
- Paste in "John Doe <john.doe@email.com>" as the OperatorEmail. Leave other entries at their defaults.
- Click Next.
- Observe the next red error message: "Value 'John Doe <john.doe@email.com>' for field 'OperatorEmail' is invalid. An email address cannot contain the "<" or ">" characters.
- Correct the email address entry to read only "john.doe@email.com".
- Click Next again and you will proceed, no longer seeing the error.
- Enter an Assay ID for the run, such as "BadRun".
- Don't provide a Processing Lab value this time.
- Click Save and Finish.
The sequence in which validators are run does not necessarily match their order in the design.
- Observe the red error text: "ProcessingLab is required and must be of type String."
- Enter a value and click Save and Finish again.
- Observe error message: "Value '-2' for field 'CultureDay' is invalid. Valid Culture Day values are between 1 and 10." The invalid CultureDay value is included in the spreadsheet being imported, so the only way to clear this particular error would be to edit/save/reimport the spreadsheet.
There is no actual need to import bad data now that we have seen how it works, so cancel the import or simply click the
Assay Tutorial link to return to the home page.
Related Topics