Build LabKey from Source |
2025-07-09 |
The process of building and deploying LabKey Server from source is covered in this topic.
One of the key things to note here is the cleanBuild command removes the entire build directory, requiring all of the build steps to be run again. This is generally not what you want or need to do since Gradle's up-to-date checks should be able to determine when things need to be rebuilt. (If that does not seem to be the case, please file a bug.) The one exception to this rule is when we change the LabKey version number after a release. Then you need to do a cleanBuild to get rid of the artifacts with the previous release version in their names.


Gradle tasks can also be invoked from within IntelliJ via the "Gradle projects" panel, but this has not been widely tested.
By changing these properties, you can turn off parallel builds or adjust the number of threads Gradle uses.If Gradle warns that "JVM heap space is exhausted", add more memory as described in the topic Gradle Tips and Tricks.
- Build Directories
- Application Build Steps
- Module Build Steps
- Build Tasks
- Parallel Build Feature
- Exclude Specific Gradle Tasks
- Build from Source (or Not)
Build Directories
These are the various directories involved in the build process, listed in the order in which they are used in the build process. All will be under the <LK_ENLISTMENT> location where you created your enlistment when you set up the development machine:- Source directory - Where the source code lives. This is where developers do their work. The build process uses this as input only.
- Build directory - Where all the building happens. This is the top-level output directory for the build. It is created if it does not exist when doing any of the build steps.
- Module build directory - Where the building happens for a module. This is the output directory for a module's build steps. It is created if it does not exist when doing a build.
- Staging directory - A gathering point for items that are to be deployed. This is just a way station for modules and other jars. The artifacts are collected here so they can be copied all at once into the deploy directory in order to prevent reloading the application multiple times when multiple modules are being updated.
- Deploy directory - The directory where the application is deployed and run.
| Directory Type | Path (relative to <LK_ENLISTMENT>) | Added to by... | Removed from by... | Deleted by... |
|---|---|---|---|---|
| Source | server/modules/<module> | you | you | you |
| Build | build | Any build step | Any cleaning step | cleanBuild |
| Module build | build/modules/<module> | module | N/A | :server:modules:<module>:clean |
| Staging | build/staging | :server:deployApp :server:modules:<module>:deployModule | :server:modules:<module>:undeployModule | :server:cleanStaging :server:cleanDeploy |
| Deploy | build/deploy | :server:deployApp :server:modules:<module>:deployModule | :server:modules:<module>:undeployModule | :server:cleanDeploy |
Application Build Steps
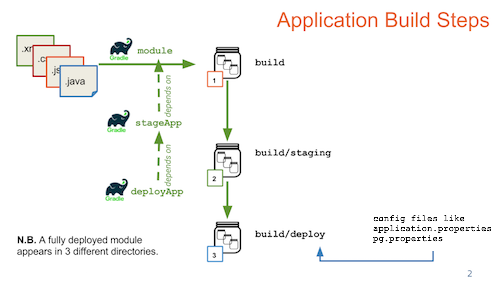
Source code is built into jar files (and other types of files) in a module's build directory. The result is a .module file, which contains potentially several jar files as well as other resources used by the module. This .module file is copied from the module's build directory into the staging directory and from there into the deploy directory. This is all usually accomplished with the './gradlew deployApp' command. The 'deployApp' task also configures and copies the application.properties file to the deploy directory.
Module Build Steps
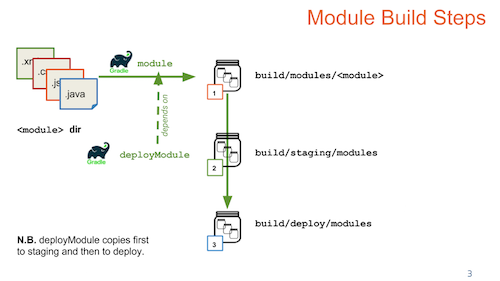
A single module is deployed using the './gradlew deployModule' command. This command will create a .module file in the module's build directory, then copy it first into the staging modules directory and then into the deploy modules directory.
Build Tasks
A few important tasks:| Gradle Taskooooooooooooooooooooooooooooooooo | Description |
|---|---|
| gradlew tasks | Lists all of the available tasks in the current project. |
| gradlew pickPg or gradlew pickMSSQL | Use the pickPg task to configure your system by merging the settings in your pg.properties file with the application.properties template. This task is run the first time you build LabKey, and again any time you modify properties. See below. If you are using Microsoft SQL Server use the task pickMSSQL and file mssql.properties instead. |
| gradlew deployApp | Build the LabKey Server source for development purposes. This is a development-only build that skips many important steps needed for production environments, including GWT compilation for popular browsers, gzipping of scripts, production of Java & JavaScript API documentation, and copying of important resources to the deployment location. Builds produced by this command will not run in production mode. |
| gradlew :server:modules:wiki:deployModule or server/modules/wiki>gradlew deployModule | For convenience, every module can be deployed separately. If your changes are restricted to a single module then building just that module is a faster option than a full build. Example, to build the wiki module: 'gradlew :server:modules:wiki:deployModule'. |
| gradlew deployApp -PdeployMode=prod | Build the LabKey Server source for deployment to a production server. This build takes longer than 'gradlew deployApp' but results in artifacts that are suitable and optimized for production environments. |
| gradlew cleanBuild | Delete all artifacts from previous builds. This should be used sparingly as it requires Gradle to start all over again and not capitalize on the work it's done before. |
| gradlew stopTomcat | Can be used to stop the server if IntelliJ crashes or can't shutdown LabKey for some reason. |
| gradlew projects | Lists the current modules included in the build. |
| gradlew :server:test:uiTest | Open the test runner's graphical UI. |
| gradlew :server:test:uiTest -Psuite=DRT | Run the basic automated test suite. |
pickPg
Use the pickPg task to configure your system before you run the server the first time, and any time you change either of the component files later. This task takes the contents of two files:- <LK_ENLISTMENT>/server/configs/pg.properties
- <LK_ENLISTMENT>/server/configs/application.properties
- <LK_ENLISTMENT>/build/deploy/embedded/config/application.properties
If you are using Microsoft SQL Server use the task pickMSSQL and file mssql.properties instead.
Parallel Build Feature
To improve performance, the LabKey build is configured by default to use Gradle's parallel build feature. This is controlled by these properties in the gradle.properties file:org.gradle.parallel=true
org.gradle.workers.max=3
Exclude Specific Gradle Tasks
If you want to build without completing all build tasks, such as without overwriting the application.properties file, you can use "-x" syntax to exclude a task. Find out specific tasks using:gradlew tasks