The data processing pipeline performs long-running, complex processing jobs in the background. Applications include:
- Automating data upload
- Performing bulk import of large data files
- Performing sequential transformations on data during import to the system
Users can configure their own pipeline tasks, such as configuring a
custom R script pipeline, or use one of the predefined pipelines, which include study import, MS2 processing, and flow cytometry analysis.
The pipeline handles queuing and workflow of jobs when multiple users are processing large runs. It can be configured to provide notifications of progress, allowing the user or administrator to respond quickly to problems.
For example, an installation of LabKey Server might use the data processing pipeline for daily automated upload and synchronization of datasets, case report forms, and sample information stored at the lab level around the world.
Topics:
View Data Pipeline Grid
The Data Pipeline grid displays information about current and past pipeline jobs. You can add a
Data Pipeline web part to a page, or view the site-wide pipeline grid:
- Site-Wide Pipeline:
- Select > Site > Admin Console.
- Under Management, click Pipeline.
- Project or Folder Pipeline:
- Use a Data Pipeline web part or:
- Select > Go to Module > Pipeline.

The pipeline grid shows a line for each current and past pipeline job. Options differ by permissions and scope, but may include:
- (Grid Views), (Charts and Reports), (Export) grid options are available as on other grids.
- Click Process and Import Data to initiate a new job in a container.
- Use Setup to change file permissions, set up a pipeline override, and control email notifications.
- Select the checkbox for a row to enable Retry, Delete, Cancel, and Complete options for that job.
- Click (Print) to generate a printout of the status grid.
Initiate a Pipeline Job
- From the pipeline status grid in a container, click Process and Import Data. You will see the current contents of the pipeline root. Drag and drop additional files to upload them.
- Navigate to and select the intended file or folder. If you navigate into a subdirectory tree to find the intended files, the pipeline file browser will remember that location when you return to import other files later.
- Click Import.
Cancel a Pipeline Job
To cancel a pipeline job, select the checkbox for the intended job and click
Cancel. The job status will be set to "CANCELLING" while the server attempts to interrupt the job, killing database queries (Postgres only) or external processes (R or Python scripts, external analysis tools, etc.). Once the job has halted, its status will be set to "CANCELLED".
Note that any child processes launched by external processes (for example, a python script executed by an R script executed by the server) will not be killed even though the job may be marked as "CANCELLED". These may need to be terminated manually to avoid continuing to consume resources.
Delete a Pipeline Job
To delete a pipeline job, click the checkbox for the row on the data pipeline grid, and click
(Delete). You will be asked to confirm the deletion.

If there are associated experiment runs that were generated, you will have the option to delete them at the same time via checkboxes. In addition, if there are no usages of files in the pipeline analysis directory when the pipeline job is deleted (i.e., files attached to runs as inputs or outputs), we will delete the analysis directory from the pipeline root. The files are not actually deleted, but moved to a ".deleted" directory that is hidden from the file-browser.
Use Pipeline Override to Mount a File Directory
You can configure a
pipeline override to identify a specific location for the storage of files for usage by the pipeline.
Set Up Email Notifications (Optional)
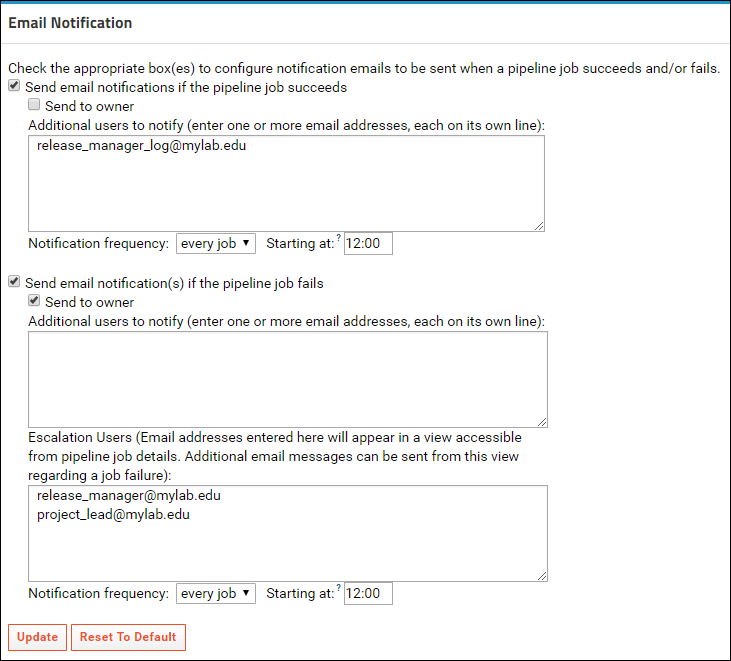
If you or others wish to be notified when a pipeline job succeeds or fails, you can configure email notifications at the site, project, or folder level. Email notification settings are inherited by default, but this inheritance may be overridden in child folders.
- In the project or folder of interest, select Admin > Go To Module > Pipeline, then click Setup.

- Check the appropriate box(es) to configure notification emails to be sent when a pipeline job succeeds and/or fails.
- Check the "Send to owner" box to automatically notify the user initiating the job.
- Add additional email addresses and select the frequency and timing of notifications.
- In the case of pipeline failure, there is a second option to define a list of Escalation Users.
- Click Update.
- Site and application administrators can also subscribe to notifications for the entire site.
- At the site level, select Admin > Site > Admin Console.
- Under Management, click Pipeline Email Notification.
Customize Notification Email
You can customize the email notification(s) that will be sent to users, with different templates for failed and successful pipeline jobs. Learn more in this topic:
In addition to the standard substitutions available, custom parameters available for pipeline job emails are:
| Parameter Name | Type | Format | Description |
|---|
| dataURL | String | Plain | Link to the job details for this pipeline job |
| jobDescription | String | Plain | The job description |
| setupURL | String | Plain | URL to configure the pipeline, including email notifications |
| status | String | Plain | The job status |
| timeCreated | Date | Plain | The date and time this job was created |
| userDisplayName | String | Plain | Display name of the user who originated the action |
| userEmail | String | Plain | Email address of the user who originated the action |
| userFirstName | String | Plain | First name of the user who originated the action |
| userLastName | String | Plain | Last name of the user who originated the action |
Escalate Job Failure
Once
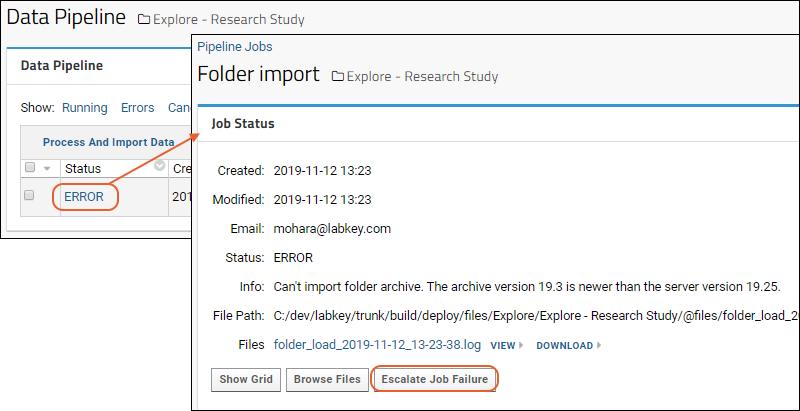
Escalation Users have been configured, these users can be notified from the pipeline job details view directly using the
Escalate Job Failure button. Click the
ERROR status from the pipeline job log, then click
Escalate Job Failure.

Related Topics
 The pipeline grid shows a line for each current and past pipeline job. Options differ by permissions and scope, but may include:
 If there are associated experiment runs that were generated, you will have the option to delete them at the same time via checkboxes. In addition, if there are no usages of files in the pipeline analysis directory when the pipeline job is deleted (i.e., files attached to runs as inputs or outputs), we will delete the analysis directory from the pipeline root. The files are not actually deleted, but moved to a ".deleted" directory that is hidden from the file-browser.


