6: Build the Android App |
2025-07-02 |
This topic is under construction.
- 6.1 Introduction
- 6.2 Requirements
- 6.3 Steps to Pull Code from GitHub
- 6.4 Initial Setup
- 6.5 Apply Your Branding
- 6.6 Steps to Install Android app
- 6.7 Create the Android App Build
- 6.8 Next Steps
- Appendix: Build at the Command Line
6.1 Introduction
This topic explains how to setup the FDA MyStudies Android app and install and run it on an Android device. This is section 6 of the overall setup process covered in: FDA MyStudies: Technical Setup Document6.2 Requirements
6.2.1 IDE Environment Setup
Download Android Studio from the following link and set up the environment.6.2.2 Android OS Support
- The application can be run on Android OS right from the Nougat version and up to Android 10.
6.3 Steps to Pull Code from GitHub
- a. After setting up the IDE environment do integrate the GIT version control system.
- b. Copy the app’s source code link from the GitHub repo.
- c. Open Android Studio and go to File > New > Project from version control > Git. This will open a window and then copy the link to the Git Repository URL field.
- d. Set the path to which the project has to be cloned in the Parent Directory field.
- e. Give Directory name in Directory Name field.
- f. Click on the Clone button which will download the source code, and the user can open the 'MyStudies' source code in the new window.
6.4 Initial Setup
6.4.1 App Setup
Create apikey.properties file in the home directory of the project and add the following details (for the android.bundleid, refer to section: 3.2.3):apikey="android.bundleid:android.apptoken"
app_id_key="applicationId"
app_id_value="xxxx"
org_id_key="orgId"
org_id_value="xxxx"
study_id="xxxx"
base_url_wcp_server= "https://wcp_base_url/StudyMetaData/"
base_url_registration_server="https://registration_sever_base_url/fdahpUserRegWS/"
base_url_response_server="https://response_server_base_url/"
6.4.2 Push Notification Setup
- a. Go to your Firebase project.
- b. Set up push notifications for Android.
- c. Download the JSON file and replace the google-services.json file in the app/src/fda directory.
- d. Send the Server Key (from Cloud Messaging section of Firebase) to App Properties API.(REFER SECTION 4.3.2)
6.4.3 Update the Map Key
Update the map key (com.google.android.maps.v2.API_KEY) in Android Manifest file in app/src/main directory and app/src/fda directory**6.5 Apply Your Branding
- AppIcon & Launch Screen: To update these, the following changes have to make in src/fda directory:
- a) Replace ic_launcher.png in mipmap-hdpi, mipmap-mdpi, mipmap-xhdpi, mipmap-xxhdpi, mipmap-xxxhdpi directories with respective resolutions for App icon updates.
- b) Replace fda_logo1.png, fda_logo2.png in drawable-560dpi, drawable-xhdpi, drawable-xxhdpi, drawable-xxxhdpi directories with respective resolutions for updating launch screen logos and update the activity_splash.xml file in the layout directory for launch screen UI.
- Change Display Information & App Introduction Changes: There are some informational content items in the app that can be directly changed at file level, and not required to be changed at the code level. Look for file strings.xml in the values directory and change information appropriate to your application including App Introduction screen text.
6.6 Steps to Install Android App
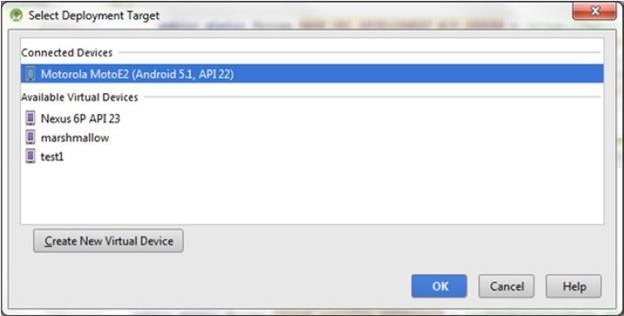
The app can be installed to the device or emulator from Android Studio by clicking on the Run button in the Menu bar, which will open a window asking you to choose between emulator and device.
6.7 Create the Android App Build
- a. First increment the versionName and versionCode in the build.gradle file in App Directory from Project Explorer.
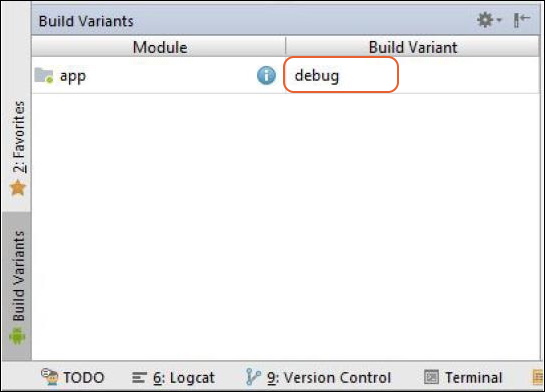
- b. Click on Build Variants in Android Studio and click on the area where debug text is displayed.
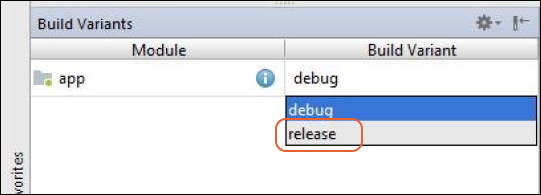
- c. Select the release option from the list.
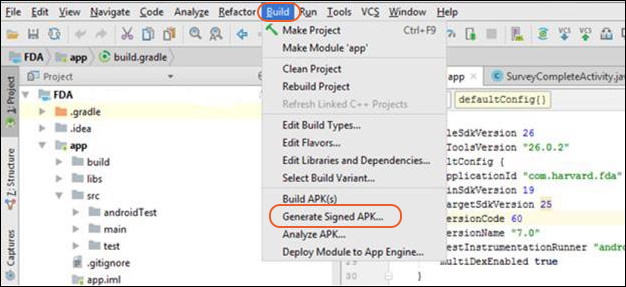
- d. Click on Build from the menu bar and select Generate Signed APK.
- e. Download the keystore.jks from the following link <Keystore Location>
- f. In the new window opened enter the details about keystore:
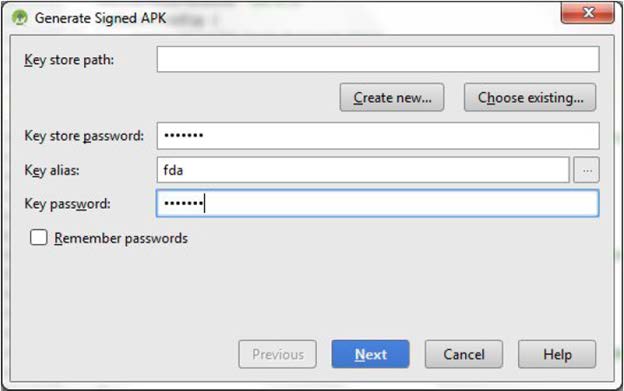
- Key store path: Browse to the path of the downloaded keystore by clicking the Choose existing... button.
- Enter Key store password.
- Key alias: fda
- Enter Key password.
- Click the Next button.
- g. In the new window enter the details:
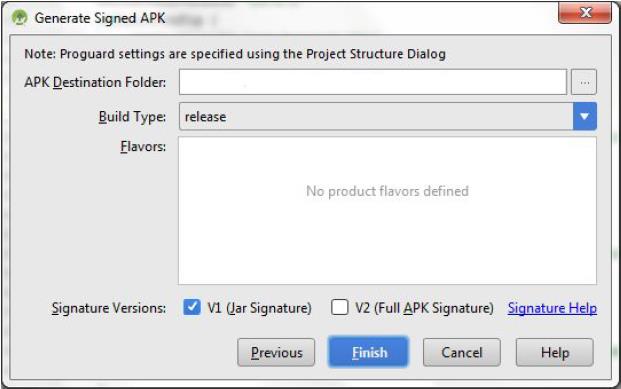
- Enter the APK Destination Folder to which the build will be generated.
- Select release as Build Type
- Select the check box V1(Jar Signature)
- Click Finish, which will generate the Android build.
6.8 Next Steps
Continue with set up in the main document.Appendix: Build at the Command Line
It may be desirable to build your Android app at the command line, particularly for use with automation. This next section will serve as a brief overview and basic example of building and testing the app in this way.The Android app repo uses gradle to execute builds. Gradle operates on a self-bootstrapping basis, meaning that you do not specifically need to install gradle beforehand, as gradle will take care of "installing itself" the first time you run the build. Other LabKey projects also use gradle, and you can learn more about using gradle with LabKey in this section of the LabKey Server documentation (opens in a new tab): Gradle Build Overview
Setting up to build on Windows is not covered in detail in this guide.
Appendix.1 Set Up the Android SDK
You'll need the Android SDK from either the "Android Studio" desktop app or the "commandline-tools".Ensure that the Android SDK license is accepted. The license acceptance process is specific both to the OS you're using and to how you installed the Android SDK. And as such, is not specifically covered by this guide. You will need to have accepted the Android SDK/Android Studio licenses to proceed.- Attempting to build without accepting the licenses results in error messages like the one below:
You have not accepted the license agreements of the following SDK components: [Android SDK Platform 23, Android SDK Build-Tools 23.0.1]. Before building your project, you need to accept the license agreements and complete the installation of the missing components using the Android Studio SDK Manager.
Appendix.2 Ensure Gradlew is Executable
Building is done using the gradlew script. On platforms other than Windows, to ensure this script is executable, run:chmod a+x ./gradlew
./gradlew tasks
Appendix.3 Set Environment Variables
Set the $ANDROID_HOME environment variable. The value of this environment variable is specific both to the OS you're using and to how you installed the Android SDK. Determining the path to your Android SDK is not covered by this guide.Ensure that the $JAVA_HOME environment variable is set correctly. At time of writing, this repo expects to use JDK version 1.8/8Running ./gradlew build without setting the $JAVA_HOME environment variable results in error messages like the one below:FAILURE: Build failed with an exception.
* What went wrong:
Could not create an instance of type org.gradle.initialization.DefaultSettings_Decorated.
> Could not initialize class org.codehaus.groovy.runtime.InvokerHelper
Appendix.4 Configure Code Signing for the App
Code signing for the app must be configured. Learn more in the official documentation on the Android developer site:Appendix.5 Build the App
If your goal is simply to determine if the project builds at all, you can now run gradle with ./gradlew build without filling in apikey.properties.- You'll find the resultant .apk files under the app/build/outputs/apk/fda/debug and app/build/outputs/apk/fda/release directories.
- These .apk files are explicitly untracked in the repo as is common for binary artifacts, so you won't see them in git status after building them.
./gradlew build