This topic is under construction.
4.1 Getting Started
The User Registration web services are built on the LabKey environment. To start this project, you need to set up a LabKey development machine. The link given below will guide you through this process:
Once the LabKey development environment is set up, clone the GitHub repositories such as 'UserReg-WS' into the /server/modules folder. (If checked out into a different folder/name please update path in settings.gradle, build.gradle of distributions folder and commands accordingly.)
Switch to the primary branch and then do a
git pull.
4.2 Build
4.2.1 User Registration Web Services
In your settings.gradle file, find the commented out lines with this text:
// The line below is an example of how to include a single module
//include ":server:modules:workflow"
Underneath this line, add these two lines:
include ":server:modules:UserReg-WS"
include ":server:modules:UserReg-WS:distributions:Registration"
, use the below command:
gradlew cleanBuild deployApp

Once the build is successful, click the
icon in your IDE.
Use this link to ping the local server after it is started, to verify that the web services are running locally:
http://localhost:8080/labkey/fdahpUserRegWS/ping.api
To open the LabKey home page of the (local) User Registration server, use:
To generate a production build, use the following commands:
gradlew deployApp -PdeployMode=prod
gradlew -PdeployMode=prod :server:modules:UserReg-WS:distributions:Registration:distribution
Once the build is completed, you will find the distribution file at the path given below, where <LABKEY_HOME> is the root folder where you have cloned the LabKey code:
- <LABKEY_HOME>/dist/Registration
To deploy the UserReg-WS module to the production server, please refer to:
4.3 Multiple App Support
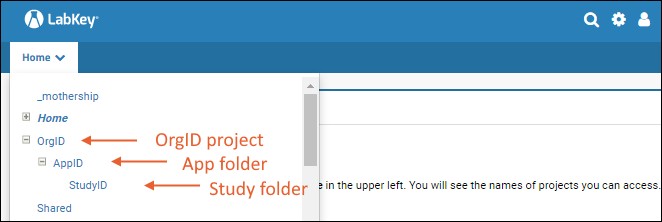
The MyStudies platform supports multiple apps with a single deployment. The User-Reg server follows a specific project and folder structure (Org project, App folder, and Study folder) to handle all the data accordingly:
- A Project named for the Organization (OrgID) with
- A Folder inside it for each App (AppID) plus
- One or more Study folder(s) within these (StudyID).
The data is sent by the mobile application to the specific Study folder that matches this three level naming structure.
4.3.1 Folder Creation
The following steps describe the folder creation process for the user registration server. The folder hierarchy to be followed is: Org folder -> App folder -> Study folder.
The App folder will hold all the app-level data, and the Study folder will store all the study-level data. The Org folder helps identify the organization to which the apps and inherent studies belong. Users can be assigned permissions to the various hierarchies of folders, as required, using the LabKey
user management features.
Note:
For the User-reg server to handle App & Study level data, the following steps need to be followed before publishing the study:
- Folder creation: If a study with a new OrgId and AppId is created in WCP server, then the Org, App, and Study Folders should be created on the User Registration server, with OrgId, AppId, and StudyId as the names respectively.
- If a study with an already existing AppId (and thus OrgId) is created in WCP server, then only the Study Folder needs to be created within it.
- Note that for a production/live environment (as well as a staging environment) access to data can be restricted as required by controlling access to the server and user permissions on the LabKey folders.
- Also note that there is no change required in the folder creation process on the Response Server.
- Firing App Properties API: More about this is given in the last part of this document.
Following are the steps to create the folders in the User Registration server and steps to view the data on the server:
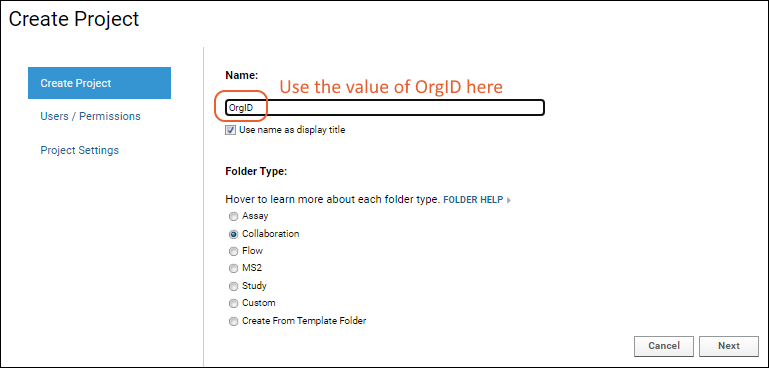
Step 1: Create a project for the organization if one does not already exist. The name must be the same as the value of OrgID used on the WCP. Choose folder type "Collaboration" and accept other defaults.
 Step 2
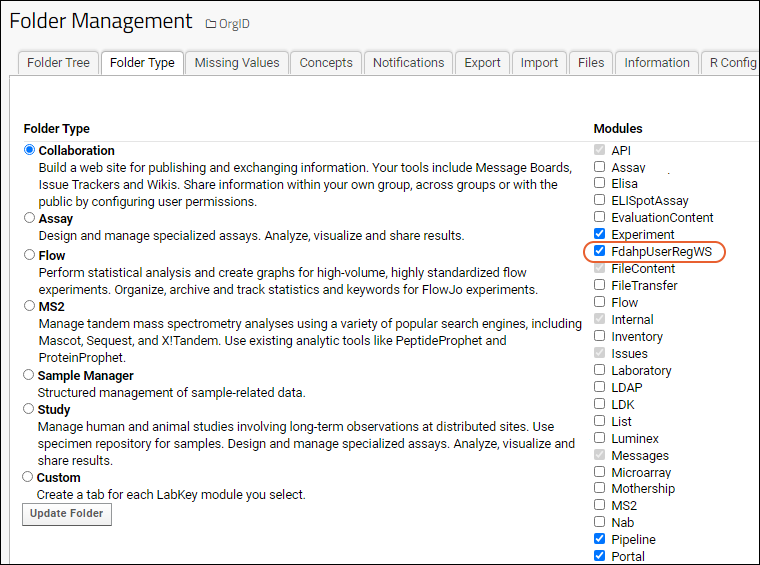
: Select
(Admin) > Folder > Management, click the
Folder Type tab and make sure that the
FdahpUserRegWS module is checked.
 Step 3
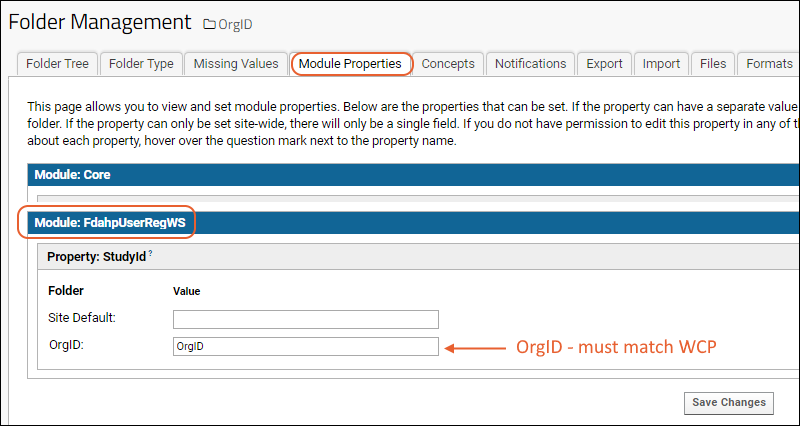
: Still in the folder management section, click the
Module Properties tab and add the
OrgID as used on the WCP in the value of
StudyId for the new project you just created, also named with the "OrgID" used on the WCP. Save this change.
 Step 4
: In the project, create a subfolder to hold all the data for this app - each organization may have one or more AppIDs in use on the WCP. For each one, you need a folder named the same as the "AppID". Use the "Collaboration" type and accept other defaults.
Step 5: Select
(Admin) > Folder > Management, click the
Folder Type tab and make sure that the
FdahpUserRegWS module is checked. Click the
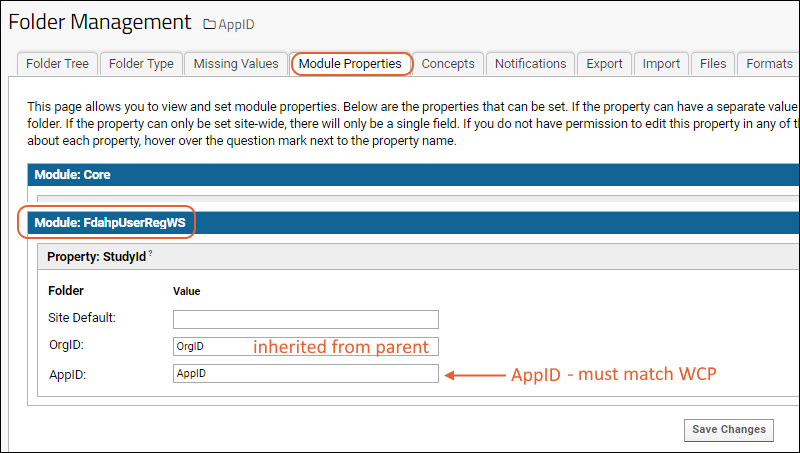
Module Properties tab and add the
AppID of the application in the value of
StudyId for the new folder you just created, also named AppID. Save this change.
 Step 6
: Next, within the AppID folder, create a subfolder to hold all the study level data. The name of this folder must be the same as the "StudyID" used on the WCP. Use the "Collaboration" type and accept other defaults.
Step 7: In the new folder, select
(Admin) > Folder > Management, click the
Folder Type tab and make sure that the
FdahpUserRegWS module is checked. On the
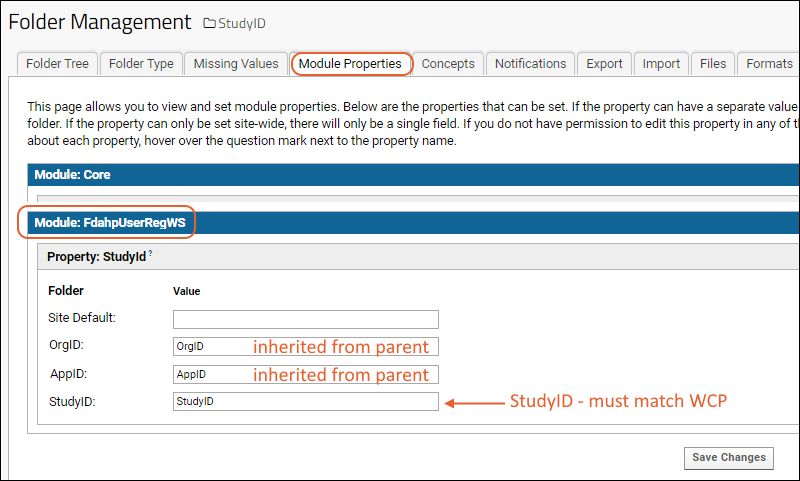
Module Properties tab, enter the StudyID value used on the WCP as the value of
StudyId for the new folder also named the same StudyID value.
 Step 8
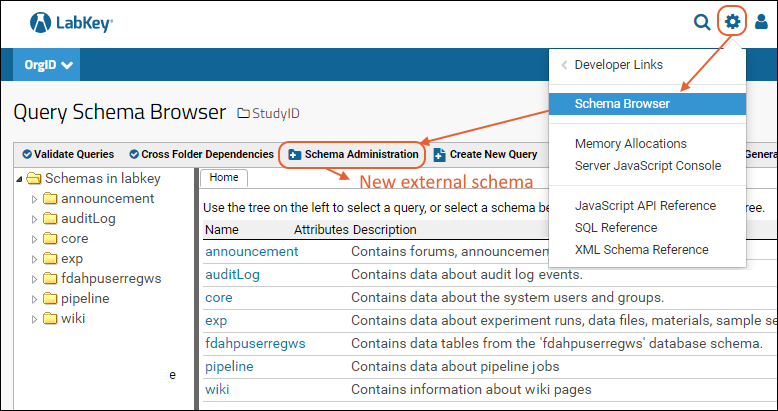
: To view the data, create external schemas. Select
> Developer Links > Schema Browser. Click
Schema Administration, then
New External Schema.
 Step 9
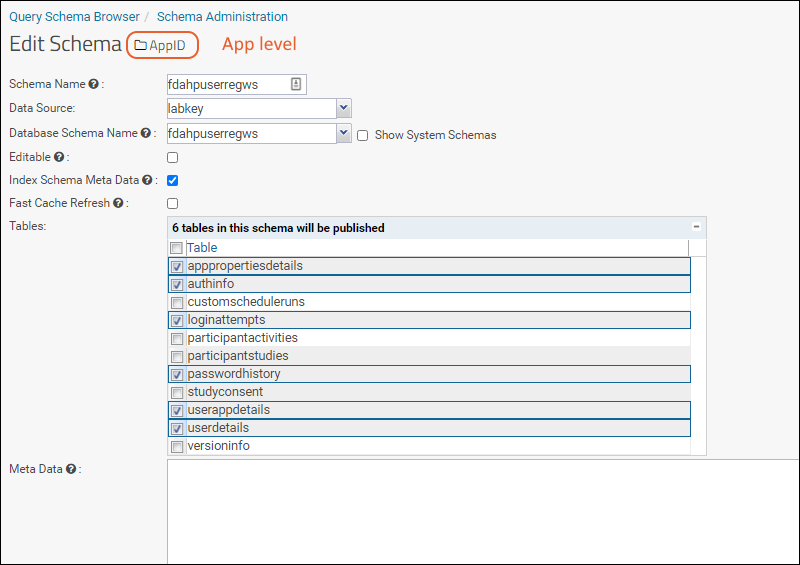
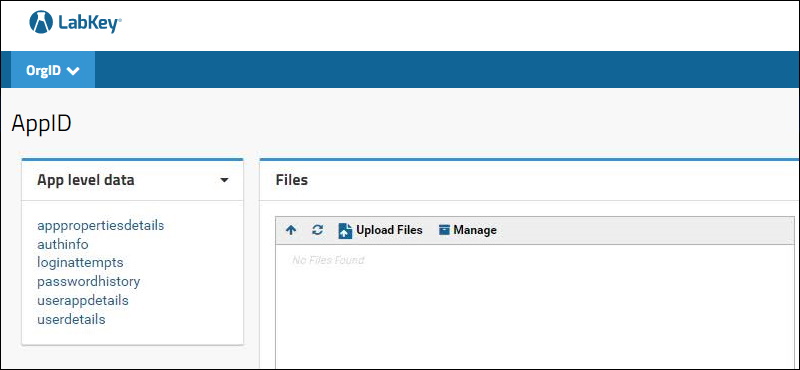
: Enable the below tables in the schema to view app level data (i.e. at the AppID level):
- apppropertiesdetails
- authinfo
- loginattempts
- passwordhistory
- userappdetails
- userdetails
 Step 10
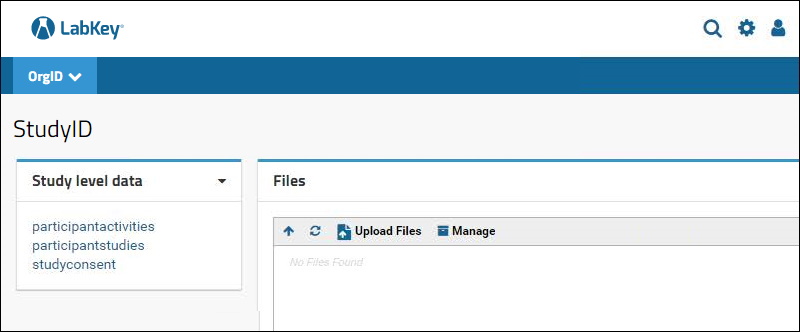
: Enable the below tables in the schema to view study level data (i.e. in the StudyID subfolder):
- participantactivities
- participantstudies
- studyconsent
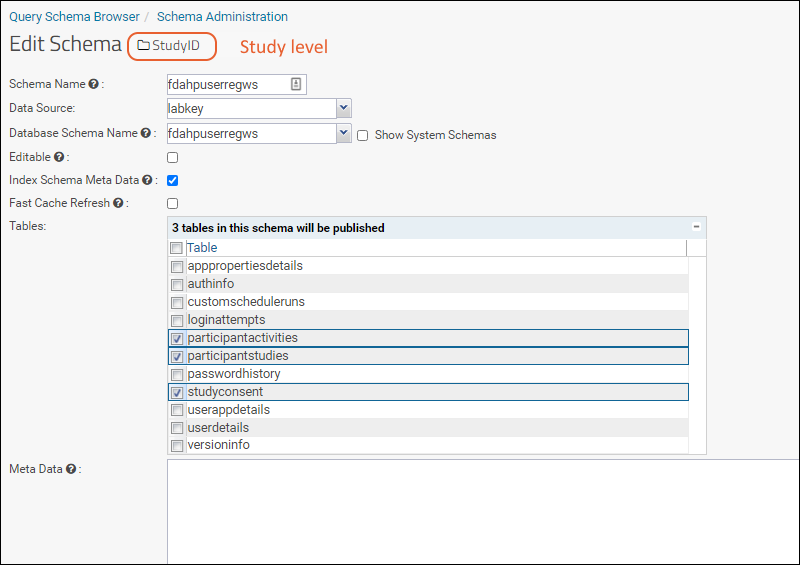 Step 11
: Add a
Query web part and choose the schema to view the data. Add a
Files web part to view the associated files. Do this at both the project level (App level data) and subfolder level (Study level data). The two levels are shown below:
4.3.2 App Properties API
If a new app is created in the WCP server, i.e., if a new App ID is introduced, then the following API should be called manually before publishing the study and after creating the Org, App, and Study level folders in the User Reg server. This API helps to populate the user registration server with app-specific data and files required to operate the mobile apps. Please ensure the API is loaded with values as applicable to your app.
Note that the platform will be enhanced in the future to provide an interface in the WCP for managing such app-level properties and content and automating the transfer of these values to the user registration server with the API. That is one of the objectives of the MAMO feature.
The API’s generic template is provided below for reference:
POST: {Base url of user-Reg-WS}/fdahpUserRegWS/appPropertiesUpdate.api
Content-Type: application/json
{
"appId": "", // app ID
"orgId":"", // org ID
"androidBundleId":"", // Android app package name
"androidServerKey":"", // Android push notification (fcm) server key
"iosBundleId":"", // iOS app bundle id
"iosCertificate":"", // base64 format text of iOS push notification certificate
"iosCertificatePassword":"", // password of the certificate
"email":"", // email from which mail needs to be sent
"emailPassword":"", // password of the mail id (Not required for production environment)
"registerEmailSubject":"", // email subject for signup mail
"registerEmailBody":"<html><body><div style='margin:20px; padding:10px; font-family: sans-serif; font-size: 14px;'><span>Hi, </span><br/><br/><span>Thank you for registering with us! We look forward to having you on board and actively taking part in<br/>research studies conducted by
xxxxxx. </span><br/><br/><span>Your sign-up process is almost complete. Please use the verification code provided below to<br/>complete the Verification step in the mobile app. </span><br/><br/><span><strong>Verification Code:</strong>
<<< TOKEN HERE >>> </span><br/><br/><span>This code can be used only once and is valid for a period of 48 hours only. </span><br/><br/><span>Please note that registration (or sign up) for the app is requested only to provide you with a <br/>seamless experience of using the app. Your registration information does not become part of <br/>the data collected for any study housed in the app. Each study has its own consent process <br/> and no data for any study will be collected unless and until you provide an informed consent<br/> prior to joining the study </span><br/><br/><span>For any questions or assistance, please write to <a>
Contact Email Address</a> </span><br/><br/><span style='font-size:15px;'>Thanks,</span><br/><span>The
xxxxxx Team</span><br/><span>----------------------------------------------------</span><br/><span style='font-size:10px;'>PS - This is an auto-generated email. Please do not reply. </span></div></body></html>", // email subject for signup mail, replace ‘
xxxxxx’ with your organization’s name that is offering the app, or other suitable text.
"forgotPassEmailSubject":"", // email subject for 'Password Help' email
"forgotPassEmailBody":"<html><body><div style='margin:20px;padding:10px;font-family: sans-serif; font-size: 14px;'><span>Hi,</span><br/><br/><span>Thank you for reaching out for password help.</span><br/><br/><span>Here is a temporary password which you can use to sign in to the
(app name) App.<br/> You will be required to set up a new password after signing in.</span><br/><br/><span><strong>Temporary Password:</strong>
<<< TOKEN HERE >>> </span><br/><br/><span>Please note that this temporary password can be used only once and is valid for a period of 48 hours only.</span><br/><br/><span>For any questions or assistance, please write to <a>
Contact Email Address </a> </span><br/><br/><span style='font-size:15px;'>Thanks,</span><br/><span>The
xxxxxx Team</span><br/><span>----------------------------------------------------</span><br/><span style='font-size:10px;'>PS - This is an auto-generated email. Please do not reply. If you did not request password help, please visit the app and change your password as a precautionary measure. </span></div></body></html>" // email Body for Password Help email, replace ‘
xxxxxx’ with your organization’s name that is offering the app, or other suitable text.
"feedbackEmail":"", // email to which 'feedback' mail needs to be sent
"contactUsEmail":"", // email to which 'contact us' mail needs to be sent
"appName":"", // name of the application
"methodHandler":false
}
Important Notes:
- The body of the emails need to be in HTML format and the <<< TOKEN HERE >>> part represents the identifier for the verification code or temporary password dynamically generated for that email.
- All fields in the API are mandatory.
After setting up the folder structure and calling the API as described above, publish the study from the WCP application, and start using the mobile app.
Next Steps
Continue the setup instructions in the
main document
Related Topics
 Once the build is successful, click the icon in your IDE.Use this link to ping the local server after it is started, to verify that the web services are running locally:
 Step 2: Select (Admin) > Folder > Management, click the Folder Type tab and make sure that the FdahpUserRegWS module is checked.
 Step 3: Still in the folder management section, click the Module Properties tab and add the OrgID as used on the WCP in the value of StudyId for the new project you just created, also named with the "OrgID" used on the WCP. Save this change.
 Step 4: In the project, create a subfolder to hold all the data for this app - each organization may have one or more AppIDs in use on the WCP. For each one, you need a folder named the same as the "AppID". Use the "Collaboration" type and accept other defaults.Step 5: Select (Admin) > Folder > Management, click the Folder Type tab and make sure that the FdahpUserRegWS module is checked. Click the Module Properties tab and add the AppID of the application in the value of StudyId for the new folder you just created, also named AppID. Save this change.
 Step 6: Next, within the AppID folder, create a subfolder to hold all the study level data. The name of this folder must be the same as the "StudyID" used on the WCP. Use the "Collaboration" type and accept other defaults.Step 7: In the new folder, select (Admin) > Folder > Management, click the Folder Type tab and make sure that the FdahpUserRegWS module is checked. On the Module Properties tab, enter the StudyID value used on the WCP as the value of StudyId for the new folder also named the same StudyID value.
 Step 8: To view the data, create external schemas. Select > Developer Links > Schema Browser. Click Schema Administration, then New External Schema.
 Step 9: Enable the below tables in the schema to view app level data (i.e. at the AppID level):
 Step 10: Enable the below tables in the schema to view study level data (i.e. in the StudyID subfolder):
 Step 11: Add a Query web part and choose the schema to view the data. Add a Files web part to view the associated files. Do this at both the project level (App level data) and subfolder level (Study level data). The two levels are shown below:
