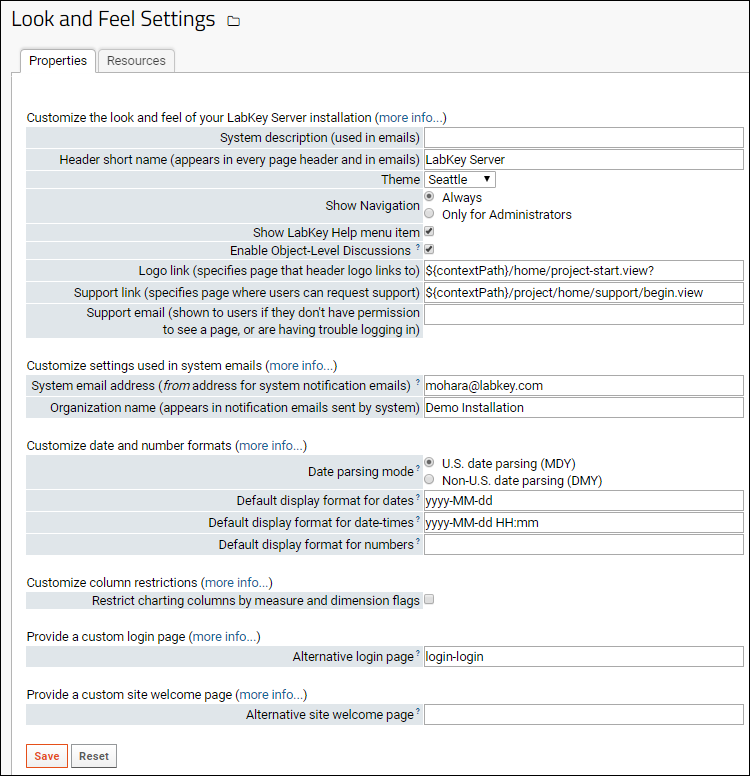
The overall look and feel of your LabKey Server can be set at the site level, then further customized at the project level as desired. Settings selected at the project-level supersede the broader site-level settings. For example, each project can have a custom string included in emails generated (such as the project name).
Site-Level Settings
To customize the
Look and Feel settings at the site level:
- Go to (Admin) > Site > Admin Console.
- Click the Admin Console Links tab.
- Under Configuration, click Look and Feel Settings.

Settings on the
Properties tab are set and cleared as a group; the settings on the
Resources tab are set and cleared individually.
Properties Tab
Customize the Look and Feel of Your LabKey Server Installation
- System description: A brief description of your server that is used in emails to users.
- Header short name: Specifies the name of your server as it appears in the page header and in system-generated emails. By default, this property is set to LabKey.
- Theme: Specifies the color scheme for your server. Learn more here.
- Show Navigation: Select the conditions under which the project and folder menus are visible. Options: always, or only shown to administrators.
- Show LabKey Help menu item: Specifies whether to show the built in "Help" menu.
- Enable Object-Level Discussions: Specifies whether to show "Discussion >" links on wiki pages and reports. If object-level discussions are enabled, users must have "Message Board Contributor" permission to participate.
- Logo link: Specifies the page that the logo in the page header section of the web application links to. By default: /labkey/project/home/home.view The logo image is provided on the resources tab.
- Support link: Specifies page where users can request support.
- Support email: Email address to show to users to request support with issues like permissions and logins.
Customize Settings Used in System Emails
- System email address: Specifies the address which appears in the From field in administrative emails sent by the system.
- Organization name: Specifies the name of your organization, which appears in notification emails sent by the system.
Customize Date and Number Formats
Customize Column Restrictions
Provide a Custom Login Page
- Alternative login page: To provide a customized login page to users, point to your own HTML login page deployed in a module. Specify the page as a string composed of the module name, a hyphen, then the page name in the format: <module>-<page>. For example, to use a login HTML page located at myModule/views/customLogin.html, enter the string 'myModule-customLogin'. By default, LabKey Server uses the login page at modules/core/resources/views/login.html which you can use as a template for your own login page. For more details and examples see Modules: Custom Login Pages.
Provide a Custom Site Welcome Page
- Alternative site welcome page (site-level setting only): The relative URL of the page, either a full LabKey view or simple HTML resource, to be loaded as the welcome page. The welcome page will be loaded when a user loads the site with no action provided (i.e. https://www.labkey.org). This is often used to provide a splash screen for guests. Note: do not include the contextPath in this string. For example: /myModule/welcome.view to select a view within the module myModule, or /myModule/welcome.html for a simple HTML page in the web directory of your module. Remember that the module containing your view or HTML page must be enabled in the Home project.
Save and Reset
- Save: Save changes to all properties on this page.
- Reset: Reset all properties on this page to default values.
Resources Tab
- Header logo (optional): Specifies the custom image that appears in every page header in the upper left. 147 x 56 pixels.
- Favorite icon (optional): Specifies an icon file (*.ico) to show in the favorites menu or bookmarks. Note that you may have to clear your browser's cache in order to display the new icon.
- Custom stylesheet: Custom CSS stylesheets can be provided at the site and/or project levels. A project stylesheet takes precedence over the site stylesheet. Resources for designing style sheets:
Project Settings
To customize or project settings, controlling
Look and Feel at the project level, plus custom menus and file roots:
- Navigate to the project home page.
- Go to (Admin) > Folder > Project Settings.

The project-level settings on the
Properties and
Resources tabs nearly duplicate the site-level options enabling optional overrides at the project level. One additional project-level property is:
- Security defaults: When this box is checked, new folders created within this project inherit project-level permission settings by default.
Menu Bar Tab
You can add a custom menu at the project level. See
Add Custom Menus for a walkthrough of this feature.
Files Tab
This tab allows you to optionally configure a project-level file root, data processing pipeline, and/or shared file web part. See
Set File Roots.
Related Topics
