Field Editor |
2025-06-30 |
This topic explains how to use the field editor tool to create and customize fields in Sample Types, Sources, and Assay designs.
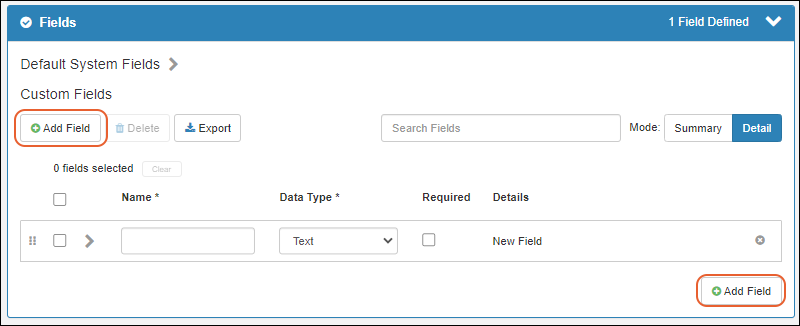


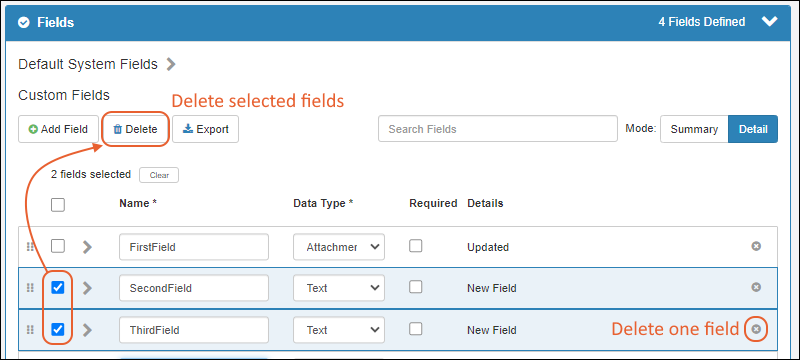 To delete a single field, you can click the .
 In both cases, you will be reminded that deleting a field also deletes any data stored in it. Confirm the deletion if you want to proceed.


 In Summary mode, you see a grid of fields and properties, not all of which are relevant to Sample Manager usage. Scroll for more columns. Instead of having to expand panels to see things like whether there is a URL or formatting associated with a given field, the summary grid makes it easier to see and search large sets of fields at once.You can add new fields, delete selected fields, and export fields (selected or all) while in summary mode. Click to switch back to Detail if you want to edit field properties.
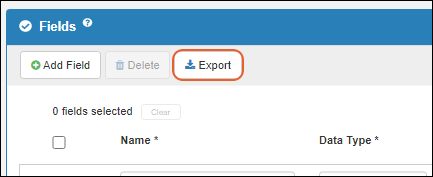 A Fields_*.fields.json file describing your fields as a set of key/value pairs will be downloaded. All properties that can be set for a field in the user interface will be included in the exported file contents.You can use this file as a template to generate a set of field definitions for import elsewhere.
- Create New Fields
- Edit, Rearrange, and Delete Fields
- Add/Edit Field Properties
- Sample Fields: Editable for Samples, Aliquots or Both
- Name and Linking Options
- Conditional Formatting and Validation Options
- Advanced Settings
- View Fields in Summary Mode
- Export Sets of Fields (Domains)
Create New Fields
Import or Infer Fields from File
When creating a sample type, source type, or assay design, you'll have the option to:- import fields from a specially prepared JSON file, OR
- infer them from an example data spreadsheet matching the structure of your data.
Manually Define Fields
To use the Field Editor to create a new set of fields and their properties manually, click Manually Define Fields.- Open the field editor.
- Click Manually Define Fields (or get started by importing or inferring fields, which will prepopulate the manual editor).
- To define a new field, click Add Field.
- Give the field a Name. Field names can contain a combination of letters, numbers, and underscores, should not contain spaces, and should start with a letter or underscore.
- Use the menu to select the Data Type. The set of data types available may vary with your configuration and each has a different set of properties you can set. Once you have saved fields, you can only make limited changes to the type.
- You can use the checkbox if you want to make it required that that field have a value in every row.
- Continue to add any new fields you need - one for each column of your data.
- Click the Finish Creating.../Save... button to save and exit the editor.
Edit Fields
To edit fields, reopen the editor and make the changes you need. If you attempt to navigate away with unsaved changes you will have the opportunity to save or discard them. When you are finished making changes, click Save.Once you have saved a field or set of fields, you can change the name and most options and other settings. However, you can only make limited changes to the type of a field. For example, you can change among text types, but cannot change a text field into a number or a boolean.Rearrange Fields
To change field order, drag and drop the rows using the six-block handle on the left.Delete Fields
To one or many fields, select them using the checkboxes and click Delete. You can use the checkbox at the top of the column to select all fields in the section.Save Fields
Click Save when finished.Add/Edit Field Properties
Each field can have additional properties defined. The properties available vary based on the field type. To open the properties for a field, click the icon on the right (it will become a handle for closing the panel).Fields of different types include some or all of these sections:- Sample Fields Only: Editable for Samples, Aliquots or Both
- Type-specific options for formatting values: See types in the field properties reference.
- Text and integer fields can be marked as barcode fields.
- Name and Linking Options
- Validation Options
Sample Fields: Editable for Samples, Aliquots or Both
Fields in Sample Type definitions can specify whether they should be settable/editable for Samples, Aliquots, or both.- Under Sample/Aliquot Options, select one:
- Editable for samples only (default): Aliquots will inherit the value of the field from the sample.
- Editable for aliquots only: Samples will not display this field, but it will be included for aliquots.
- Separately editable for samples and aliquots: Both samples and aliquots can set a different value for this property. Note that if you change an existing Sample Type field from "Editable for samples only" to this "Separately editable for samples and aliquots" option, any stored values for aliquots will be dropped.
Name and Linking Options
All types of fields allow you to set the following properties:- Description: An optional text description. This will appear in the hover text for the field you define.
- Label: Different text to display in column headers for the field. This label may contain spaces. The default label is the Field Name with camelCasing indicating separate words. For example, the field "firstName" would by default be labelled "First Name".
- Import Aliases: Define alternate field names to be used when importing from a file to this field. Multiple aliases may be separated by spaces or commas. To define an alias that contains spaces, use double-quotes (") around it.
- URL: Use this property to change the display of the field value within a data grid into a link. Multiple formats are supported, which allow ways to easily substitute and link to other locations in LabKey. Learn more about using URL Formatting Options.
Conditional Formatting and Validation Options
Conditional Formatting is available for most fields when using the LabKey LIMS and Biologics LIMS applications, and when Sample Manager is used with a Premium Edition of LabKey Server. Conditional formatting will display values with color or text highlighting in grids and detail views when those values meet certain criteria. Learn more in this topic: Validation Options are offered on most fields. String-based fields offer regular expression validation. Numeric, date, and user fields offer range expression validation.Create Regular Expression Validator
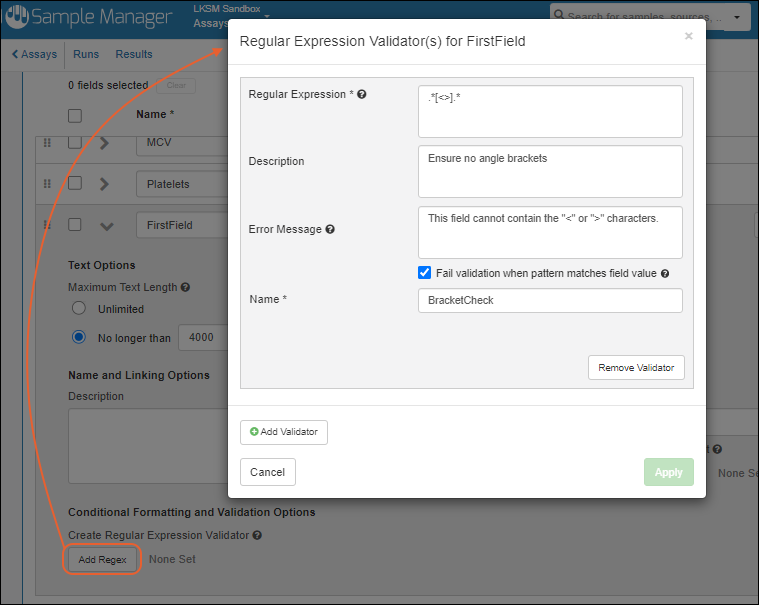
- Click Add Regex to open the popup.
- If you don't see this option, it is not supported for your field type.
- If any regex validators are defined, you'll also see a link showing the number active and the button will read Edit Regex.
- Enter the Regular Expression that this field's value will be evaluated against. All regular expressions must be compatible with Java regular expressions as implemented in the Pattern class.
- Description: Optional description.
- Error Message: Enter the error message to be shown to the user when the value fails this validation.
- Check the box for Fail validation when pattern matches field value in order to reverse the validation: With this box unchecked (the default) the pattern must match the expression. With this box checked, the pattern may not match.
- Name: Enter a name to identify this validator.
- You can use Add Validator to add a second condition. The first panel will close and show the validator name you gave. You can reopen that panel using the (pencil) icon.
- Click Apply when your regex validators for this field are complete.
- Click Save or Finish in the editor.
Create Range Expression Validator
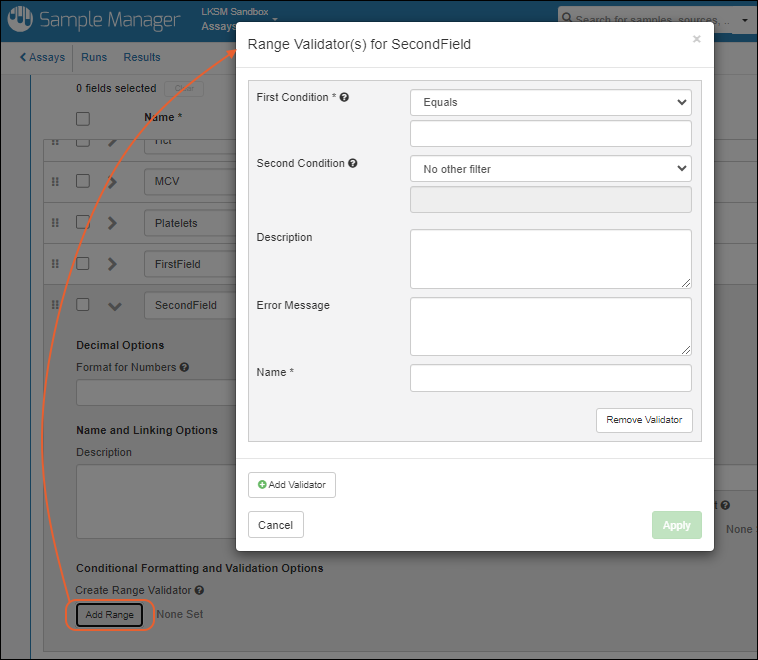
- Click Add Range to open the popup.
- If you don't see this option, it is not supported for your field type.
- If any range validators are defined, you'll also see a link showing the number active and the button will read Edit Ranges.
- Enter the First Condition that this field's value will be evaluated against. Select a comparison operator and enter a value.
- Optionally enter a Second Condition.
- Description: Optional description.
- Error Message: Enter the error message to be shown to the user when the value fails this validation.
- Name: Enter a name to identify this validator.
- You can use Add Validator to add a second condition. The first panel will close and show the validator name you gave. You can reopen that panel using the (pencil) icon.
- Click Apply when your range validators for this field are complete.
- Click Save or Finish in the editor.
Advanced Settings
When using Sample Manager with a Premium Edition of LabKey Server, you may see additional options in the field editor that are not covered in this topic. For more information about these options, please see the companion topics in the LabKey Server documentation:View Fields in Summary Mode
In the upper right, choose the Mode:- Detail: Fields can be expanded to edit properties.
- Summary: Only a summary of fields are shown; limited editing is available.
Export Sets of Fields (Domains)
Once you have defined a set of fields (domain) that you want to be able to save or reuse, you can export it by clicking (Export).If you want to only export a subset of the fields included, use the selection checkboxes to select the fields to export.- When any (or all) boxes are checked, only the checked fields are exported.
- If no boxes are checked, all fields will be exported.
 A Fields_*.fields.json file describing your fields as a set of key/value pairs will be downloaded. All properties that can be set for a field in the user interface will be included in the exported file contents.You can use this file as a template to generate a set of field definitions for import elsewhere.
Note that importing fields from a JSON file is only supported when creating a new set of fields. You cannot apply property settings to existing data with this process.
Some field names may differ from what is shown in the UI. For example, derivationDataScope controls whether a sample field is editable for samples, aliquots, or both.
Related Topics
- Field Properties Reference: Type specific formatting and advanced options.
- Barcode Fields