Premium Feature — Available in the Professional Edition of Sample Manager and with the Starter Edition when used with a Premium Edition of LabKey Server.
Learn more or
contact LabKey.
The results of experiments and instrument runs can be uploaded and associated with samples that are registered in the system.
This topic covers how to create a "template" describing each different type of experiment data you will upload. LabKey Sample Manager calls these data descriptions
Assay Designs. All assay data must be associated with a sample, via a field of type "Sample".
Create Assay Design
From the main menu, select
Assays and then click
Create Assay Design. Before any assays have been created, you will see a direct link to "Create an assay design" on the menu. Note that you can only create Assay Designs in the home (top-level) folder. If the creation button is missing, navigate
home first.
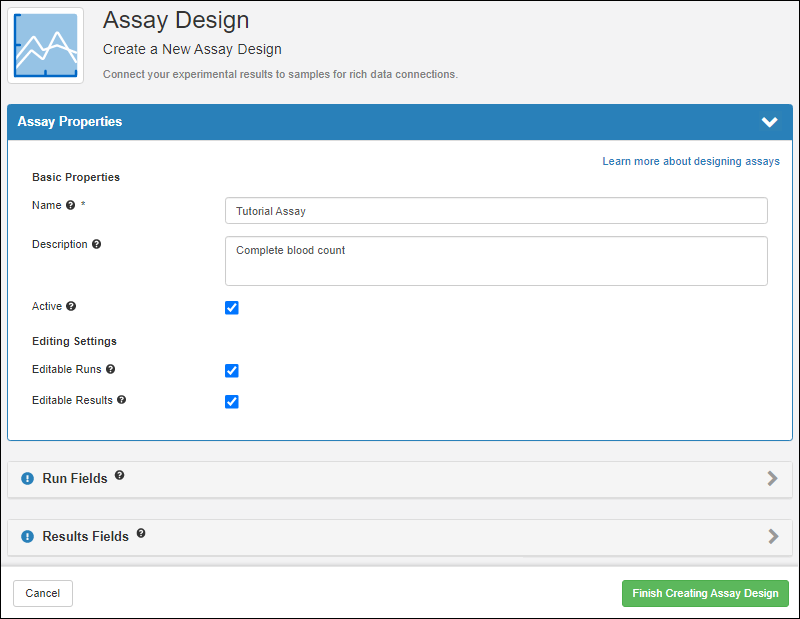
- Give the assay design a Name (Required).
- The name must be unique, must start with a letter or number character, and cannot contain special characters or some reserved substrings listed here.
- Enter a Description to give more information (Optional).
- Active: Check the box for assay designs in active use. When this box is unchecked, the design is archived and hidden in certain views.
- Choose Editing Settings using the checkboxes. Either runs, results, or both can be editable.
- Add the necessary fields and sample mapping described below before clicking Finish Creating Assay Design.
Add Run Fields
Run fields represent information that will be set once per
run of data, such as a spreadsheet of individual result rows uploaded together. All result rows in a run will have the same value for any run fields you define.
- Click the Run Fields section to open it.
- If you have a specially prepared JSON file of field definitions, you can drop it into the Import fields from file panel.
- Otherwise, click Manually Define Fields.
- Use Add Field to add each run field you need (one is created for you).
- Enter a Name (without spaces)
- Select the Data Type.
- To set more properties of the field, click the to expand it.
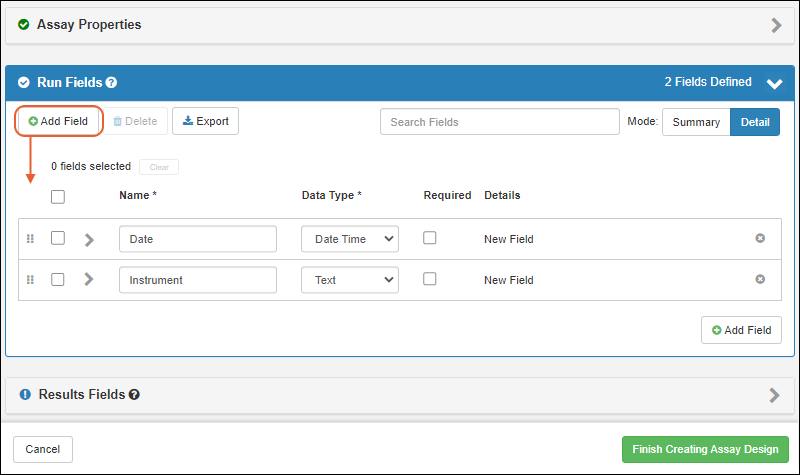
If you add any extraneous fields, delete them by clicking the
.
In addition to any fields you define, each assay design in Sample Manager includes a
Workflow Task run field, which can be used to link assay runs with specific
workflow tasks. If your assay design includes making runs editable, you can also associate runs with workflow tasks after import.
Add Results Fields
Results Fields represent the data information in the spreadsheet. You can define results fields in several ways:
- Upload a sample spreadsheet to infer all the necessary fields. Either drag and drop a file into the upload area, or click within the same area to select a file directly.
- Import a specially designed JSON file containing field definitions by dropping or selecting it in the same panel.
- Click Manually Define Fields below the panel to define fields in the editor.
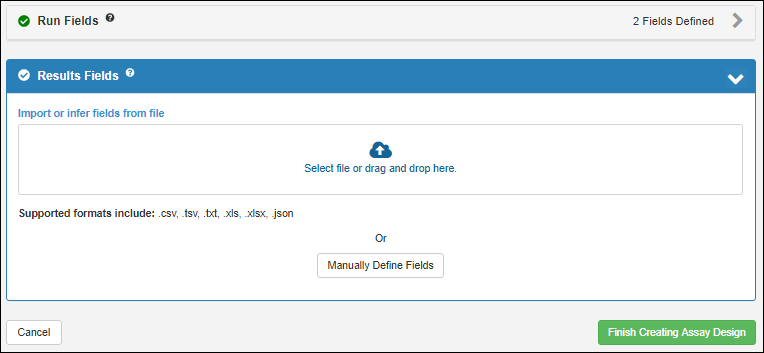
Results fields will be inferred from your upload.
- Note that the data itself will not be imported at this time.
- Once fields have been inferred, you can make changes as needed.
- For example, if your results spreadsheet also includes columns for the run fields you defined, you may need to delete the duplicate fields. Click the to delete a field.
- If your result spreadsheet contains any reserved fields, they will not be shown on the inferral list, but they will always be created. You will see a blue banner indicating this reason for not seeing specific fields from your file.
There must be a field mapping assay data to the sample it represents. If your fields include one named "SampleID", it will be automatically mapped. Otherwise, you will see a blue notice and need to follow the steps in the
next section before clicking
Finish Creating Assay Design for your assay design.
Map to Samples
In order to associate all assay data with the sample it represents, every assay design must included a field which maps to samples in the system. The data type
Sample is used to represent that mapping as a lookup into the Sample Type containing the samples.
After you infer fields, if one of them is named "SampleID" (such as when you use a naming pattern), it will be mapped automatically. If not, you will see a blue message section asking you to map one of the fields to be the Sample Lookup. The pulldown menu will be populated with the results fields that were inferred. If you need to add a new field to provide the sample linkage, use
Add new field. In this example, the SampleID field will be our lookup.
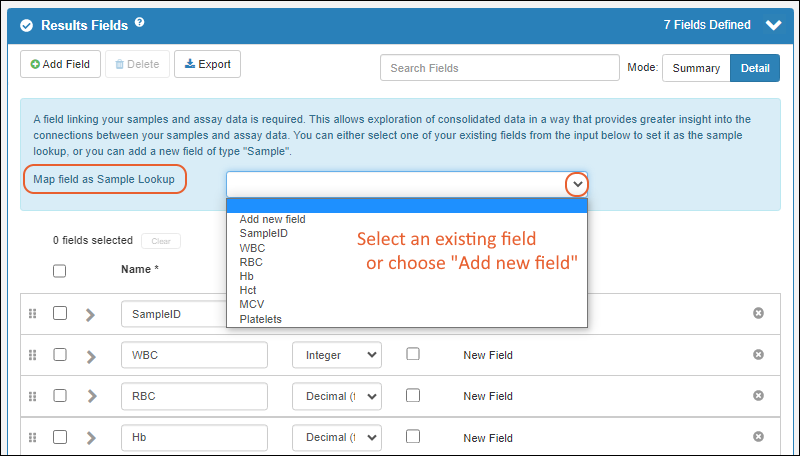
As soon as you select it from the dropdown, the chosen field changes to be of type
Sample and opens the properties panel. Select the desired Sample Type from the dropdown.
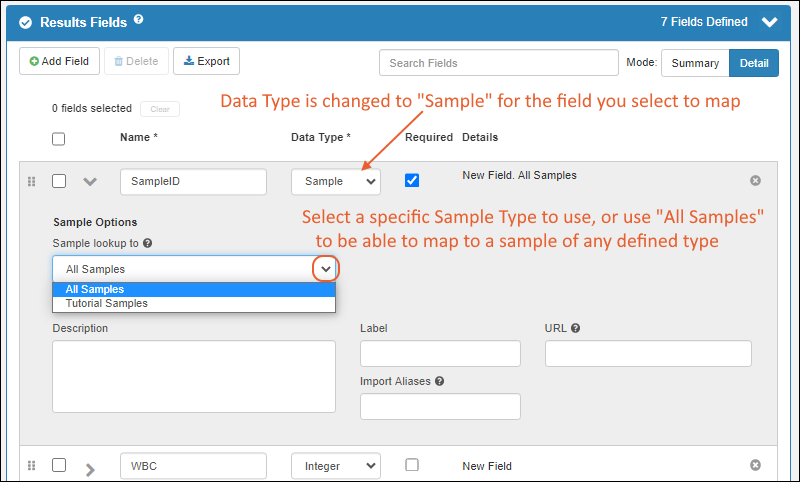
Click
Finish Creating Assay Design in the lower right when finished.
The assay design describing the
structure of assay data has now been created. Note that the actual data contained in the spreadsheet you used to infer fields was
not imported.
Now you can add experiment data that matches this structure and map it to samples and other associated data.
Related Topics