Conditional formats change how data is displayed depending on the value of the data. For example, if temperature goes above a certain value, you can highlight those values using orange. If the value is below a certain level those could be blue. Bold, italic, and strikethrough text can also be used.
Conditional formats are available in LabKey Server, LabKey LIMS, and Biologics LIMS. They are defined as properties of fields using the
Field Editor.
Specify a Conditional Format
To specify a conditional format, open the
field editor, and click to expand the field of interest. Under
Create Conditional Format Criteria, click
Add Format.
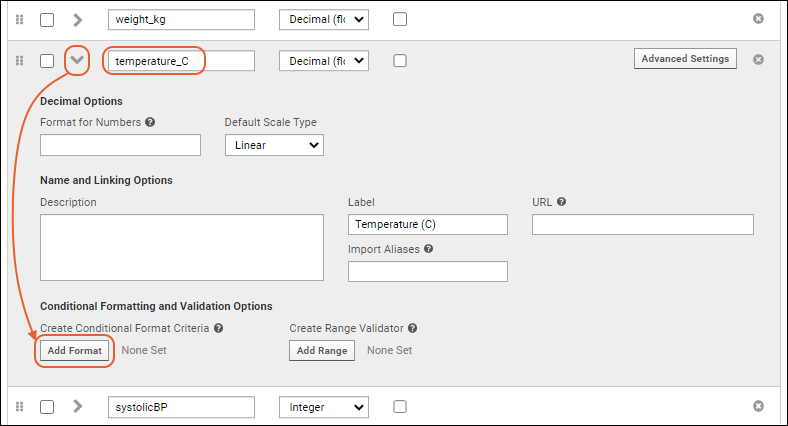
In the popup, identify the condition(s) under which you want the conditional format applied. Specifying a condition is similar to specifying a
filter. You need to include a
First Condition. If you specify a second one, both will be AND-ed together to determine whether a single conditional format is displayed.
Only the value that is being formatted is available for the condition checks. That is, you cannot use the value in column A to apply a conditional format to column B.
Next, you can specify
Display Options, meaning how the field should be formatted when that condition is met.
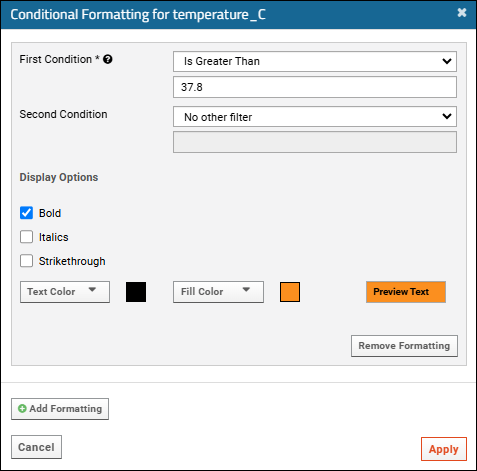
Display options are:
- Bold
- Italic
- Strikethrough
- Colors: Select Text and/or Fill colors. Click a block to choose it, or type to enter a hex value or RGB values. You'll see a box of preview text on the right.

Click
Apply to close the popup, then
Save.
When you view the table, you'll see your formatting applied.
Multiple Conditional Formats
Multiple conditional formats are supported in a single column. Before applying the format, you can click
Add Formatting to add another. Once you have saved an active format, use
Edit Formats to reopen the popup and click
Add Formatting to specify another conditional format. This additional condition can have a different type of display applied.

Each format you define will be in a panel within the popup and can be
edited separately.
If a value fulfills multiple conditions, then the first condition satisfied is applied, and conditions lower on the list are ignored.
For example, suppose you have specified two conditional formats on one field:
- If the value is 40 degrees or greater, then display in bold text.
- If the value is 38 degrees or greater, then display in italic text.
Although the value 40 fulfills both conditions, only the first condition to apply is considered, resulting in bold display.
Example: Conditional Formats for Temperature
In the following example, values out of the normal human body temperature range are highlighted with color if too high and shown in italics if too low. In this example, we use the Physical Exam dataset that is included with the
importable example study.
- In a grid view of the Physical Exam dataset, click Manage.
- Click Edit Definition.
- Select a field (such as temperature in this example), expand it, and click Add Format under "Create Conditional Format Criteria".
- For First Condition, choose "Is Greater Than", enter 37.8.
- Check Bold.
- From the Fill Color drop down, choose orange for this example.
- This format option is shown above.
- Click Add Formatting in the popup before clicking Apply.
- For First Condition of this second format, choose "Is Less Than", enter 36.1.
- Check the box for Italics.
- Choose a blue Fill Color.
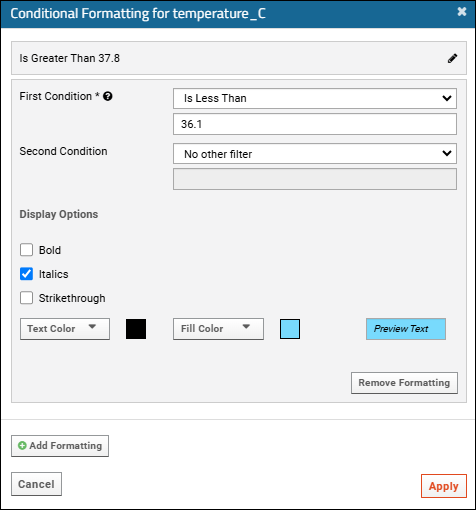
- Click Apply, then Save.
- Click View Data to return to the data grid.
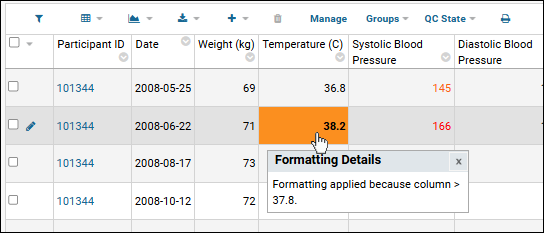
Now temperature values above 37.8 degrees are in bold on orange cells and those below 36.1 are displayed in italics with a blue background.
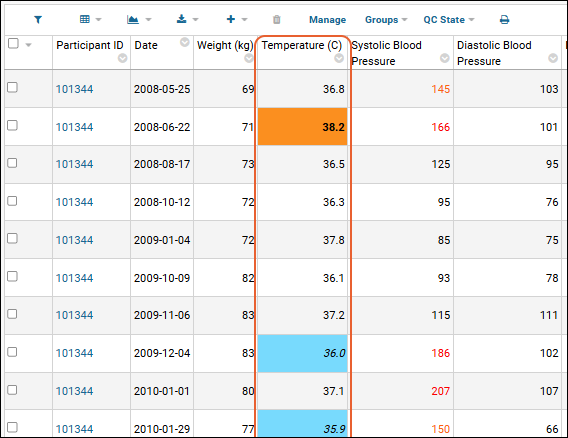
When you hover over a formatted value in the LabKey Server interface, a pop up dialog will appear explaining the rule behind the format. Note that these popups are not available in the LIMS products.
View Conditional Formats in LIMS Products
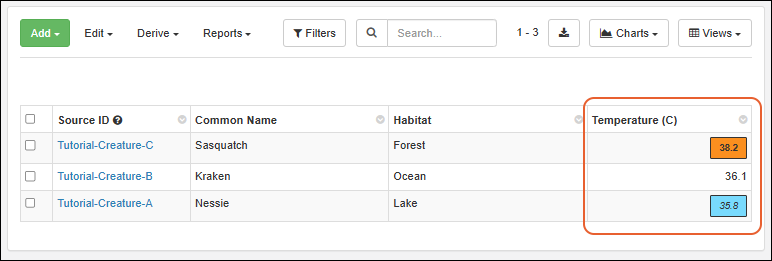
In LabKey LIMS and Biologics LIMS, you use the same mechanism to set formatting as described above. Instead of filling the entire cell, background colors are displayed as a lozenge as shown here.
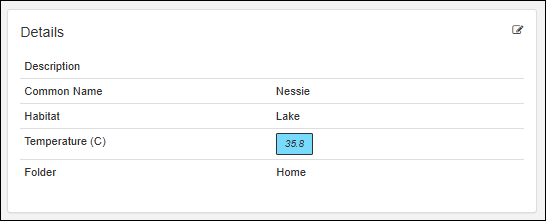
The conditional formatting is also shown in individual details views for an entity:
Related Topics
 Click Apply to close the popup, then Save.
When you view the table, you'll see your formatting applied.
 When you hover over a formatted value in the LabKey Server interface, a pop up dialog will appear explaining the rule behind the format. Note that these popups are not available in the LIMS products.