Security Scenario
Suppose you are collecting data from multiple labs for a longitudinal study. The different teams involved will gather their data and perform quality control steps before the data is integrated into the study. You need to ensure that the different teams cannot see each other's data until it has been added to the study. In this tutorial, you will install a sample workspace that provides a framework of folders and data to experiment with different security configurations.
You configure security by assigning different levels of access to users and groups of users (for a given folder). Different access levels, such as Reader, Author, Editor, etc., allow users to do different things with the data in a given folder. For example, if you assign an individual user Reader level access to a folder, then that user will be able to see, but not change, the data in that folder. These different access/permission levels are called
roles.
Set Up Security Workspace
The tutorial workspace is provided as a folder archive file, preconfigured with subfolders and team resources that you will work with in this tutorial. First, install this preconfigured workspace by creating an empty folder and then importing the folder archive file into it.
- Log in to your server and navigate to your "Tutorials" project. Create it if necessary.
- If you don't already have a server to work on where you can create projects, start here.
- If you don't know how to create projects and folders, review this topic.
- Create a new folder named "Security Tutorial". Accept all defaults.
- Import the downloaded workspace archive into the new folder:
- Select > Folder > Management and click the Import tab.
- Confirm Local zip archive is selected and click Choose File (or Browse) and select the SecurityTutorial.folder.zip you downloaded.
- Click Import Folder.
- When the pipeline status shows "COMPLETE", click the folder name to navigate to it.

Structure of the Security Workspace
The security workspace contains four folders:
- Security Tutorial -- The main parent folder.
- Lab A - Child folder for the lab A team, containing data and resources visible only to team A.
- Lab B - Child folder for the lab B team, containing data and resources visible only to team B.
- Study - Child folder intended as the shared folder visible to all teams.
In the steps that follow we will configure each folder with different access permissions customized for each team.
To see and navigate to these folders in the LabKey Server user interface:
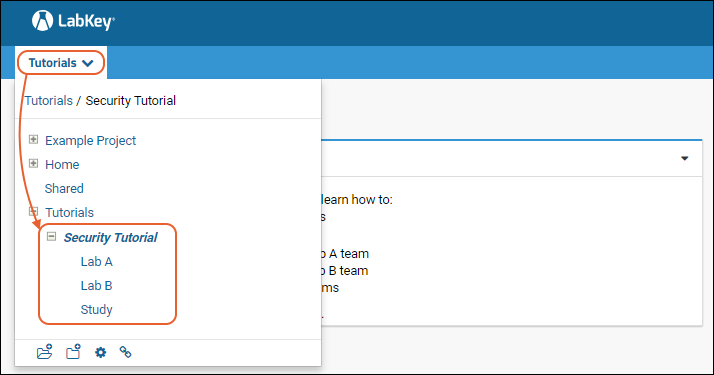
- Hover over the project menu to see the contents.
- Open the folder node Security Tutorial by clicking the expansion button (it will become a ).
- You will see three subfolders inside: Lab A, Lab B, and Study.
- Click a subfolder name to navigate to it.

Configure Permissions for Folders
How do you restrict access to the various folders so that only members of each authorized team can see and change the contents? The procedure for restricting access has two overarching steps:
- Create user groups corresponding to each team.
- Assign the appropriate roles in each folder to each group.
Considering our scenario, we will configure the folders with the following permissions:
- Only the Lab A group will be able to see the Lab A folder.
- Only the Lab B group will be able to see the Lab B folder.
- In the Study folder, Lab A and Lab B groups will have Reader access (so those teams can see the integrated data).
- In the Study folder, a specific "Study Group" will have Editor access (intended for those users working directly with the study data).
To perform this procedure, first create the groups:
- Navigate to the folder Lab A (click it on the project menu).
- Select > Folder > Permissions.
- Notice that the security configuration page is greyed-out. This is because the default security setting, Inherit permissions from parent, is checked. That is, security for Lab A starts out using the settings of its parent folder, Security Tutorial.
- Click the tab Project Groups. Create the following groups by entering the "New group name", then clicking Create New Group.
- Lab A Group
- Lab B Group
- Study Group
- You don't need to add any users to the groups, just click Done in the popup window.
- Note that these groups are created at the project level, so they will be available in all project subfolders after this point.
- Click Save when finished adding groups.
Next assign roles in each folder to these groups:
- Click the Permissions tab.
- Confirm that the Lab A folder is bold, i.e. "current", in the left-side pane.
- Uncheck Inherit permissions from parent.
- Notice that the configuration page is activated for setting permissions different from those in the parent.
- (The asterisk in the left hand pane indicating permissions are inherited won't disappear until you save changes.)
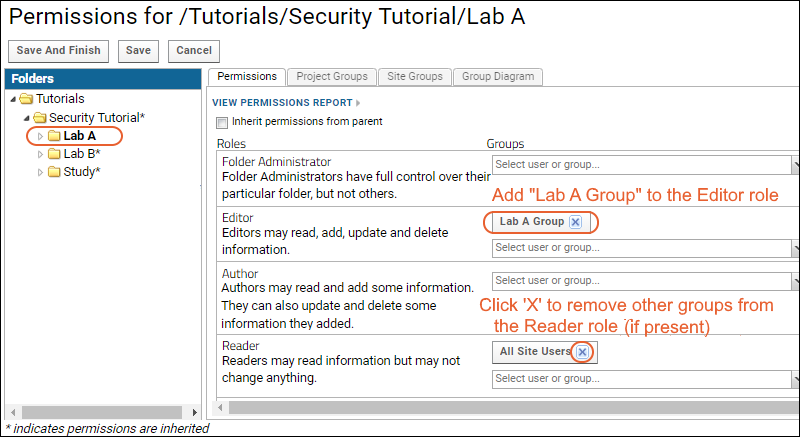
- Locate the Editor role. This role allows users to read, add, update, and delete information in the current folder.
- Open the "Select user or group" dropdown for the Editor role, and select the group Lab A Group to add it.
- Locate the Reader role and remove the All Site Users and Guests groups, if present. Click the X by each entry to remove it. If you see a warning when you remove these groups, simply dismiss it.

- Select the Lab B folder, and repeat the steps:
- Uncheck Inherit permissions from parent.
- Add "Lab B Group" to the Editor role.
- Remove site user and guest groups from the Reader role (if present).
- Click Save.
- Select the Study folder, and perform these steps:
- Uncheck Inherit permissions from parent.
- Add "Study Group" to the Editor role.
- Remove any site user and guest groups from the Reader role.
- Add the groups "Lab A Group" and "Lab B Group" to the Reader role.
- Click Save and Finish.
In a real world application you would add individual users (and/or other groups) to the various groups. But this is not necessary to test our permissions configuration. Group and role "impersonation" lets you test security behavior before any actual users are added to the groups.
In the next step, we'll explore impersonation.
