Sample Types help you organize samples in your lab and allow you to add fields that help you describe attributes of those samples for easy tracking of data. For example, "Blood" samples might have some different properties than "Serum" samples, so could be defined as two different types with different sets of fields.
This topic covers the details of creating and configuring sample types. For a tutorial to help you learn this process, see
Tutorial: Add Samples.
Create a New Sample Type
Create a new Sample Type by clicking
Sample Types on the main header menu, then selecting
Create > Sample Type.

Before any Sample Types have been created, you can also use two quicker pathways: clicking the linked word
here in the empty Dashboard Insights panel, or selecting
Create a sample type from the main menu under Sample Types.

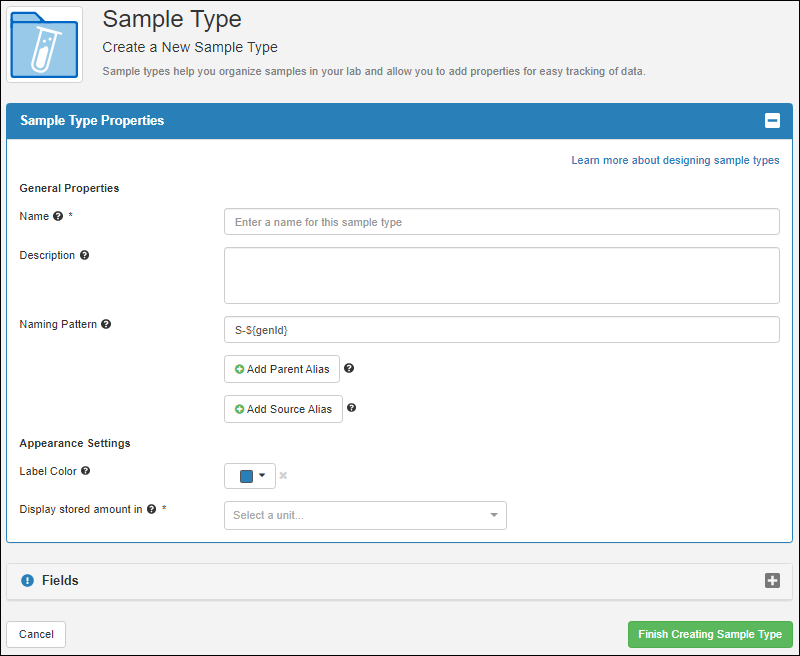
Define Sample Type Properties
- The Name of the Sample Type is required, must be unique, and cannot be changed later.
- Entering a Description is optional. A description can help others understand the usage.
- Naming Pattern: Every sample must have a unique name or identifier, known as a "Sample Id". For each Sample Type, determine whether you will provide these sample IDs or whether you want the system to generate them for you. This decision determines what, if anything, you will enter in the Naming Pattern field. Learn more in this topic: Sample ID Naming.
- If you will provide the sample IDs, and they are in your data in a column named "SampleID", delete the default naming pattern (and ignore the grayed out placeholder text).
- If you will provide the sample IDs, but they are in a column named something other than "SampleID", you provide a naming pattern like this pattern ${COLUMN_NAME}. See below.
- If you want sample identifiers generated for you by the system, provide a naming pattern using the guidance in this topic: Sample ID Naming. A few examples are at the bottom of this page.
- The default naming pattern is "S-${genId}", meaning the letter S followed by an incrementing counter.

- To declare a field that will identify a parent sample, click Add Parent Alias. Enter the field name and select the Sample Type where the parent information will be found. It can be the current type or a different one.
- If there are Sources defined in the system, you will have a similar option to Add Source Alias here.
- Appearance Settings: You can assign a specific Label Color to this type of sample to help make quick visual identification easier in various application views.
- Display stored amount in (Required): Select the units in which you want stored amounts of this sample to be displayed. Options:
- g (grams)
- mg (milligrams)
- kg (kilograms)
- mL (milliliters)
- uL (microliters)
- l (liters)
- unit (for cases where none of the other options are appropriate and each sample is a unit)
- Before you click Finish Creating Sample Type, review the next section and determine whether you need to add Fields.
Define Sample Type Fields
Built-In (Reserved) Fields
Every Sample Type is created with several default fields (columns) built in. You do not add and cannot change these fields; these are "reserved fields" and are always created in a new Sample Type:
- SampleID
- Description: This is a description field for an individual sample, not the description of the Sample Type as a whole that is shown in the properties section.
- Created/CreatedBy: These are populated with the userID and time of creation, respectively.
- Modified/ModifiedBy: These are populated with the userID and time of modification, respectively.
- Stored Amount
- Freeze/Thaw Count
- Storage Status
- Checked Out By
Find a full list of reserved and internal field names in this topic:
Data Import Guidelines
Add New Sample Type Fields
Add any additional fields that you want in your Sample Type definition as follows:
- Click the Fields section to open it.
- If you left the editor, you can return via the Sample Type menu on the right, choosing Edit Sample Type Design.
There are several methods available when adding the first custom fields. The panel opens showing
Import or infer fields from file:
- You can select or drag a spreadsheet containing your data into the upload panel.
- This will populate the fields section based on inferrals from the data.
- Note: If your spreadsheet contains rows for the built-in fields "SampleID" and "Description", delete them from the list to avoid duplicate definitions.
- You can also import field definitions from a prepared JSON file if you have one.
After importing or inferring fields from a file, you can adjust them or add additional fields using the manual method editor described below.
- Instead of using a file, click the text Manually Define Fields and continue.
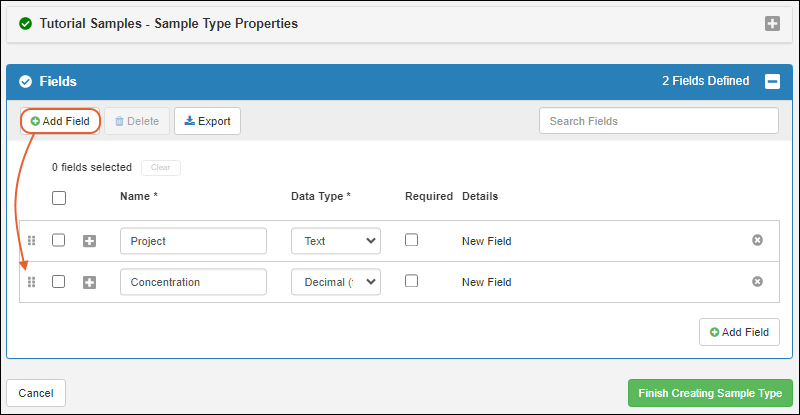
- For each additional field in your sample data, click Add Field:
- Enter the Name. Names should not contain spaces or special characters. Learn more in this topic.
- Select the Data Type. Learn more about types and their properties here.
- Check the box if the field is required.
- Click the (expansion) icon to define more properties of your new field if needed.
- You can reorder the fields by dragging and dropping with the six-block handle.

- Add all the fields you need. If you add an extra and need to delete it, click the on the right.
Finish Creating Sample Type
- Click Finish Creating Sample Type when finished.
Learn more about defining fields and their properties in this topic:
Field Editor.
After creating a new Sample Type, you will see it listed on the main header menu and be able to begin creating samples of this type.
Edit Sample Type Design
If necessary, you can return to edit
properties or
fields/columns later via the
menu. Reopen the Sample Type design for editing by choosing
Edit Sample Type Details from the
menu.

You cannot change the name of the Sample Type, and should use caution if changing the naming pattern to ensure SampleIDs remain unique.
After completing edits, click
Finish Updating Sample Type in the lower right.
Appearance Settings
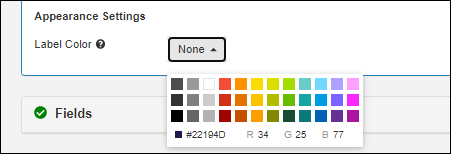
To assign a
Label Color when you are creating or editing your sample type, click the selection area to open a color picker:

- Click a block of color to select it.
- Type a hex code next to the # sign or individual RGB values into the panel for more color control.
Resource: Sample Naming Pattern Examples
A few examples of how you might choose to name your samples and how to construct a naming expression. You can use values from your data, dates, and counters to ensure that every sample name is unique. Separators like '-' and '_' are commonly used but optional.
| Description | Example SampleIDs | Naming Pattern |
|---|
The character 'S' followed by a counter (Default)
(always unique within this type of sample) | S-1
S-2
S-3 | S-${genId} |
| The word 'Blood' followed by a 2 digit counter | Blood-01
Blood-02
Blood-03 | Blood-${genId:number('00')} |
| The value of the "Lab" column + '_' + a counter | LabA_1
LabB_2
LabC_3 | ${Lab}_${genId} |
'S' plus current date followed by a counter that resets daily
(always unique; tracks date of entry into system) | S-20200204-1
S-20200204-2
S-20200205-1 | S-${now:date}-${dailySampleCount} |
'S' plus values from two columns in my data: the Project and ParticipantID
(only unique if one sample per participant) | S-Study101-pt231
S-Study101-pt232
S-Study101-pt233 | S-${Project}-${ParticipantId} |
Values of "ParticipantID" and "Draw Date" columns, then a counter
(always unique and tracks draw date, not date of entry into system) | pt231-20191203-1
pt231-20191214-2
pt231-20191214-3 | ${ParticipantID}-${DrawDate}-${genId} |
| The values already present in the "SampleID" column in my data | unique
values
provided | No naming pattern required |
| The values already present in the "Identifier" column in my data | unique
values
provided | ${Identifier} |
Learn more about building naming patterns in this topic:
Sample ID Naming
Related Topics