This topic is under construction.
5.1 Introduction
This topic covers how to set up the FDA MyStudies iOS app and install and run it on an iPhone. This is section 5 of the overall setup process covered in:
FDA MyStudies: Technical Setup Document
5.2 Requirements
5.2.1 IDE
Xcode 11 and above can be used to run application. You can install Xcode from the Mac App Store.
5.2.2 iOS
The application is supported only on iOS 13 and above versions.
5.3 Xcode Setup
After successful installation of xcode follow below steps:
a. Setup Developer Credentials
- Open Xcode and go to Preferences.
- Click on Accounts on top menu.
- Click on the icon and Choose Apple ID.
- Sign In with Apple developer account.
b. Change Bundle Identifier
- Enter a new bundle identifier for your application.
- Choose Code Signing to “Automatically manage signing” and Xcode will take care of registering the bundle identifier.
c. Enable for Push Notification
Note: To learn more about Xcode and above setup, refer to
Apple's official guide to Xcode Setup
5.4 How to Open Project in Xcode
- Download the project from GitHub or clone.
- To open a project in Xcode go to the project location on your Mac Machine and look for the file named “HPHC.xcworkspace” and double-tap on it.
5.5 How to Change Server URLs
Note: Once your registration is complete and the WCP & Response Server are set up, please follow the below steps.
5.5.1 Set up study and API configuration
After the application is set up on the WCP server and after creating the study (
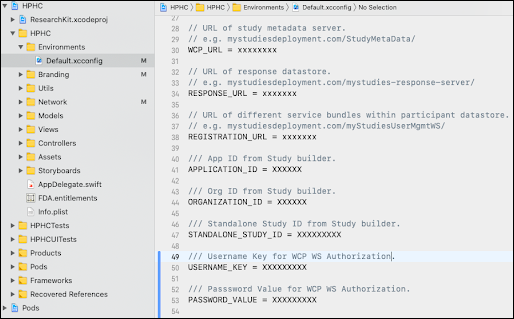
REFER SECTION: 8), you will need to add the following settings in "Default.xcconfig", shown in the image below.
- WCP_URL
- RESPONSE_URL
- REGISTRATION_URL
- APPLICATION_ID
- ORGANIZATION_ID
- STANDALONE_STUDY_ID
- USERNAME_KEY: This is ios.bundleid (Refer to section: 3.2.3)
- PASSWORD_VALUE: This is ios.apptoken (Refer to section: 3.2.3)

5.6 How to Build and Run
The application can be run on an iPhone Simulator OR iPhone Device.

5.6.1 Run on Simulator
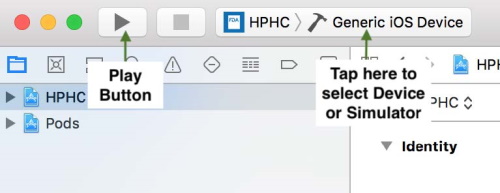
To run on the simulator, select a simulator from the simulator listing and click on the Play button.
5.6.2 Run on Device
To build and run the application on your iPhone device, connect your phone with a power cable to the Mac machine.
The iPhone name will be listed under Device. Select 'iPhone' and click on the Play button.
5.7 How to Set Up a Standalone Study App
Note: You need to create the standalone study on the WCP server first & get the studyID. Once the standalone study setup is finished (REFER SECTION: 8) please follow the steps below:1. Open the project workspace in Xcode.
2. Replace the StandaloneStudyId value with studyID in Info.plist
3. Make sure OrganizationID & ApplicationID is same in the Info.plist from the same WCP server.
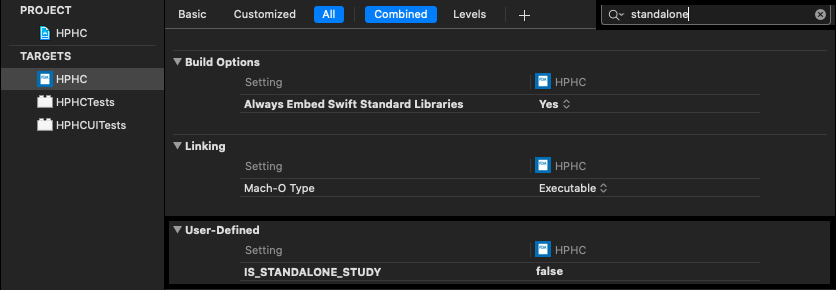
4. Go to main target build settings & look for “standalone”
5. Under User-Defined, set the “IS_STANDALONE_STUDY” value to
true for both debug and release.

6. Build and run the project.
5.8 Apply Your Branding
- AppIcon & Launch Image
- Replace your AppIcon and launch Images into Assets.xcassets under the AppIcon & LaunchImage respectively.
- Change Display Information
- There are some informational content items that can be directly changed at file level and are not required to be changed at the code level.
- Look for file Branding.plist and change information appropriate to your application.
- App Introduction Changes
- App Introduction screen can also be changed at file level.
- Look for GatewayOverview.plist file and change information appropriate to your application.
5.9 Next Steps
Continue with set up in the
main document.
Appendix: Build at the Command Line
It may be desirable to build your MyStudies iOS app at the command line (rather than in the GUI of Xcode) as with CI/CD or other automation. This next section will serve as a brief overview and basic example of building and testing the iOS app using the Xcode CLI tool "xcodebuild". Refer to Github Actions configuration (
.github/workflows/Build-iOS.yml) in the repo when configuring similar CI/CD automation on other platforms.
For the purposes of code validation, valid iOS code-signing is not necessary. Building with valid code-signing falls outside the scope of this guide.
These instructions assume Xcode 11 is being used from
/Applications/Xcode_11.X.app.
Appendix.1 Set Xcode Code-Signing Environment Variables
The primary purpose of these is to disable code-signing:
export CODE_SIGN_IDENTITY=''
export CODE_SIGNING_REQUIRED='NO'
Appendix.2 Set Xcode Architecture Environment Variable
The following environment varaible limits the code to being compiled only for the CPU architecture of the machine running Xcode and is desirable to avoid building for iOS device architectures for the purposes of code validation:
export ONLY_ACTIVE_ARCH='YES'
Appendix.3 Change to the "HPHC" Directory Within the Repo
Some steps of the build process assume that you are in the "HPHC" directory, which is a sub-directory of the root of the repo:
Appendix.4 Build
To build, use
xcodebuild from the HPHC directory. You may need the full path to xcodebuild, and must substitute your platform, OS, and name settings in the -destination argument:
/Applications/Xcode_11.7.app/Contents/Developer/usr/bin/xcodebuild clean build -workspace HPHC.xcworkspace -scheme HPHC -destination "platform=iOS Simulator,OS=13.7,name=iPhone 11"
If you are using a GitHub Actions config instead of including the specific versions in the command string you could define a "matrix.destination" such as:
strategy:
      matrix:
        destination: ["platform=iOS Simulator,OS=13.7,name=iPhone 11"]
Then run, using syntax like:
xcodebuild clean build
  -workspace HPHC.xcworkspace
  -scheme HPHC
  -destination "${{ matrix.destination }}"
Appendix.5 Test
xcodebuild test
            -workspace HPHC.xcworkspace
            -scheme HPHC
            -destination "${{ matrix.destination }}"
References
Related Topics


 6. Build and run the project.