This topic explains how to manually test the enrollment and data submissions methods described in the topic
Mobile Client API.
Assumptions
We assume that you have already completed the following set up steps, all described in the topic
7: Response Server Setup:
- A parent project has been created.
- A subfolder of type 'Mobile App Study' has been created.
- A StudyId has been specified and data submission has been enabled in the subfolder.
- Enrollment tokens have been generated.
Set Up a Test Environment
To set up a testing environment:
- Complete all of the steps above in Assumptions.
- And follow steps below:
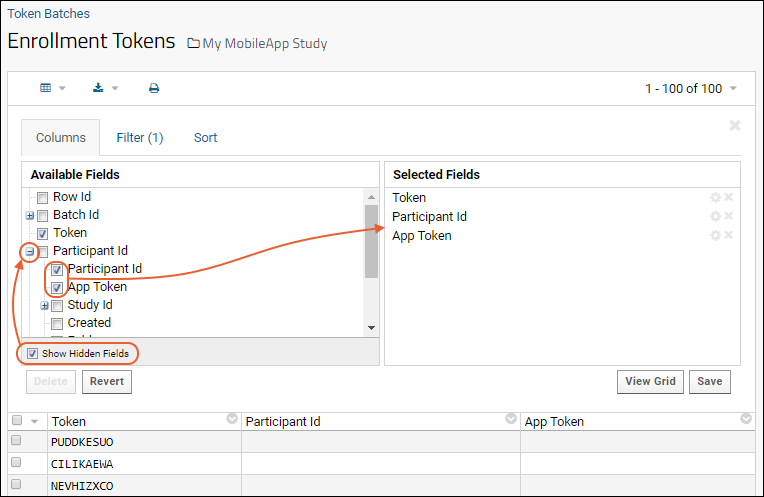
When manually testing the submission method, it is useful to get a complete view of the enrollment tokens, participant ids, and app tokens in one grid. To make this grid do the following:
- Go to the study folder to be tested.
- In the panel Enrollment Token Batches, select a batch of (already generated) enrollment tokens. (Click a value in the Batch Id column.)
- On the Enrollment Tokens grid, select (Grid Views) > Customize Grid.
- Under Available Tokens check the box for Show Hidden Fields.
- Open the node Participant Id, and place checkmarks next to Participant Id and App Token.

- Click Save and save the grid as the default view.
- Now you have a table of available App Tokens to use in testing.
It is also convenient to add the Lists web part and the mobileappstudy schema to your study folder, so you can easily track submitted data and any errors that arise.
- To add the Lists web part:
- Enter > Page Admin Mode.
- In the lower left corner of the page, click the dropdown Select Web Part, and select Lists. Click the Add button. (Before the submission of data there are no Lists yet. Once data has been submitted and processed, the data, partitioned into Lists, will appear here.)
- To add the mobileappstudy schema:
- Again click the dropdown Select Web Part, and select Query.
- For Web Part Title enter 'mobileappstudy'.
- On the Schema dropdown select mobileappstudy.
- Click Submit.
- Click Exit Admin Mode to hide the page editing tools.
Test Enrollment
- To test your set up, enroll a fictional participant in the study by calling an URL like the following.
- For <server>, if you are working on a local machine use 'localhost:8080'. Or substitute the domain name appropriate for your set up, such as 'myserver.labkey.com'.
- For <study-id>, substitute the value you have specified for the target subfolder.
- For <enrollment-token>, substitute one of the enrollment token values generated in that folder.
https://<server>/response-enroll.api?studyId=<study-id>&token=<enrollment-token>
- Successful enrollment will produce a response like the following:
{
   "data" : {
       "appToken" : "2b277794d8f209a05e9259b076362bda"
   },
   "success" : true
}
- Copy the appToken value for further testing. LabKey Server uses this appToken value in all future communications to figure out (1) where to save submitted data and (2) which participant the data pertains to.
Test Data Submission
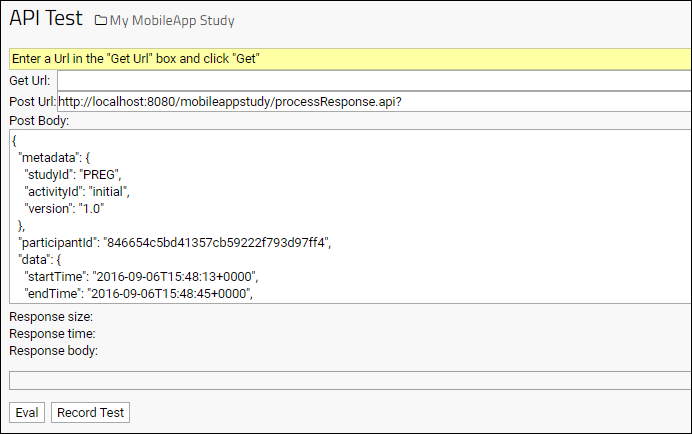
LabKey Server provides a
built-in tool for testing the submission process:
- The built-in tool is located at the following URL, substituting <server> as appropriate to your environment.
- Note: we have also had success testing via the Chrome plugin Postman.
https://<server>/query-APITest.view
- In Post URL enter an URL like the following:
https://<server>/response-processResponse.api
- In Post Body enter the survey responses as a JSON object. Download a sample object is available at: InitialSurvey_v2.2.1.json
- In the JSON object, substitute the participantId value with one of the appTokens (not enrollment token) provided to you on successful enrollment of a participant.

- Click the Post button.
- On successful submission, the Response body panel will display the following:
Withdraw From a Study
When testing is completed, you may wish to delete the test data from the tables so that it is not mixed in with future participant response data. When a participant withdraws from the study, their data will be deleted.
To withdraw the fictional participant, and delete any submitted survey responses, call the action withdrawFromStudy.api, where <appToken> is the appToken for the withdrawing participant.
https://<server>/response-withdrawFromStudy.api?delete=TRUE&participantId=<appToken>
Withdrawing from a study is available in the app inself under
Resources > Leave Study.
Troubleshooting
If your test does not produce a success message, an admin or troubleshooter can check the Response table for possible error status messages:
- Select (Admin) > Go To Module > Query.
- Open the mobileappstudy schema and click the Response table.
- Click View Data.
- Scan or filter the Status column for any errors, and for these, check the Error Message column.
An admin can also check the site error logs:
- Select (Admin) > Site > Admin Console.
- Click View Site Errors Since Reset or View All Site Errors.
- Search from the bottom for the most recent errors and warnings.
To check module properties, go to the container where you expect to see data and select
(Admin) > Folder > Management. Click the
Module Properties tab.
Incorrect Module Properties: MetadataServiceBaseUrl
Error: If you see an Error Message similar to
There were problems storing the configuration. Received response status 400 using uri https://SERVER_NAME/StudyMetaData/activity?%2FparticipantProperties&studyId=STUDYID_001"
: Notice the "%2F" in the path - this encoded slash indicates an incorrect creation of the full URI. Check the setting of the module property "MetadataServiceBaseUrl" to confirm that it ends with "StudyMetaData" and does not end with a question mark.
Incorrect Module Properties: MetadataServiceAccessToken
Error: If you see an error with Response status 401 and a correct-looking path for results including the studyId, like:
https://SERVER_NAME/StudyMetaData/participantProperties?studyId=STUDYID_001"
: Check the module property "MetadataServiceAccessToken" to confirm that it did NOT inadvertently get set to the AppId or StudyId. This property should only have a site-level setting that is an apparently random long string.
Related Topics

