FDA MyStudies Overview
FDA MyStudies: Technical Setup Document
3: WCP and Webservices Setup
4: User Registration Web Services
5: Building the IOS App
6: Build the Android App
7: Response Server Setup
Enrollment Tokens
Previous UI for Response Server Setup
8: WCP - Create New Study
FDA MyStudies Infrastructure Deployment Automation
Install Script Automation
Deployment Automation with Terraform
FDA MyStudies: Release Notes
User Registration Server: Set Up
Mobile Client API
Web Configuration Portal API
WCP - Schemas and Structures
User Registration Server API
Response Server API
Survey Designs and Responses
Data Sharing Consent
Testing the Response Server
Response Processing
Querying the Response Server
External Documentation Resources
FDA MyStudies Overview
The FDA MyStudies platform provides all of the components necessary to support data collection from mobile applications and the storage of collected data in a compliant data environment. This help section contains documentation and links to background information to help you set up and use MyStudies.
The topics below are intended for developers and administrators who wish to set up a MyStudies instance for collecting data from patients. Set up requires the deployment and configuration of the following components:
- the Registration Server where participants sign up and create an account
- the Mobile Client App into which participants enter data
- the Response Server which handles and stores the responses sent by the Mobile App
- the Web Configuration Portal, or "Study Designer", where administrators design research questionnaires
Technical Setup for FDA MyStudies
Begin here:
Response Server Topics
Registration Server Topics
Web Configuration Portal Topics
Topics for Mobile App Developers
FDA MyStudies: Technical Setup Document
This documentation covers the technical setup for the components that make up the FDA MyStudies Mobile Application System. This top level page gives a broad overview; details for each component are covered on linked pages. The system components are:
- the Registration Server where participants sign up and create an account (UserReg-WS)
- the Mobile Client App into which participants enter data (Android or iOS)
- the Response Server which handles and stores the responses sent by the Mobile App (Response)
- the Web Configuration Portal where administrators design research questionnaires (WCP and WCP-WS)
The GitHub repository for this open source project is here:
Sections
1 Introduction
This documentation provides deployment instructions for the FDA MyStudies platform open-source code present in the
FDA-MyStudies GitHub repository. It serves as a deployment guide for technical teams and explains how the different components of the platform can be set up and used.
2 High-Level Technical Architecture
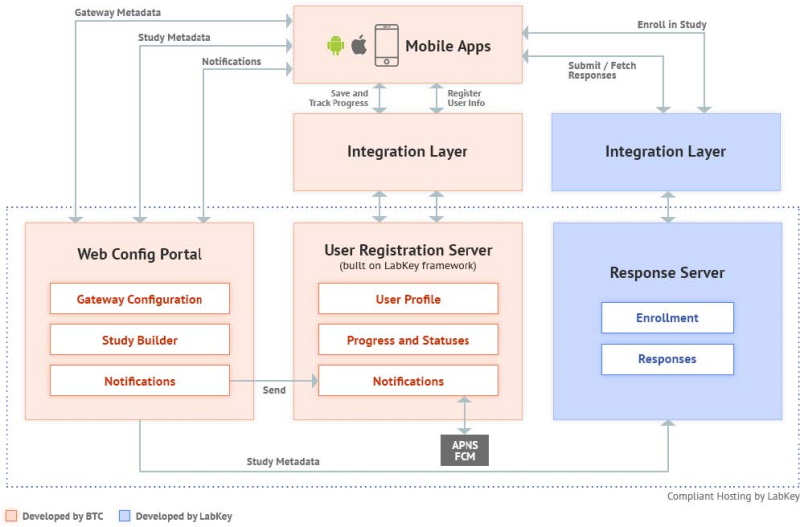
Web Configuration Portal (WCP)
The Web Configuration Portal is a web-based application that provides mechanisms to create and manage content for studies that can be made available to patients/participants via the mobile apps. It also offers corresponding "Study Metadata" webservices to the mobile apps, and to the Response server that holds the data or "responses" provided by participants due to their participation in the mobile-app based study.
The WCP application is built on Java.
The WCP allows you to:
- Manage WCP users (also referred to as Admins, WCP ‘users’ would typically be researchers, clinicians, or study administrators involved in carrying out a study)
- Manage app-level notifications
- Create new studies or view/edit existing ones
- Set up:
- Study information and settings
- Eligibility and informed consent modules
- Study activities (surveys or questionnaires, and active tasks)
- This includes setting up activity content and schedules
- Study resources for each study
- Send out study-specific push notifications
- Take actions with a study such as launch study, publish updates, deactivate, etc.
Push Notifications:
Notification content created in the WCP is sent over to the User Registration Server, whose web services are utilized for the same. The User Registration server then actually sends out the notification to mobile app users, who are the intended audience for the notification.
User Registration Server
(Here ‘User’ refers to the mobile app user or study participant)
The User Registration server is built on the LabKey framework. It leverages LabKey’s User and Registration modules to provide registration services to mobile app users. It helps manage the mobile app user’s app activity and maintains the user’s app usage and study participation metadata. This server, however, does not contain any actual study ‘Response’ data (Response data is saved in the Response server against an anonymized Participant ID).
The User Registration server is thus primarily used for the following:
- User registration (handling app sign up and sign-in related flows)
- User profile and app-level preferences
- User’s app usage and study-specific participation metadata (study participation status, activity completion status, etc.)
- Firing push notifications to the mobile app users
Mobile Applications
- FDA MyStudies comprises iOS and Android mobile apps intended for study participants to use. These apps help capture study data from participants via surveys and active tasks, after taking them through a process of testing their eligibility to participate in the study, and providing electronic informed consent.
- The iOS app leverages Apple’s ResearchKit framework and the Android app leverages ResearchStack to present studies for users to enroll and take part in.
Response Server
The Response server is built by LabKey. It is the data store for the responses captured from mobile app users. It also provides access to this data to authorized members of the research team, for analysis purposes.
The Response Server thus primarily facilitates the following:
- Participant enrollment into a study
- Response data storage
- Access to the Response data for analysis
Multiple Language Support
When you configure a study, you have the option to elect whether to support multiple languages for the user. Beginning with version 21.10 (October 2011), English is the default and Spanish language is also supported.
Note that all administrative actions for setting up the study and resources for researchers/data analysts will be presented in English. The multiple language support applies only to the information and messages shown to the user of the mobile app.
Administrators can
Enable Multiple Language Support when defining a study on the WCP, providing both English and Spanish question and answer options. For studies with both defined, the version supplied to the user will be determined by the settings on the mobile device.
If a language other than Spanish is selected on the device, the questions and responses will default to English.
3 WCP and Webservices Setup Instructions
To set up the WCP and Webservices and web services, follow the instructions here:
Topics in that document:
- 3.1 Installation Required
- 3.2 Configuration
- 3.2.1 Initial Configuration
- 3.2.2 Properties Files
- 3.2.3 Bundle Id and App Token Settings
- 3.2.4 Set Super Admin Email ID
- 3.3 Build
- 3.4 Deployment
- 3.5 Test the Application(s)
4 User Registration Web Services
To set up the User Registration Server and web services, follow the instructions here:
Topics in that document:
- 4.1 Getting Started
- 4.2 Build
- 4.3 Multi App Support
- 4.3.1 Folder Creation
- 4.3.2 App Properties API
After setting up the folder structure and calling the API as described above, publish the study from the WCP application, and start using the mobile app.
5 iOS Setup
To set up the FDA MyStudies iOS app and install and run it on an iPhone, follow the instructions here:
Topics in that document:
- 5.2 Requirements
- 5.3 Xcode Setup
- 5.4 How to Open Project in Xcode
- 5.5 How to Change Server URLs
- 5.5.1 Set up study and API configuration
- 5.5.2 Registration Server
- 5.5.3 WCP Server
- 5.5.4 Response Server
- 5.6 How to Build and Run
- 5.7 How to set up a Standalone Study App
- 5.8 Apply Your Branding
- Appendix: Build at the Command Line
6 Android Setup
To set up the FDA MyStudies Android app, and install and run it on an Android device, follow the instructions here:
Topics in that document:
- 6.1 Introduction
- 6.2 Requirements
- 6.3 Steps to Pull Code from GitHub
- 6.4 Initial Setup
- 6.5 Apply Your Branding
- 6.6 Steps to Install Android app
- 6.7 Creating the Android app build
- Appendix: Build at the Command Line
7 Response Server Setup
To set up the Response Server, follow the instructions here:
Topics in that document:
- 7.1 Create a Project
- 7.2 Create a Subfolder
- 7.3 Assign Permission Roles to Users
- 7.4 Study Setup
- 7.5 Generate Tokens
- 7.6 Set Module Properties
- 7.7 Enrollment Test
8 Create Your Study on WCP and Run
Once you have set up all the different components and applications of the MyStudies solution, you are ready to create your study via the WCP, publish it to the mobile app, and run through the user flow of a study participant who would use the mobile app to participate in the study. Given below is a high-level description of the process you would need to employ for the same.
8.1 Create the study in WCP
Details for creating a new study in the WCP are covered in this topic:
Once that process is complete, continue as follows:
8.2 App and Study Folder in User-Reg Server
Since the MyStudies application supports multiple apps, the User-Reg Server should hold its data accordingly. So before publishing the study from WCP Server, Org Folder, App folder, and Study Folder need to be created in User-Reg Server (
REFER SECTION 4.3).
Note: For each app created, users should do a fresh signup since user data is not shared among different applications.
8.3 Create Study on Response Server, and Generate Enrollment Tokens
- Once your study has been set up on the WCP, and the Response Server is ready too, login to the LabKey admin portal
- Create your Project.
- Create your Study space/folder using the same Study ID you used to create the Study in the WCP.
- Once this is done, enrollment tokens can be created for the Study (if Token Validation method is being used for ascertaining eligibility), these are distributed to users of the mobile app to participate in the study.
(Please refer to
LabKey documentation for more details on steps to set up a study on the Response Server.)
8.4 Study Participation using the mobile application
- Launch the mobile app installed on your phone
- Sign up with a valid email ID and password and follow the instructions to set up your user account.
- (Note that mobile app users would need to sign up separately for each of the apps created using the platform.)
- After successful sign up, if using a gateway type of app, there would be list of studies to choose from (all published to the app using the WCP).
- Pick a study for which you have the enrollment token and proceed, OR, choose a study that does not require a token to be used but has an eligibility questionnaire/test instead.
- Participants can search using the enrollment token to find the study that he/she wants to enroll in.
- To join the selected study, complete the Enrollment Token Validation/ Eligibility steps and the Informed Consent process. This involves reviewing consent sections, taking a comprehension test (if available for the study), completing the legally authorized representative section (if enabled for the study), and then doing a final review of and agreeing to the full Consent Document. The process ends with an e-signature after which the app generates a signed consent document PDF.
- Once in the study, you can participate in activities listed out as per the schedule in which they are to be taken.
- You can also view various statistics and trends on the study dashboard and access study resources.
- There are also other miscellaneous features at the app level such as a ‘Notifications’ section, Account/Preferences section, and provisions for participants to provide feedback or contact a designated email inbox for inquiries.
Related Topics
3: WCP and Webservices Setup
This topic is under construction.
This topic covers how to set up the WCP and WCP-WS web services. This is section 3 of the overall setup process covered in:
FDA MyStudies: Technical Setup Document.
3.1 Installation Required
Prior to installation, the following setup is required:
3.1.1 Java 8
The link below gives instructions for installing the JDK and JRE on Oracle Solaris, Windows, Linux, and OS X computers.
3.1.2 Tomcat 8
The link below will help you download and install Apache Tomcat and use many of the Apache Tomcat features
3.1.3 MySQL 5.6 or 5.7
The link below explains how to install MySQL or upgrade an existing MySQL version to a newer version.
3.1.4 Maven
The link below will assist you in installing Maven
3.1.5 Git Repository
Source code for WCP application and Web Services is available at:
3.2 Configuration
3.2.1 Initial Configuration
HPHC_My_Studies_DB_Create_Script.sql: This script file should be executed in MySQL. It is found inside the sqlscript folder at this path:
hphcAuditLogs: This folder should be created inside the server and the path should be configured inside application.properties for fda.logFilePath parameter.
- Example: fda.logFilePath=/usr/local/hphcAuditLogs/
3.2.2 Properties Files
The
template_application.properties file should be downloaded from the WCP folder of the GitHub MyStudies repository and renamed to application.properties and stored in the system/server. Make necessary changes in the file based on your application configuration. The file path is given below:
Changes in Tomcat Configuration File:
Below are the changes required to the Tomcat context.xml file which can be found at:
- <tomcat installed path>/tomcat/conf/
Add these parameters in the context.xml file inside <context> tag.
<Parameter name="property_file_location_prop" value="/usr/local/" override="1"/>
<Parameter name="property_file_name" value="application" override="1"/>
<Parameter name="property_file_location_config" value="file://usr/local/application.properties" override="1"/>
<Parameter name="property_file_location_path" value="/usr/local/application.properties" override="1"/>
: This file for web application is available at /src/main/resources folder inside the project directory. Make necessary changes in the file based on your application configuration.
3.2.3 Bundle Id and App Token Settings
authorizationResource.properties file for web services application can be found at /studyMetaData/src/main/resources folder inside project directory. These are the changes required:
{Unique Identifier}=android.apptoken	#Unique Android identifier.
{android bundleid}=android.bundleid
{Unique Identifier}=ios.apptoken 	#Unique iOS identifier.
{iOS bundleid}=ios.bundleid
{Unique Identifier}=labkey.apptoken	#unique LabKey response server identifier.
{LabKey Unique String}=labkey.bundleid and
AppToken are the security parameters used for communication between WCP-WS and other applications.
- bundleID: the unique identifier for the authentication of client applications (e.g., Android, iOS, LabKey response server).
- AppToken: You have to create three AppTokens, one for each application, to communicate with WCP-WS. You need to create an AppToken, one each for Android, iOS, and the Response server, the three applications that communicate with the WCP-WS. Once the AppToken is created, all the communications will take place through this unique token. If a request originates from any other application, the authentication will fail.
- Mobile web services communication should take place through the bundleID and AppToken.
3.2.4 Set Super Admin Email ID
HPHC_My_Studies_DB_Create_Script.sql file can be found at
https://github.com/FDA-MyStudies/WCP/tree/develop/sqlscript and update
"your email address" text in HPHC_My_Studies_DB_Create_Script.sql file with the email id that you want to keep as super admin for WCP application. Use forgot password functionality to set a password.
3.3 Build
To build the application(s), run the command given below from the project root folder(s):
3.4 Deployment
Once the build is successful, the .war files will be generated in the target folder. To deploy, copy these .war files and paste them inside the ‘webapps’ folder of the Tomcat installation path and restart the server.
If your StudyMetaData project is created with StudyMetaData-0.0.1-SNAPSHOT.war name, change the file name to StudyMetaData.war before deploying to the Tomcat webapps.
3.5 Test the Application(s)
After deploying the builds, hit the following URLs to verify the application status:
Web application: http://localhost:8080/fdahpStudyDesigner # NOTE: In place of localhost:8080, use your configuration.
This will redirect you to the login page. Use forgot password to change the password for the email id you have provided in step 3.2.4 and use the new password to login into the application.
Web services: http://localhost:8080/StudyMetaData/ping # NOTE: In place of localhost:8080, use your configuration.
This will display “It Works!”
Next Steps
Continue with setup in the
main document
Related Topics
4: User Registration Web Services
This topic is under construction.
4.1 Getting Started
The User Registration web services are built on the LabKey environment. To start this project, you need to set up a LabKey development machine. The link given below will guide you through this process:
Once the LabKey development environment is set up, clone the GitHub repositories such as 'UserReg-WS' into the /server/modules folder. (If checked out into a different folder/name please update path in settings.gradle, build.gradle of distributions folder and commands accordingly.)
Switch to the primary branch and then do a
git pull.
4.2 Build
4.2.1 User Registration Web Services
In your settings.gradle file, find the commented out lines with this text:
// The line below is an example of how to include a single module
//include ":server:modules:workflow"
Underneath this line, add these two lines:
include ":server:modules:UserReg-WS"
include ":server:modules:UserReg-WS:distributions:Registration"
, use the below command:
gradlew cleanBuild deployApp

Once the build is successful, click the
icon in your IDE.
Use this link to ping the local server after it is started, to verify that the web services are running locally:
http://localhost:8080/labkey/fdahpUserRegWS/ping.api
To open the LabKey home page of the (local) User Registration server, use:
To generate a production build, use the following commands:
gradlew deployApp -PdeployMode=prod
gradlew -PdeployMode=prod :server:modules:UserReg-WS:distributions:Registration:distribution
Once the build is completed, you will find the distribution file at the path given below, where <LABKEY_HOME> is the root folder where you have cloned the LabKey code:
- <LABKEY_HOME>/dist/Registration
To deploy the UserReg-WS module to the production server, please refer to:
4.3 Multiple App Support
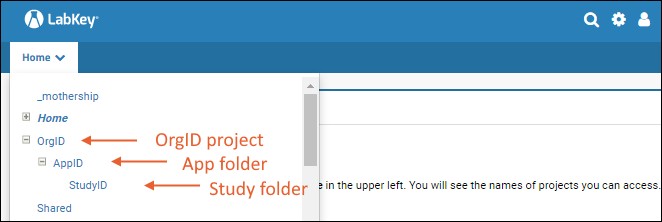
The MyStudies platform supports multiple apps with a single deployment. The User-Reg server follows a specific project and folder structure (Org project, App folder, and Study folder) to handle all the data accordingly:
- A Project named for the Organization (OrgID) with
- A Folder inside it for each App (AppID) plus
- One or more Study folder(s) within these (StudyID).
The data is sent by the mobile application to the specific Study folder that matches this three level naming structure.
4.3.1 Folder Creation
The following steps describe the folder creation process for the user registration server. The folder hierarchy to be followed is: Org folder -> App folder -> Study folder.
The App folder will hold all the app-level data, and the Study folder will store all the study-level data. The Org folder helps identify the organization to which the apps and inherent studies belong. Users can be assigned permissions to the various hierarchies of folders, as required, using the LabKey
user management features.
Note:
For the User-reg server to handle App & Study level data, the following steps need to be followed before publishing the study:
- Folder creation: If a study with a new OrgId and AppId is created in WCP server, then the Org, App, and Study Folders should be created on the User Registration server, with OrgId, AppId, and StudyId as the names respectively.
- If a study with an already existing AppId (and thus OrgId) is created in WCP server, then only the Study Folder needs to be created within it.
- Note that for a production/live environment (as well as a staging environment) access to data can be restricted as required by controlling access to the server and user permissions on the LabKey folders.
- Also note that there is no change required in the folder creation process on the Response Server.
- Firing App Properties API: More about this is given in the last part of this document.
Following are the steps to create the folders in the User Registration server and steps to view the data on the server:
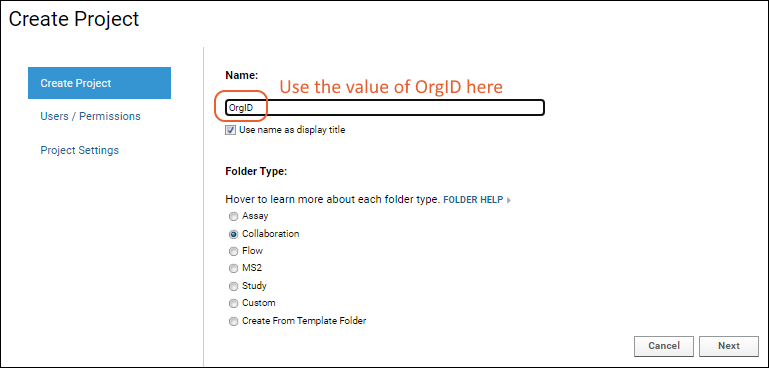
Step 1: Create a project for the organization if one does not already exist. The name must be the same as the value of OrgID used on the WCP. Choose folder type "Collaboration" and accept other defaults.
 Step 2
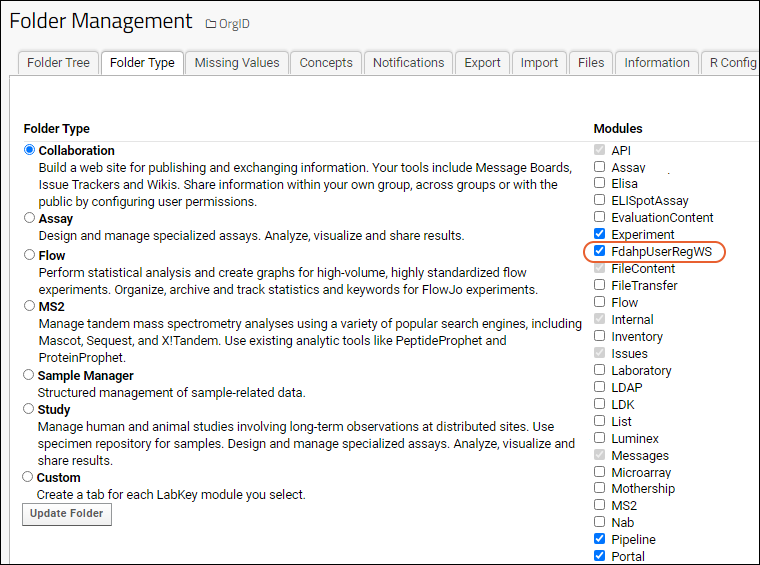
: Select
(Admin) > Folder > Management, click the
Folder Type tab and make sure that the
FdahpUserRegWS module is checked.
 Step 3
: Still in the folder management section, click the
Module Properties tab and add the
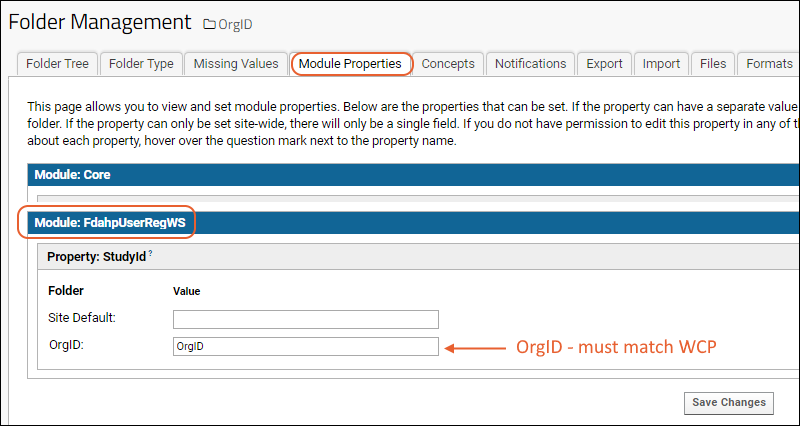
OrgID as used on the WCP in the value of
StudyId for the new project you just created, also named with the "OrgID" used on the WCP. Save this change.
 Step 4
: In the project, create a subfolder to hold all the data for this app - each organization may have one or more AppIDs in use on the WCP. For each one, you need a folder named the same as the "AppID". Use the "Collaboration" type and accept other defaults.
Step 5: Select
(Admin) > Folder > Management, click the
Folder Type tab and make sure that the
FdahpUserRegWS module is checked. Click the
Module Properties tab and add the
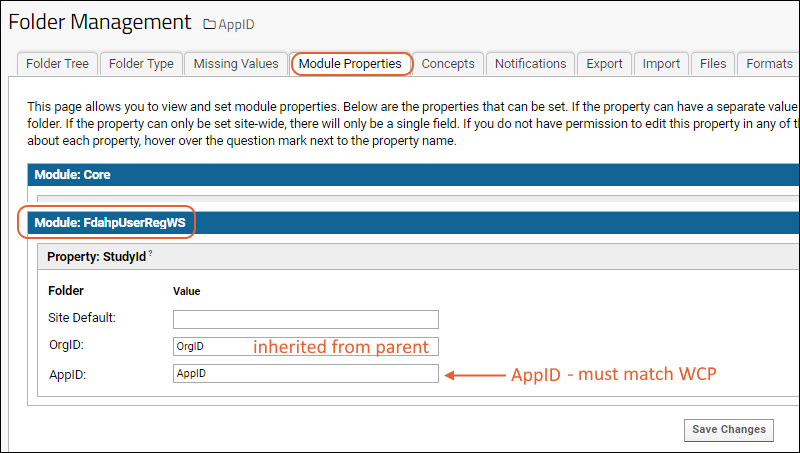
AppID of the application in the value of
StudyId for the new folder you just created, also named AppID. Save this change.
 Step 6
: Next, within the AppID folder, create a subfolder to hold all the study level data. The name of this folder must be the same as the "StudyID" used on the WCP. Use the "Collaboration" type and accept other defaults.
Step 7: In the new folder, select
(Admin) > Folder > Management, click the
Folder Type tab and make sure that the
FdahpUserRegWS module is checked. On the
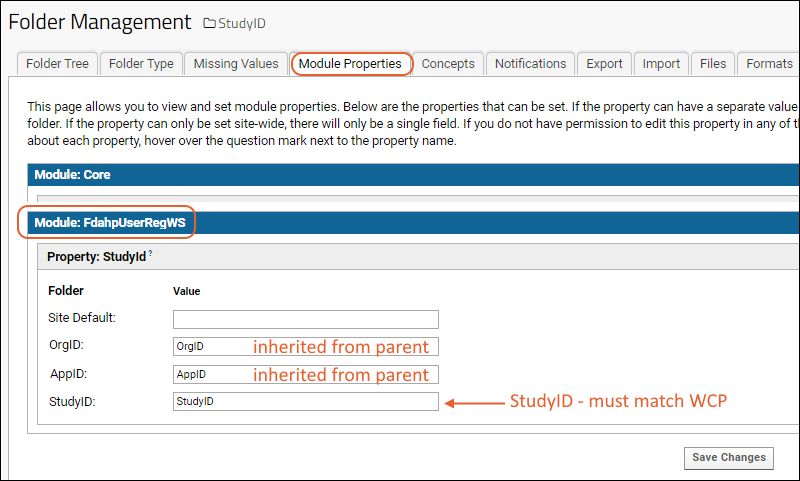
Module Properties tab, enter the StudyID value used on the WCP as the value of
StudyId for the new folder also named the same StudyID value.
 Step 8
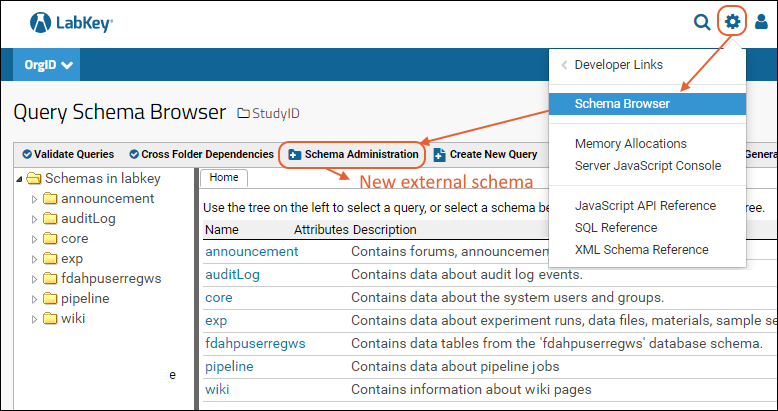
: To view the data, create external schemas. Select
> Developer Links > Schema Browser. Click
Schema Administration, then
New External Schema.
 Step 9
: Enable the below tables in the schema to view app level data (i.e. at the AppID level):
- apppropertiesdetails
- authinfo
- loginattempts
- passwordhistory
- userappdetails
- userdetails
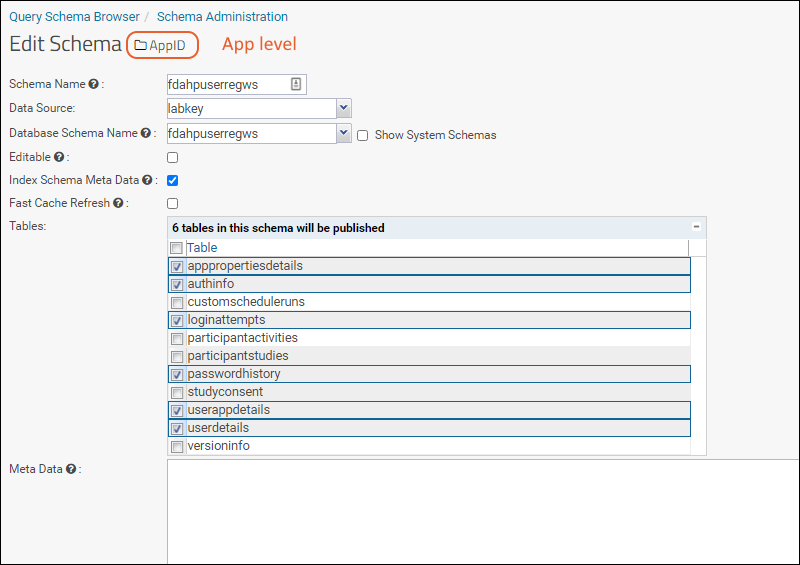 Step 10
: Enable the below tables in the schema to view study level data (i.e. in the StudyID subfolder):
- participantactivities
- participantstudies
- studyconsent
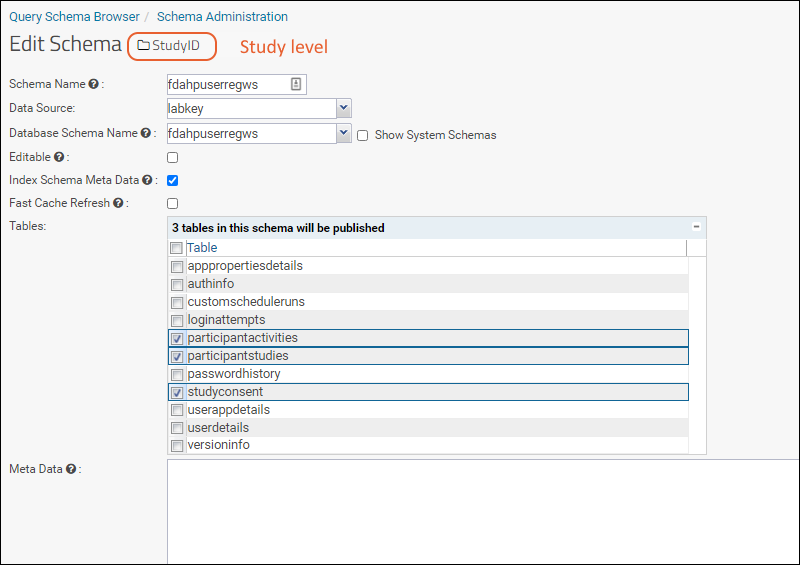 Step 11
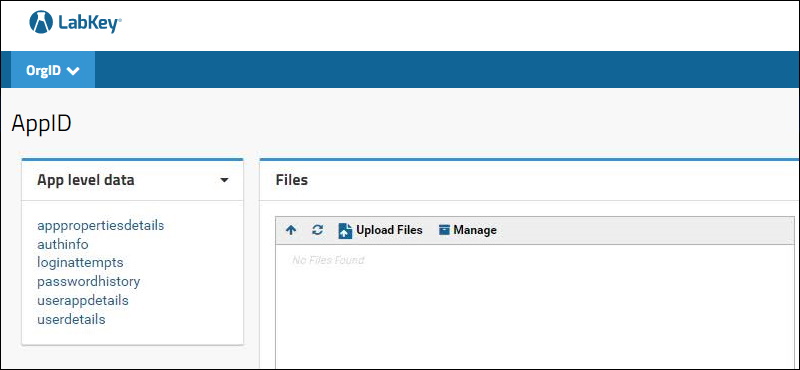
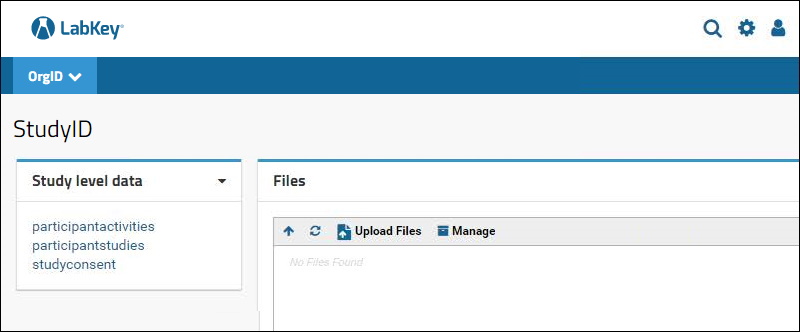
: Add a
Query web part and choose the schema to view the data. Add a
Files web part to view the associated files. Do this at both the project level (App level data) and subfolder level (Study level data). The two levels are shown below:
4.3.2 App Properties API
If a new app is created in the WCP server, i.e., if a new App ID is introduced, then the following API should be called manually before publishing the study and after creating the Org, App, and Study level folders in the User Reg server. This API helps to populate the user registration server with app-specific data and files required to operate the mobile apps. Please ensure the API is loaded with values as applicable to your app.
Note that the platform will be enhanced in the future to provide an interface in the WCP for managing such app-level properties and content and automating the transfer of these values to the user registration server with the API. That is one of the objectives of the MAMO feature.
The API’s generic template is provided below for reference:
POST: {Base url of user-Reg-WS}/fdahpUserRegWS/appPropertiesUpdate.api
Content-Type: application/json
{
"appId": "", // app ID
"orgId":"", // org ID
"androidBundleId":"", // Android app package name
"androidServerKey":"", // Android push notification (fcm) server key
"iosBundleId":"", // iOS app bundle id
"iosCertificate":"", // base64 format text of iOS push notification certificate
"iosCertificatePassword":"", // password of the certificate
"email":"", // email from which mail needs to be sent
"emailPassword":"", // password of the mail id (Not required for production environment)
"registerEmailSubject":"", // email subject for signup mail
"registerEmailBody":"<html><body><div style='margin:20px; padding:10px; font-family: sans-serif; font-size: 14px;'><span>Hi, </span><br/><br/><span>Thank you for registering with us! We look forward to having you on board and actively taking part in<br/>research studies conducted by
xxxxxx. </span><br/><br/><span>Your sign-up process is almost complete. Please use the verification code provided below to<br/>complete the Verification step in the mobile app. </span><br/><br/><span><strong>Verification Code:</strong>
<<< TOKEN HERE >>> </span><br/><br/><span>This code can be used only once and is valid for a period of 48 hours only. </span><br/><br/><span>Please note that registration (or sign up) for the app is requested only to provide you with a <br/>seamless experience of using the app. Your registration information does not become part of <br/>the data collected for any study housed in the app. Each study has its own consent process <br/> and no data for any study will be collected unless and until you provide an informed consent<br/> prior to joining the study </span><br/><br/><span>For any questions or assistance, please write to <a>
Contact Email Address</a> </span><br/><br/><span style='font-size:15px;'>Thanks,</span><br/><span>The
xxxxxx Team</span><br/><span>----------------------------------------------------</span><br/><span style='font-size:10px;'>PS - This is an auto-generated email. Please do not reply. </span></div></body></html>", // email subject for signup mail, replace ‘
xxxxxx’ with your organization’s name that is offering the app, or other suitable text.
"forgotPassEmailSubject":"", // email subject for 'Password Help' email
"forgotPassEmailBody":"<html><body><div style='margin:20px;padding:10px;font-family: sans-serif; font-size: 14px;'><span>Hi,</span><br/><br/><span>Thank you for reaching out for password help.</span><br/><br/><span>Here is a temporary password which you can use to sign in to the
(app name) App.<br/> You will be required to set up a new password after signing in.</span><br/><br/><span><strong>Temporary Password:</strong>
<<< TOKEN HERE >>> </span><br/><br/><span>Please note that this temporary password can be used only once and is valid for a period of 48 hours only.</span><br/><br/><span>For any questions or assistance, please write to <a>
Contact Email Address </a> </span><br/><br/><span style='font-size:15px;'>Thanks,</span><br/><span>The
xxxxxx Team</span><br/><span>----------------------------------------------------</span><br/><span style='font-size:10px;'>PS - This is an auto-generated email. Please do not reply. If you did not request password help, please visit the app and change your password as a precautionary measure. </span></div></body></html>" // email Body for Password Help email, replace ‘
xxxxxx’ with your organization’s name that is offering the app, or other suitable text.
"feedbackEmail":"", // email to which 'feedback' mail needs to be sent
"contactUsEmail":"", // email to which 'contact us' mail needs to be sent
"appName":"", // name of the application
"methodHandler":false
}
Important Notes:
- The body of the emails need to be in HTML format and the <<< TOKEN HERE >>> part represents the identifier for the verification code or temporary password dynamically generated for that email.
- All fields in the API are mandatory.
After setting up the folder structure and calling the API as described above, publish the study from the WCP application, and start using the mobile app.
Next Steps
Continue the setup instructions in the
main document
Related Topics
5: Building the IOS App
This topic is under construction.
5.1 Introduction
This topic covers how to set up the FDA MyStudies iOS app and install and run it on an iPhone. This is section 5 of the overall setup process covered in:
FDA MyStudies: Technical Setup Document
5.2 Requirements
5.2.1 IDE
Xcode 11 and above can be used to run application. You can install Xcode from the Mac App Store.
5.2.2 iOS
The application is supported only on iOS 13 and above versions.
5.3 Xcode Setup
After successful installation of xcode follow below steps:
a. Setup Developer Credentials
- Open Xcode and go to Preferences.
- Click on Accounts on top menu.
- Click on the icon and Choose Apple ID.
- Sign In with Apple developer account.
b. Change Bundle Identifier
- Enter a new bundle identifier for your application.
- Choose Code Signing to “Automatically manage signing” and Xcode will take care of registering the bundle identifier.
c. Enable for Push Notification
Note: To learn more about Xcode and above setup, refer to
Apple's official guide to Xcode Setup
5.4 How to Open Project in Xcode
- Download the project from GitHub or clone.
- To open a project in Xcode go to the project location on your Mac Machine and look for the file named “HPHC.xcworkspace” and double-tap on it.
5.5 How to Change Server URLs
Note: Once your registration is complete and the WCP & Response Server are set up, please follow the below steps.
5.5.1 Set up study and API configuration
After the application is set up on the WCP server and after creating the study (
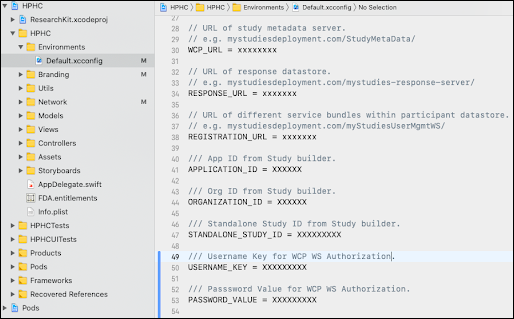
REFER SECTION: 8), you will need to add the following settings in "Default.xcconfig", shown in the image below.
- WCP_URL
- RESPONSE_URL
- REGISTRATION_URL
- APPLICATION_ID
- ORGANIZATION_ID
- STANDALONE_STUDY_ID
- USERNAME_KEY: This is ios.bundleid (Refer to section: 3.2.3)
- PASSWORD_VALUE: This is ios.apptoken (Refer to section: 3.2.3)
5.6 How to Build and Run
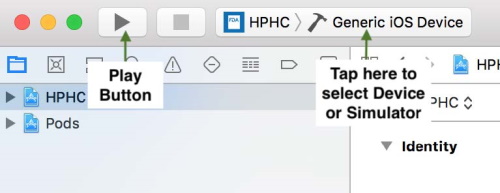
The application can be run on an iPhone Simulator OR iPhone Device.
5.6.1 Run on Simulator
To run on the simulator, select a simulator from the simulator listing and click on the Play button.
5.6.2 Run on Device
To build and run the application on your iPhone device, connect your phone with a power cable to the Mac machine.
The iPhone name will be listed under Device. Select 'iPhone' and click on the Play button.
5.7 How to Set Up a Standalone Study App
Note: You need to create the standalone study on the WCP server first & get the studyID. Once the standalone study setup is finished (REFER SECTION: 8) please follow the steps below:1. Open the project workspace in Xcode.
2. Replace the StandaloneStudyId value with studyID in Info.plist
3. Make sure OrganizationID & ApplicationID is same in the Info.plist from the same WCP server.
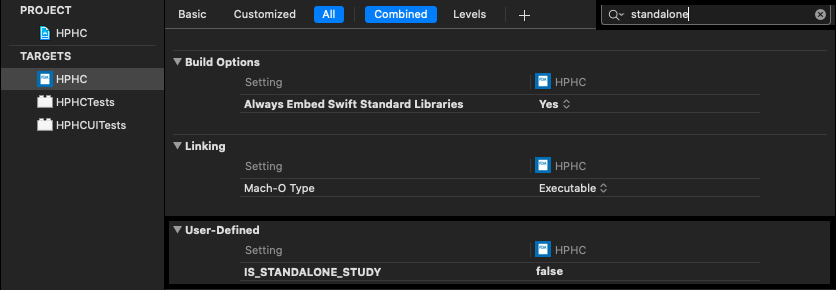
4. Go to main target build settings & look for “standalone”
5. Under User-Defined, set the “IS_STANDALONE_STUDY” value to
true for both debug and release.
6. Build and run the project.
5.8 Apply Your Branding
- AppIcon & Launch Image
- Replace your AppIcon and launch Images into Assets.xcassets under the AppIcon & LaunchImage respectively.
- Change Display Information
- There are some informational content items that can be directly changed at file level and are not required to be changed at the code level.
- Look for file Branding.plist and change information appropriate to your application.
- App Introduction Changes
- App Introduction screen can also be changed at file level.
- Look for GatewayOverview.plist file and change information appropriate to your application.
5.9 Next Steps
Continue with set up in the
main document.
Appendix: Build at the Command Line
It may be desirable to build your MyStudies iOS app at the command line (rather than in the GUI of Xcode) as with CI/CD or other automation. This next section will serve as a brief overview and basic example of building and testing the iOS app using the Xcode CLI tool "xcodebuild". Refer to Github Actions configuration (
.github/workflows/Build-iOS.yml) in the repo when configuring similar CI/CD automation on other platforms.
For the purposes of code validation, valid iOS code-signing is not necessary. Building with valid code-signing falls outside the scope of this guide.
These instructions assume Xcode 11 is being used from
/Applications/Xcode_11.X.app.
Appendix.1 Set Xcode Code-Signing Environment Variables
The primary purpose of these is to disable code-signing:
export CODE_SIGN_IDENTITY=''
export CODE_SIGNING_REQUIRED='NO'
Appendix.2 Set Xcode Architecture Environment Variable
The following environment varaible limits the code to being compiled only for the CPU architecture of the machine running Xcode and is desirable to avoid building for iOS device architectures for the purposes of code validation:
export ONLY_ACTIVE_ARCH='YES'
Appendix.3 Change to the "HPHC" Directory Within the Repo
Some steps of the build process assume that you are in the "HPHC" directory, which is a sub-directory of the root of the repo:
Appendix.4 Build
To build, use
xcodebuild from the HPHC directory. You may need the full path to xcodebuild, and must substitute your platform, OS, and name settings in the -destination argument:
/Applications/Xcode_11.7.app/Contents/Developer/usr/bin/xcodebuild clean build -workspace HPHC.xcworkspace -scheme HPHC -destination "platform=iOS Simulator,OS=13.7,name=iPhone 11"
If you are using a GitHub Actions config instead of including the specific versions in the command string you could define a "matrix.destination" such as:
strategy:
      matrix:
        destination: ["platform=iOS Simulator,OS=13.7,name=iPhone 11"]
Then run, using syntax like:
xcodebuild clean build
  -workspace HPHC.xcworkspace
  -scheme HPHC
  -destination "${{ matrix.destination }}"
Appendix.5 Test
xcodebuild test
            -workspace HPHC.xcworkspace
            -scheme HPHC
            -destination "${{ matrix.destination }}"
References
Related Topics
6: Build the Android App
This topic is under construction.
6.1 Introduction
This topic explains how to setup the FDA MyStudies Android app and install and run it on an Android device. This is section 6 of the overall setup process covered in:
FDA MyStudies: Technical Setup Document
6.2 Requirements
6.2.1 IDE Environment Setup
Download Android Studio from the following link and set up the environment.
6.2.2 Android OS Support
- The application can be run on Android OS right from the Nougat version and up to Android 10.
6.3 Steps to Pull Code from GitHub
- a. After setting up the IDE environment do integrate the GIT version control system.
- b. Copy the app’s source code link from the GitHub repo.
- c. Open Android Studio and go to File > New > Project from version control > Git. This will open a window and then copy the link to the Git Repository URL field.
- d. Set the path to which the project has to be cloned in the Parent Directory field.
- e. Give Directory name in Directory Name field.
- f. Click on the Clone button which will download the source code, and the user can open the 'MyStudies' source code in the new window.
6.4 Initial Setup
6.4.1 App Setup
Create apikey.properties file in the home directory of the project and add the following details (for the android.bundleid, refer to
section: 3.2.3):
apikey="android.bundleid:android.apptoken"
app_id_key="applicationId"
app_id_value="xxxx"
org_id_key="orgId"
org_id_value="xxxx"
study_id="xxxx"
base_url_wcp_server= "https://wcp_base_url/StudyMetaData/"
base_url_registration_server="https://registration_sever_base_url/fdahpUserRegWS/"
base_url_response_server="https://response_server_base_url/"
6.4.2 Push Notification Setup
- a. Go to your Firebase project.
- b. Set up push notifications for Android.
- c. Download the JSON file and replace the google-services.json file in the app/src/fda directory.
- d. Send the Server Key (from Cloud Messaging section of Firebase) to App Properties API.(REFER SECTION 4.3.2)
6.4.3 Update the Map Key
Update the map key (com.google.android.maps.v2.API_KEY) in Android Manifest file in app/src/main directory and app/src/fda directory**
6.5 Apply Your Branding
- AppIcon & Launch Screen: To update these, the following changes have to make in src/fda directory:
- a) Replace ic_launcher.png in mipmap-hdpi, mipmap-mdpi, mipmap-xhdpi, mipmap-xxhdpi, mipmap-xxxhdpi directories with respective resolutions for App icon updates.
- b) Replace fda_logo1.png, fda_logo2.png in drawable-560dpi, drawable-xhdpi, drawable-xxhdpi, drawable-xxxhdpi directories with respective resolutions for updating launch screen logos and update the activity_splash.xml file in the layout directory for launch screen UI.
- Change Display Information & App Introduction Changes: There are some informational content items in the app that can be directly changed at file level, and not required to be changed at the code level. Look for file strings.xml in the values directory and change information appropriate to your application including App Introduction screen text.
6.6 Steps to Install Android App
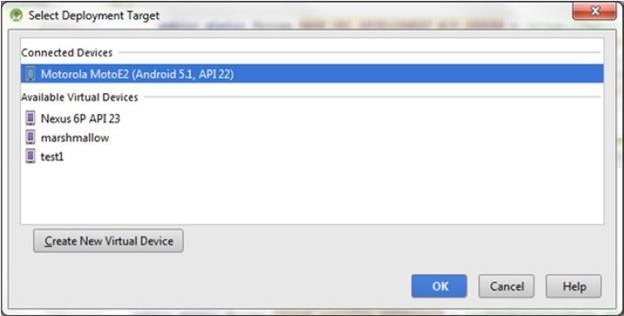
The app can be installed to the device or emulator from Android Studio by clicking on the
Run button in the Menu bar, which will open a window asking you to choose between emulator and device.

6.7 Create the Android App Build
- a. First increment the versionName and versionCode in the build.gradle file in App Directory from Project Explorer.
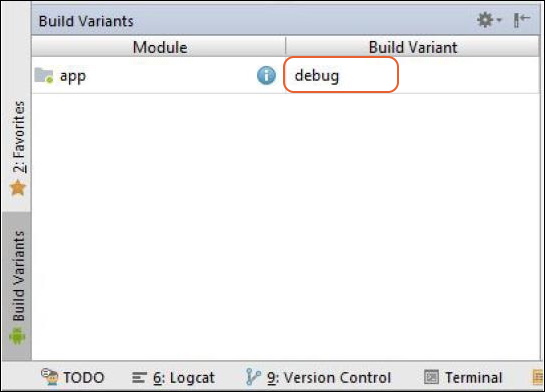
- b. Click on Build Variants in Android Studio and click on the area where debug text is displayed.
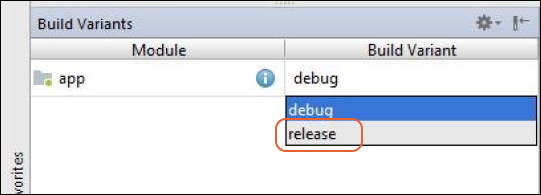
- c. Select the release option from the list.
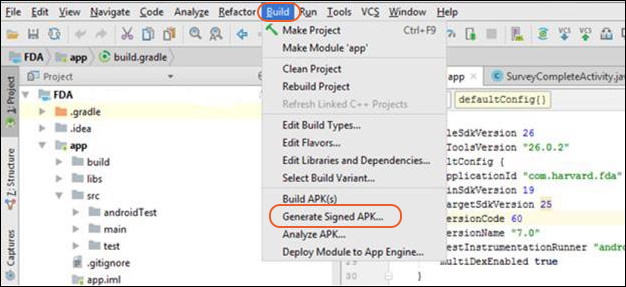
- d. Click on Build from the menu bar and select Generate Signed APK.
- e. Download the keystore.jks from the following link <Keystore Location>
- f. In the new window opened enter the details about keystore:
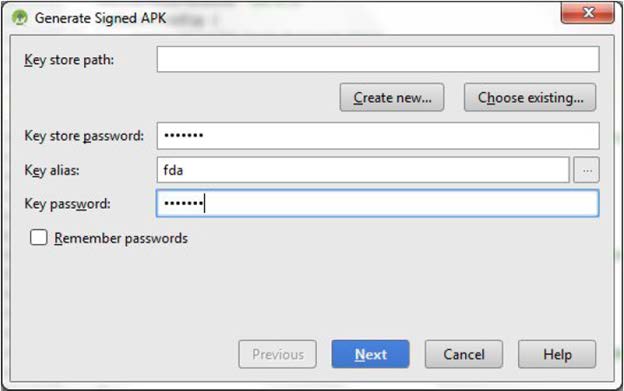
- Key store path: Browse to the path of the downloaded keystore by clicking the Choose existing... button.
- Enter Key store password.
- Key alias: fda
- Enter Key password.
- Click the Next button.
- g. In the new window enter the details:
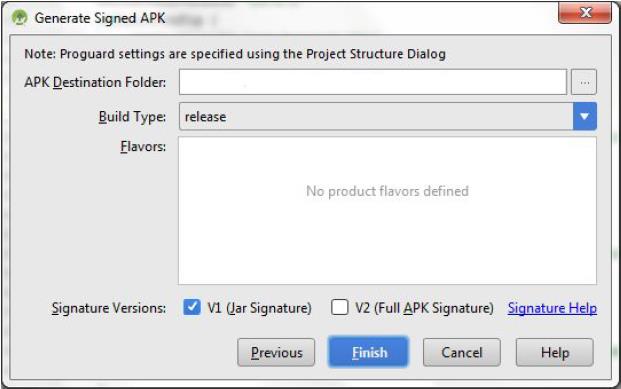
- Enter the APK Destination Folder to which the build will be generated.
- Select release as Build Type
- Select the check box V1(Jar Signature)
- Click Finish, which will generate the Android build.
6.8 Next Steps
Continue with set up in the
main document.
Appendix: Build at the Command Line
It may be desirable to build your Android app at the command line, particularly for use with automation. This next section will serve as a brief overview and basic example of building and testing the app in this way.
The Android app repo uses gradle to execute builds. Gradle operates on a self-bootstrapping basis, meaning that you do not specifically need to install gradle beforehand, as gradle will take care of "installing itself" the first time you run the build. Other LabKey projects also use gradle, and you can learn more about using gradle with LabKey in this section of the LabKey Server documentation (opens in a new tab):
Gradle Build Overview
Setting up to build on Windows is not covered in detail in this guide.
Appendix.1 Set Up the Android SDK
You'll need the Android SDK from either the "Android Studio" desktop app or the "commandline-tools".
Ensure that the Android SDK license is accepted. The license acceptance process is specific both to the OS you're using and to how you installed the Android SDK. And as such, is not specifically covered by this guide. You will need to have accepted the Android SDK/Android Studio licenses to proceed.
- Attempting to build without accepting the licenses results in error messages like the one below:
You have not accepted the license agreements of the following SDK components: [Android SDK Platform 23, Android SDK Build-Tools 23.0.1]. Before building your project, you need to accept the license agreements and complete the installation of the missing components using the Android Studio SDK Manager.
Appendix.2 Ensure Gradlew is Executable
Building is done using the
gradlew script. On platforms other than Windows, to ensure this script is executable, run:
As with most gradle projects, you can use the following command to see what tasks are available in this repo:
Appendix.3 Set Environment Variables
Set the
$ANDROID_HOME environment variable. The value of this environment variable is specific both to the OS you're using and to how you installed the Android SDK. Determining the path to your Android SDK is not covered by this guide.
Ensure that the
$JAVA_HOME environment variable is set correctly. At time of writing, this repo expects to use JDK version 1.8/8
Running
./gradlew build without setting the $JAVA_HOME environment variable results in error messages like the one below:
FAILURE: Build failed with an exception.

* What went wrong:
Could not create an instance of type org.gradle.initialization.DefaultSettings_Decorated.
> Could not initialize class org.codehaus.groovy.runtime.InvokerHelper
Appendix.4 Configure Code Signing for the App
Code signing for the app must be configured. Learn more in the official documentation on the Android developer site:
Appendix.5 Build the App
If your goal is simply to determine if the project builds at all, you can now run gradle with
./gradlew build without filling in apikey.properties.
- You'll find the resultant .apk files under the app/build/outputs/apk/fda/debug and app/build/outputs/apk/fda/release directories.
- These .apk files are explicitly untracked in the repo as is common for binary artifacts, so you won't see them in git status after building them.
If your goal is to build a configured and functional app, you will need to fill out the
apikey.properties file similar to
Step 6.4.1 above before running the build with
Related Topics
7: Response Server Setup
This topic explains how to set up the response server to begin collecting data from the mobile apps. This is section 7 of the overall setup process covered in:
FDA MyStudies: Technical Setup Document.
Each data partner owns a project on LabKey Server, and each study resides in a different subfolder of the parent project. After a participant completes a survey, the mobile application sends the response to the server where it is stored in the appropriate study subfolder.
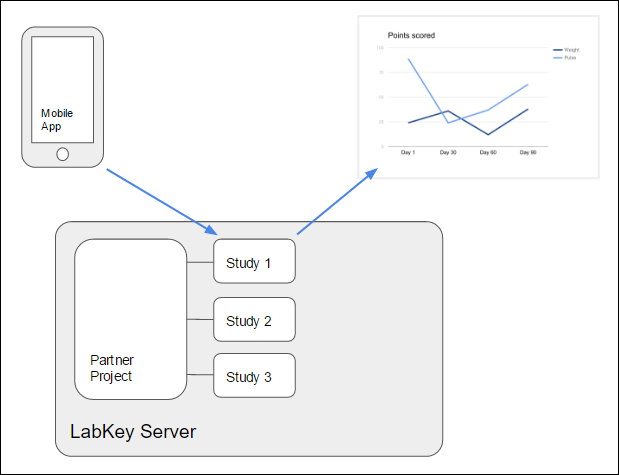
Enrollment is accomplished by the use of
enrollment tokens. A set of enrollment tokens are generated for a given study and distributed to prospective participants as tickets for enrollment in that study. Upon successful enrollment, the server provides the mobile client with a globally unique
application token, which the server uses to identify the appropriate study folder and participant on all subsequence communications.
Create a Project
If you are adding a study to an existing project, navigate to that location. A site administrator can create a new project, typically named for the app or organization performing the studies.
- Create a new project on the server. The project will serve as the parent container for the study subfolders.
- Choose folder type "Collaboration".
- For now, leave the permissions limited to your own user ID until you have correctly configured the folder. See below for how to add additional authorized users.
Create a Subfolder
Within the project:
- Create a new folder of type "MyStudies Response".
- For now, leave the permissions limited to your own user ID until you have correctly configured the folder. See below for how to add additional authorized users.
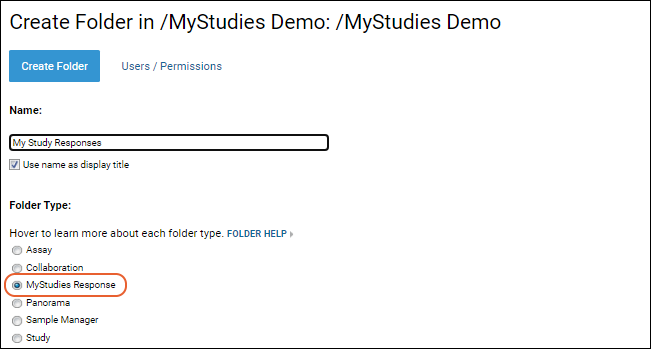
In your new folder, you will see the
MyStudies Response Server panel, which will guide you in setting up your study, then provide a quick view dashboard of the configuration to others.
Response Server Site Settings
A
one-time setup step for the Response Server is for a site administrator to connect it to the WCP, or otherwise provide metadata for testing. This configuration was previously done using module properties with similar names.
If you see a message in the
MyStudies Response Server panel like the following:
Response Server Site Settings are not configured. Click here to configure them.

- Click the word "here" to configure.
- A site administrator can also directly access this page via (Admin) > Site > Admin Console > Configuration > Response Server Configuration.
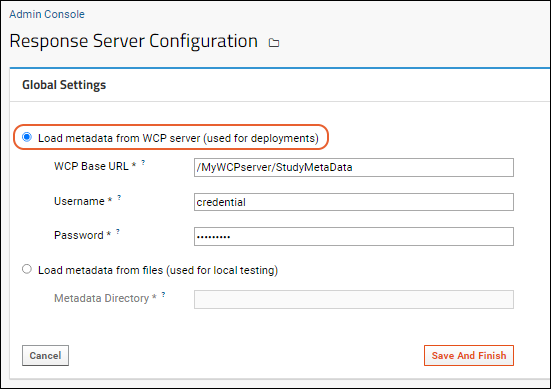
Configure how to load metadata. An option to load metadata from files is provided for local testing. For operational servers, you'll use
Load metadata from WCP server.
- Provide:
- WCP Base URL: The base URL for the Activity Metadata service. Should be an absolute URL that ends with /StudyMetaData. Note that this URL must NOT end with a question mark.
- Username: The username to use to authenticate against the WCP server, NOT the Response Server.
- Password: The password for that username on the WCP.
- Click Save And Finish.
Once the site settings are properly configured, the message will no longer be shown in the
MyStudies Response Server web parts.
Local Testing File Option
If you want to use the
Load metadata from files (used for local testing) option, provide the directory on the server that holds the survey design metadata files. These metadata files should be of the form <studyId>_<activityId>_<version>.txt.
Study Setup
Once the site settings are configured, you can configure the study folder itself to collect the correct responses.
Set Study ID
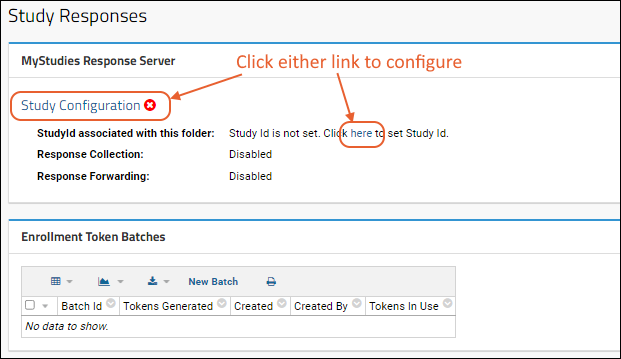
- In the MyStudies Response Server panel, you'll see a red indicating the study needs to be configured. Click either "Study Configuration" or the word "here" in the message to configure it.
- You will now be on the MyStudies Response Server tab of the (Admin) > Folder > Manage page.
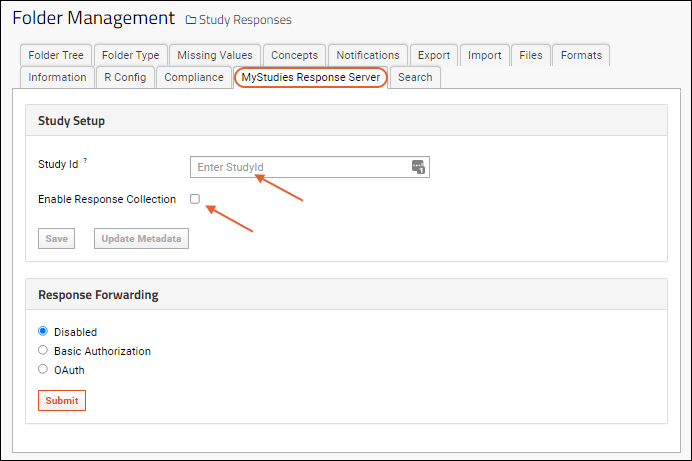
- Enter the StudyID value exactly as it appears on the WCP. In concert with the site settings you entered above, this will route the expected responses for this study to this folder.
- Check the box for Enable Response Collection. This makes the study open for enrollment and able to store response data.
- Click Save.
Once the configuration is complete, you'll see a green check, indicating the study is ready.

Update Metadata
Click
Update Metadata on the
Study Setup panel (shown above) to proactively create or update the response schema based on the latest study metadata in the WCP. Note that this step is not required for successful response submission (the response schema is updated automatically when a response indicates a newer version is available), but can assist administrators who wish to pre-populate participant properties or create queries and reports before response data is submitted.
Assign Permission Roles to Users
LabKey uses a role-based system for assigning individual permissions at different levels. Some important roles for the MyStudies system:
- Site or Project Admin: Can create new users and assign permissions.
- Folder Administrator: Can generate and view tokens, make changes to folder permissions, add webparts to pages, plus all actions an Editor can do.
- MyStudies Coordinator: (Coming soon with LabKey release 20.11) This role can be added onto a Reader or Editor role and gives permission to create and view tokens, but none of the other additional permission granted to folder administrators.
- Editor: Can read/insert/update response data and create new grid views to share with others.
- Reader: Can read response data and create new grid views for themselves, but not to share.
Permissions are assigned for each container (project or folder) and can be inherited in subfolders. To assign permissions for a folder, select
(Admin) > Folder > Permissions. Add users (or project groups of users) to the desired roles.
For example, you might have a team of researchers to assign to the "Reader" role in a given study folder. One, but not all, of these users might also be assigned to a role that lets them generate tokens.
Learn more about assigning roles to users (and groups of users) in this topic:
Configure Permissions
Generate Tokens
The data partners distribute enrollment tokens to potential participants.
Permissions required:
- Currently, the role "Folder Administrator" or higher is required to generate tokens.
- Beginning with version 20.11 of LabKey Server, users with "Reader" or higher PLUS the new role "MyStudies Coordinator" will be able to generate tokens.
Enrollment tokens are specific to the container in which they are generated. A mobile app attempting to enroll using a token from a different study will not be successful and will receive an error message from the server.
- In the panel Enrollment Token Batches click New Batch.
- Note that if you do not have "MyStudies Coordinator" or admin permission, this action will not succeed.
- In the Generate Tokens pop up dialog, specify the number of tokens to generate. Base your selection on the number participants you expect to enroll. Options:
- 100
- 1,000
- 10,000
- Other <enter custom number of tokens>
- Click Submit.
Once tokens have been generated, the admin can review each batch, see at a glance how many were generated, how many have been used, and open each batch to find available tokens for distribution.
Enrollment Test
To test your set up, enroll (and unenroll) a fictional participant, see
Testing the Response Server.
Related Topics
Enrollment Tokens
Generate Tokens
The data partners distribute enrollment tokens to potential participants.
Permissions required:
- Currently, the role "Folder Administrator" or higher is required to generate tokens.
- Beginning with version 20.11 of LabKey Server, users with "Reader" or higher PLUS the new role "MyStudies Coordinator" will be able to generate tokens.
Enrollment tokens are specific to the study container in which they are generated. A mobile app attempting to enroll using a token from a different study will not be successful and will receive an error message from the server.
- In the panel Enrollment Token Batches click New Batch.
- Note that if you do not have "MyStudies Coordinator" or admin permission, this action will not succeed.
- In the Generate Tokens pop up dialog, specify the number of tokens to generate. Base your selection on the number participants you expect to enroll. Options:
- 100
- 1,000
- 10,000
- Other <enter custom number of tokens>
- Click Submit.
Once tokens have been generated, the admin can review each batch, see at a glance how many were generated, how many have been used, and open each batch to find available tokens for distribution.
Previous UI for Response Server Setup
This topic describes the older interface for configuring the Response Server. If your new Response Server study folder shows a
Study Setup web part, follow this topic. If the web part is
My Studies Response Server, STOP and use the current topic:
7: Response Server Setup
Each data partner owns a project on LabKey Server, and each study resides in a different subfolder of the parent project. After a participant completes a survey, the mobile application sends the response to the server where it is stored in the appropriate study subfolder.
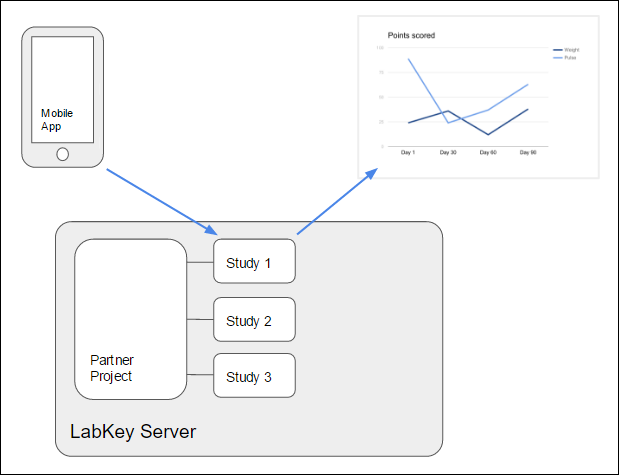
Enrollment is accomplished by the use of
enrollment tokens. A set of enrollment tokens are generated for a given study and distributed to prospective participants as tickets for enrollment in that study. Upon successful enrollment, the server provides the mobile client with a globally unique
application token, which the server uses to identify the appropriate study folder and participant on all subsequence communications.
Create a Project
A site administrator can create a new project.
- Create a new project on the server. The project will serve as the parent container for the study subfolders.
Create a Subfolder
- Create a new folder of type Mobile App Study within the project.
Assign Permission Roles to Users
LabKey uses a role-based system for assigning individual permissions at different levels. Some important roles for the MyStudies system:
- Site or Project Admin: Can create new users and assign permissions.
- Folder Administrator: Can generate and view tokens, make changes to folder permissions, add webparts to pages, plus all actions an Editor can do.
- MyStudies Coordinator: (Coming soon with LabKey release 20.11) This role can be added onto a Reader or Editor role and gives permission to create and view tokens, but none of the other additional permission granted to folder administrators.
- Editor: Can read/insert/update response data and create new grid views to share with others.
- Reader: Can read response data and create new grid views for themselves, but not to share.
Permissions are assigned for each container (project or folder) and can be inherited in subfolders. To assign permissions for a folder, select
(Admin) > Folder > Permissions. Add users (or project groups of users) to the desired roles.
For example, you might have a team of researchers to assign to the "Reader" role in a given study folder. One, but not all, of these users might also be assigned to a role that lets them generate tokens.
Learn more about assigning roles to users (and groups of users) in this topic:
Configure Permissions
Study Setup
Set Study ID
- In the panel Study Setup, enter a Study Id. This will be the id used by the mobile application.
- Select Enable Response Collection. This makes the study open for enrollment and able to store response data.
- Click Submit.

Update Metadata
Click
Update Metadata in the
Study Setup panel (shown above) to proactively create or update the response schema based on the latest study metadata in the WCP. Note that this step is not required for successful response submission (the response schema is updated automatically when a response indicates a newer version is available), but can assist administrators who wish to pre-populate participant properties or create queries and reports before response data is submitted.
Generate Tokens
The data partners distribute enrollment tokens to potential participants.
Permissions required:
- Currently, the role "Folder Administrator" or higher is required to generate tokens.
- Beginning with version 20.11 of LabKey Server, users with "Reader" or higher PLUS the new role "MyStudies Coordinator" will be able to generate tokens.
Enrollment tokens are specific to the container in which they are generated. A mobile app attempting to enroll using a token from a different study will not be successful and will receive an error message from the server.
- In the panel Enrollment Token Batches click New Batch.
- Note that if you do not have "MyStudies Coordinator" or admin permission, this action will not succeed.
- In the Generate Tokens pop up dialog, specify the number of tokens to generate. Base your selection on the number participants you expect to enroll. Options:
- 100
- 1,000
- 10,000
- Other <enter custom number of tokens>
- Click Submit.
Once tokens have been generated, the admin can review each batch, see at a glance how many were generated, how many have been used, and open each batch to find available tokens for distribution.
Set Module Properties
Certain module properties must be defined in order to know where to retrieve the metadata about the study activities that the server is receiving responses for. This metadata is used to create the schema where the response data is stored. This metadata can be retrieved either from a file on the server or from a service (API). In a production system, the service will likely be used.
- In your study folder, go to (Admin) > Folder > Management > Module Properties tab.
- Set the following properties, as appropriate. Note that the following properties can be set at three different container scopes: for the Site as a whole, for the current project as a whole, or for a single study subfolder. Enter your values at the Site or Project level will cause them to applied to any other subfolders in scope. Usually you will want to set these at the Site level.
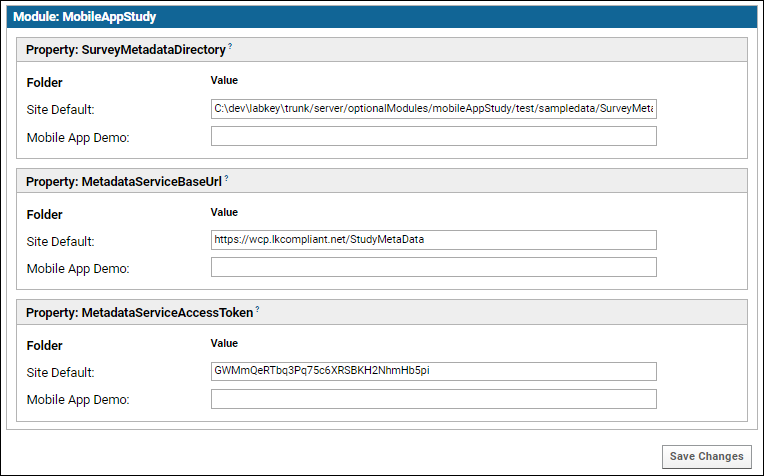
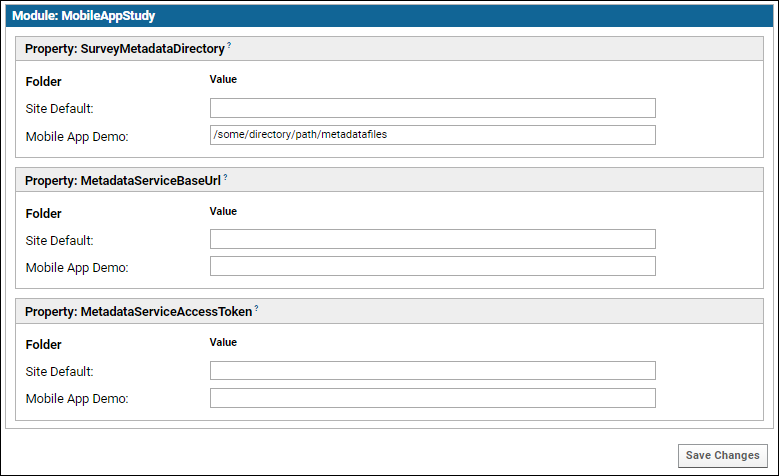
- SurveyMetadataDirectory - The directory on the server that holds the survey design metadata files. For use in testing or when the metadata service is not available.
- MetadataServiceBaseURL - The base URL for the Activity Metadata service. Should be an absolute URL that ends with /StudyMetaData; see example below. Note that this URL must NOT end with a question mark.
- MetadataServiceAccessToken - App token to be passed in request headers to the Activity Metadata Service to identify this client.
If the last two parameters are not configured, the SurveyMetadataDirectory will be used to find the metadata file. If none of the parameters are configured, an error will be generated. The name of the survey metadata file in the SurveyMetadataDirectory should be of the form <studyId>_<activityId>_<version>.txt.
The following screenshot illustrates using a metadata service for the entire LabKey Server site:
The following screenshot illustrates using a local directory only applying the path to the current study subfolder (most useful for development and local testing):
Enrollment Test
To test your set up, enroll (and unenroll) a fictional participant, see
Testing the Response Server.
Related Topics
8: WCP - Create New Study
This topic is under construction.
This topic is part of the
FDA MyStudies: Technical Setup Document. It covers the details for section creating a new study in the WCP from
this point in the setup process.
8.1 Create the Study in WCP
Sign in to the WCP, and click on Studies > Create New Study. Follow the series of steps shown below to set up content for your study.
(The WCP user is referred to as 'Admin' in the sections below.)
Support for Multiple LanguagesWhen you configure a study, you have the option to elect whether to support multiple languages for the user. At present, English is the default and Spanish language is also supported. To enable communication with the end user in the language of their choice, choose
Enable Multiple Language Support. When multiple language support is enabled, the Admin will be able to switch between languages for the writing of questions and response options in the sections below.
Note that all administrative actions for setting up the study and resources for researchers/data analysts will be presented in English. The multiple language support applies only to the information and messages shown to the user of the mobile app.
Once questions and response options have been configured in both English and Spanish, the version supplied to the user will be determined by the settings on the mobile device. If a language other than Spanish is selected, the questions will default to English.
8.1.1 Basic information
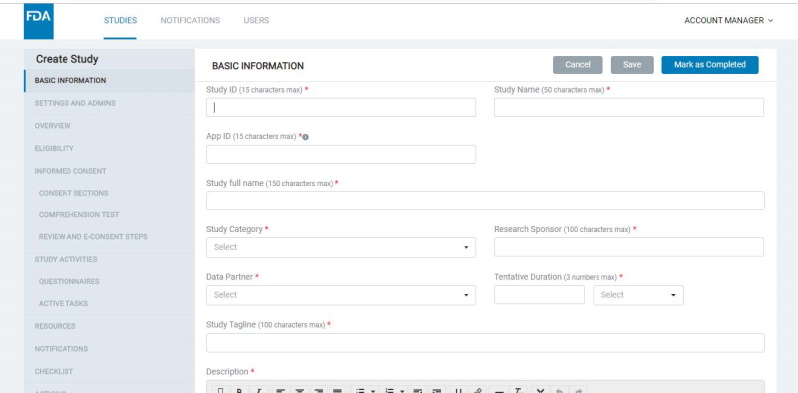
- Here, the Admin should enter a Study ID (which should be unique for each study), Study name, Study category, research and data partners, tentative duration, study tagline, study description, etc.
- Each study that you create will have a Study ID and be associated with an App ID, as well as an Org ID. The App ID and Org ID indicate the mobile app and organization with which the study is associated.
- The App ID for a study must be configured in the basic information screen (read more about app types and app IDs below).
- The Org ID field is not supported for configuration via the UI as of now but hardcoded in the backend and mobile apps with a default value. These Org IDs can be updated as required if the studies running on the deployment are associated with different organizations and if you wish to identify studies by the organization at the database level or have other use cases to address based on the Org ID.
- The platform supports two mobile app models: Gateway and Standalone.
- Gateway apps are those which house multiple studies, whereas standalone apps are those that have a single study each.
- Multiple mobile apps of each type (gateway and standalone) can be supported with a single deployment of the platform.
- Each app created off the platform must have a unique App ID.
- The Basic Information screen will allow you to specify if your study should belong to a gateway or standalone app.
- A study thumbnail image should be uploaded for a study being added to a Gateway app; this appears in the Gateway app’s study list screen.
- You would need to provide an ‘App ID’ for the study in the corresponding field on the Basic Information screen. This identifies the specific app that the study must appear in.
- If you want to add a study to an existing Gateway app, provide the app's App ID here. If adding the study to a new app (Gateway or Standalone), add a new unique App ID into this field.
- Note that standalone studies would always need a new unique App ID to be created. Refer to image below:
8.1.2 Settings & Admins
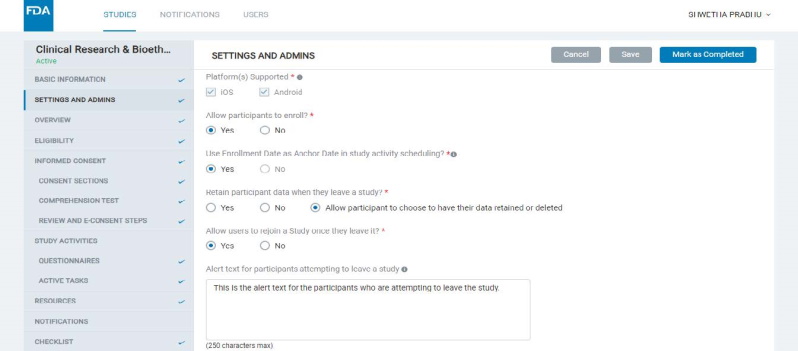
- Here, the Admin can configure certain settings for the study and manage users or “Admins" who can view or edit the study.
- Some of the key study settings here are mobile platform(s) supported for the study, enrollment being open or closed for the study, allowing enrollment date to be used as an Anchor Date for scheduling study activities and resources, etc.
8.1.3 Overview
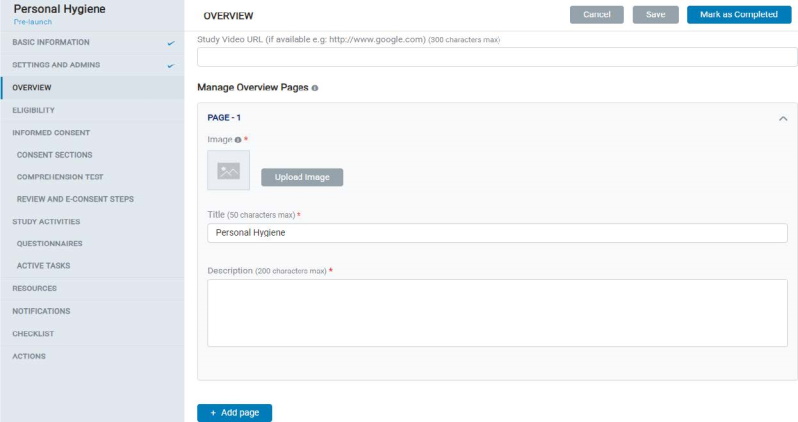
- In Overview, the Admin can add multiple pages for a study, reflected in the mobile app under Study Overview screens.
- Each page contains a Title, Description, and Image. Admin can also add a study video URL on the first page of the Study Overview.
8.1.4 Eligibility
- In the Eligibility section, the Admin can choose and set up content for the desired method to be used for determining participant eligibility:
- Token Validation Only
- Token Validation and Eligibility Test
- Eligibility Test Only.
Once the study is launched, then the Admin will not be able to edit the Eligibility type.

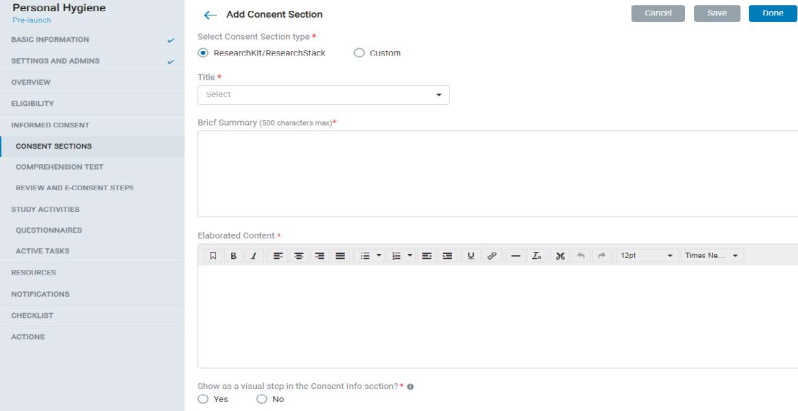
8.1.5 Consent Section
- In Consent Sections, the Admin can add ResearchKit / ResearchStack based (pre-formatted mobile UI) or custom consent section types and fill in the content accordingly.
- Each consent section contains a title, display title, summary, and elaborated content.
- The admin can also choose to display the consent section as a visual step in the mobile app.
- The admin can allow participants to take a comprehension test of the consent material and set up comprehension test questions and a minimum score to pass the test.
- In the Review Consent screen, the Admin can either choose from the auto-generated consent document (Concatenated Consent Sections) or create a Custom consent document to be used in the app.
- Consent by a LAR (Legally Authorized Representative): This will add functionality to the study's consent module in the mobile app to allow the app user to provide consent on behalf of the participant as a LAR. The study will continue to support direct consent even if this setting is enabled. The app user can choose one of two consent methods as applicable to them and will be guided through the rest of the app's consent process accordingly.
- Additional signature lines for study staff: This feature will enable additional signature lines in the finalized PDF document to accommodate required study staff signatures.
8.1.6 Participant Properties
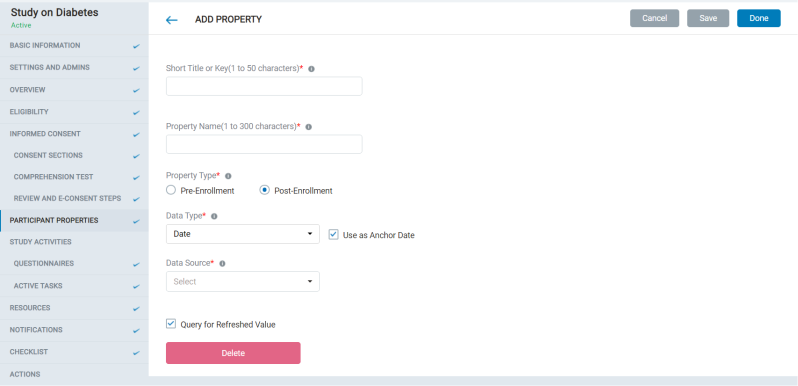
- The admin can create external properties that can define Anchor dates for activities, tasks, or resources.
- This is not a mandatory step to create the study.
8.1.7 Study Activities – Questionnaires
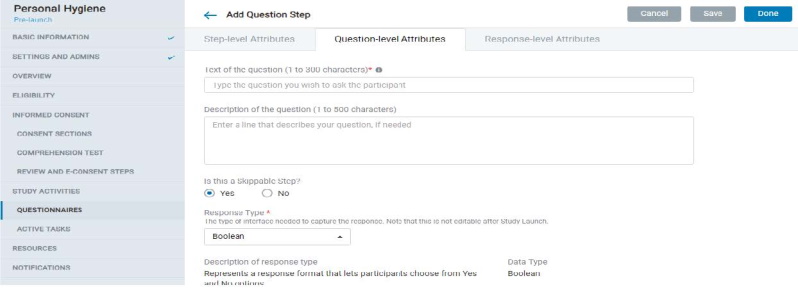
- The admin can create questionnaires with a combination of Instruction Steps, Question Steps, and Form Steps.
- Each question step comprises Step-level, Question-level, and Response-level attributes that offer several provisions to design the kind of questionnaire and study experience you need.
- A Form Step is essentially a set of Question Steps in the mobile app; all questions that belong to a form appear on a single screen.
- Many scheduling options are provided that the admin can choose from to determine the schedule of the survey in the mobile app.
8.1.8 Study Activity – Active Tasks
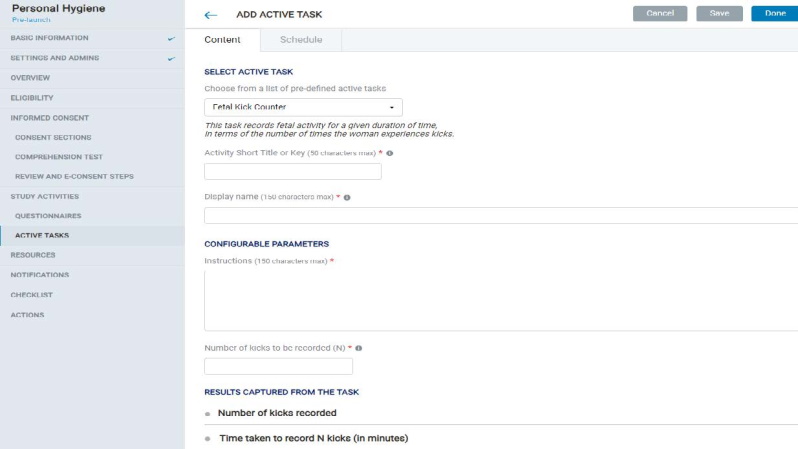
- The Admin can choose to add active tasks to the study from the options available in the WCP.
- Once an active task is selected, the admin needs to fill in values for its configurable attributes.
- A number of scheduling options are provided that the admin can choose from to determine the active task schedule in the mobile app.
8.1.9 Resources
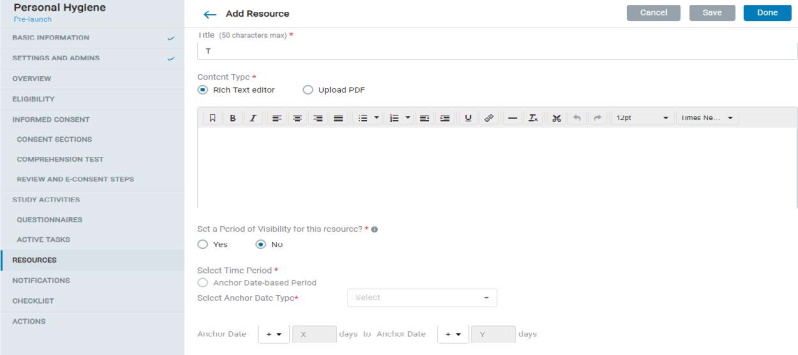
- The Admin can add resources’ content either using a text editor or by uploading a PDF. These resources will be reflected in Mobile app in the Resources section of the study.
- Resources can be made available in the app for specific time periods using the Period of Visibility settings. There is also a provision to notify mobile users when a new resource is available.
8.1.10 Notifications
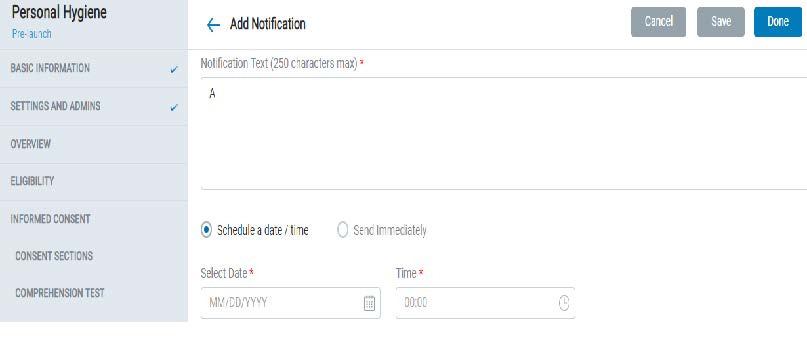
- Admins can create and send study-specific push notifications to participants
- Notifications can either be sent out immediately or scheduled for a date and time.
8.1.11 Actions
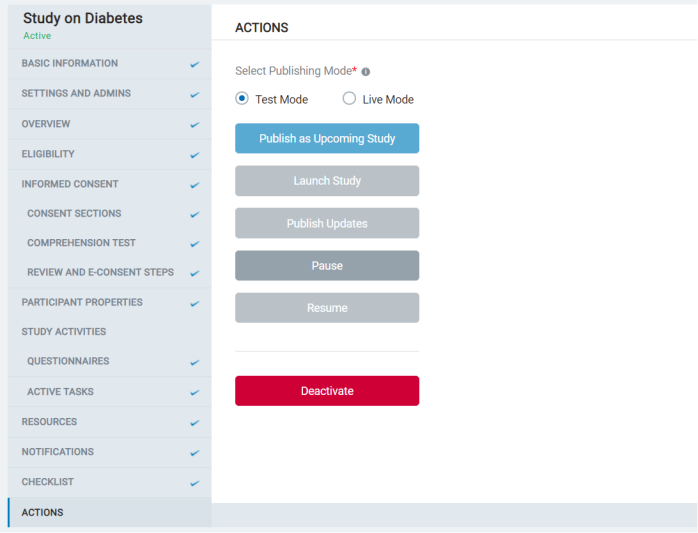
- In this section, the admin sees the various actions that can be taken with a study.
- Admins can choose to publish the study as test mode or live mode. Each mode can be published as an upcoming one, launch the study to enroll participants, collect data, publish updates ongoing to existing studies, or Pause/Resume or deactivate them.
Related Topics
FDA MyStudies Infrastructure Deployment Automation
This section documents how deployment of the FDA MyStudies Mobile Application can be deployed automatically in AWS. The purpose of this automation is to provide the FDA MyStudies community with tooling to assist in deployment of the MyStudies Application Infrastructure.
The automation consists of two components, described in these topics:
- Installation Script Automation: Accelerates the installation of LabKey and/or MyStudies servers and can be used in on-premise installations or in cloud deployments
- AWS (Terraform) Deployment Automation: A full featured automated deployment of the required infrastructure to deploy a functional MyStudies Application Infrastructure. This automation leverages the Install Script automation to deploy MyStudies Application servers with AWS.
Install Script Automation
Install Script automation accelerates the installation of the MyStudies servers and can be used in on-premise installations or in cloud deployments. This topic describes what can be automated and how to get started.
The power of the installation script is in the flexibility provided by a substantial list of internal functions and environment variables that accelerate installation with predefined values and the ability to easily override values for a custom installation. Installation functions can be skipped if that particular step is not required.
What does this script automate?
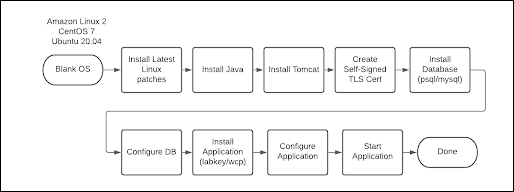
Supported Operating Systems
- Amazon Linux 2
- Centos 7
- RedHat RHEL 8
- Ubuntu 20.04
Quick Start
Sample installation configurations have been provided for quick start of installation for MyStudies Application Servers. Note: each of the below blocks is intended to be run on a different server.
Example Usage: Install MyStudies Registration Server
sudo su -
git clone https://github.com/FDA-MyStudies/install-script.git
cd ./install-script
source ./sample_registration_envs.sh
./install-labkey.bash
Example Usage: Install MyStudies Response Server
sudo su -
git clone https://github.com/FDA-MyStudies/install-script.git
cd ./install-script
source ./sample_response_envs.sh
./install-labkey.bash
Example Usage: Install MyStudies WCP Server
sudo su -
git clone https://github.com/FDA-MyStudies/install-script.git
cd ./install-script
source ./sample_wcp_envs.sh
./install-wcp.bash
Reference
A substantial list of configurable environment variables is documented in the repo ReadMe file here:
Related Topics
Deployment Automation with Terraform
The
terraform-aws-mystudies module creates and configures the "backend" components of the FDA MyStudies platform on AWS.
Overview
This topic example describes how to deploy a functional MyStudies Application Server Environment in AWS using the MyStudies Terraform Module with the following features:
- VPC
- Bastion Host
- Application Load Balancer
- TLS/SSL Certificate
- Route 53 DNS Domain Records
- Secrets Management
- Security Groups
- Registration Application Server
- Registration Database Server
- Response Application Server
- Response Database Server
- WCP Application Server
- WCP Database Server
Deployment Considerations
The MyStudies AWS Terraform Module is designed to deploy the components required to operate a functional test/evaluation MyStudies Application deployment. However, the example configuration does not take into account the requirements that should be considered for an organization to operate a system that collects Personal Health Information (PHI). Organizations planning to deploy MyStudies for PHI use will need to take into account several factors not covered by this example including but not limited to: security, backups, data retention, regulatory compliance requirements, privacy etc.
Deployment Options
- The MyStudies AWS Terraform module allows the MyStudies Administrator to choose options for deployment such as EC2 instance size, data volumes and sizes, and choices to use local or remote (dedicated) database server options. Each of these options can affect the cost of operating the MyStudies environment and care should be taken on how these choices will impact the operating costs of the deployment
- The example MyStudies deployment defaults to storing the Terraform state on the Administrators workstation. Administrators are strongly encouraged to configure the deployment to store the Terraform state in a S3 Bucket. More information about storing Terraform state remotely is available here:
- https://www.terraform.io/language/state/remote
Quick Start
The MyStudies AWS Terraform Module includes a sample deployment example which is configured to deploy an functional application server environment.
Prerequisites
- AWS Account
- AWS IAM User Account with appropriate permissions to deploy AWS resources
- AWS Access Keys for the IAM User and the administrator workstation configured with the AWS Access Keys, Profile and ENV variables
- Administrator computer configured with AWS credentials and Terraform 1.2.x installed
- An existing Route53 DNS domain configured in the target AWS account
- At least one new or existing AWS EC2 Key Pair. Two are recommended - one pair for the bastion host and one pair for the application servers
Quick Start deployment steps
Clone the MyStudies Terraform Module repo to an administrator computer:
git clone https://github.com/FDA-MyStudies/terraform-aws-mystudies.git
CD to the examples/sample-deployment directory:
cd ./terraform-aws-mystudies/examples/sample-deployment
Review and edit the terraform.tfvars configuration file - configuring appropriate values (e.g domain name, key pairs, WCP administrator email addresses etc.)
Deploy the infrastructure with terraform:
terraform init
terraform plan
terraform apply
Terraform will deploy the required resources and application servers, and will start the applications. The system is now ready for administrators to complete the initial configuration and setup. For information on how to complete initial setup follow this guide:
Clean up - How to remove the deployed environment
The deployed environment and deployed resources can be easily removed using the Terraform Destroy command as follows. Note: this will remove all deployed resources including any unsaved data. We highly recommend you take appropriate measures to back up your data.
cd ./terraform-aws-mystudies/examples/sample-deployment
terraform destroy
Troubleshooting
How to SSH to instances
The MyStudies module includes a ssh_config.txt file which can be used to SSH to the instances.
Example: SSH to MyStudies-Response server:
cd ./terraform-aws-mystudies/examples/sample-deployment
ssh -F ssh_config.txt mystudies-response
Secrets Management
Secrets Management is a component of the MyStudies Terraform Module. Random secrets are generated automatically for database admin, application connections etc. The Module utilizes the AWS Systems-Manager Parameter Store to securely store and retrieve secrets. Should you require access to the application secrets, you may view them in the AWS Systems Manager Parameter Store Web Console.
Partial/Staged Deployment Considerations - Out of order deployment consequences
The MyStudies Module has options to enable/disable each application server and associated RDS server. Administrators should take into consideration that these options are evaluated during initial deployment and have some consequences. For example if you initially choose to use local application databases and later want to use RDS (dedicated database servers) your applications will have been configured to use local databases, and the module does not take into account changing from local to RDS databases in a staged deployment.
If you find yourself in that situation you have two options:
- Backup the local database and restore the DB to the RDS database server and manually configure the applications to use the RDS server database connection
OR
- Abandon the local database and application server and redeploy a new application server. To do so, simply terminate the application server in the AWS EC2 console and redeploy with the MyStudies Terraform Module
Related Topics
FDA MyStudies: Release Notes
Migration to GitHub
You'll find the source code and more detail here:
Version 22.3 (March 2022)
- Support for multiple languages.
Version 21.11 (November 2021)
- Spanish language support. The app can present questions in Spanish or English to users. All admin and researcher review of data is in English.
Version 21.3 (March 2021)
- Consent by Legally Authorized Representative (LAR)
- Include "Additional Signature" line in consent document
Version 20.11 (November 2020)
New Features:
- New "MyStudies Coordinator" role lets a user generate and see tokens without full admin permissions
Version 20.3 (March 2020)
New Features:
- Data Sharing Consent flag
- Participant Properties available, keyed on enrollment token
Version 2019.10 (October 2019)
New Features:
- Schedule study activities and resources based on study enrollment (or other WCP-configured date elements) as Anchor Date.
- Support multiple mobile apps from a single instance of the Web Configuration Portal (WCP)
- Ability to include an “other” open-text option in single/multi select questions
- Automatically forward survey responses stored in Response Server to external systems
- Partition user email addresses by folder in the Registration Server
Application Security and Compatibility Updates:
- Compatibility with LabKey Server 19.2.X
Version 2019.05 (May 2019)
New Features:
- Ability to schedule study activities and resources based on study enrollment (or other WCP-configured date elements) as Anchor Date.
Application Security and Compatibility Updates:
- iPhone X, XR, XS
- iOS 11.x and 12.x
- ResearchKit 2.0+
- Android KitKat to Pie
- ResearchSTack 1.1.1
- Compatibility with LabKey Server 19.1.X
- Mutating APIs have been updated to require HTTP POST
Version 2017.01 (January 2017)
- Original features and API
User Registration Server: Set Up
This topic describes how to set up and build the APIs required for the FDA MyStudies mobile app Registration Server.
FDA-User Reg WS
This project is developed using the Spring MVC framework in a LabKey development environment. You will find it on github here:
Getting Started
To build this project you need to set up a LabKey development machine. Follow the instructions in this topic:
Next, clone git repositories including
UserReg-WS into the /server/modules folder in your enlistment.
Switch to the release 2019.10 branch and git pull.
In your settings.gradle file, find the commented out line with this text: //include ":server:modules:workflow" Underneath this line, add the following two lines. (Note that these might change in the future if folder structure is changed.)
include ":server:modules:UserReg-WS"
include ":server:modules:UserReg-WS:distributions:Registration"
Generate Local Build
Once the setup is done, build the distribution with this command:
gradlew cleanBuild deployApp
Run and Test
Click the Run (or Debug) icon in your IDE:

Test this URL:
Production Builds
To generate a production build use the below commands:
gradlew deployApp -PdeployMode=prod
OR
gradlew -PdeployMode=prod :server:modules:UserReg-WS:distributions:Registration:distribution
Once the build is completed, you will find the distribution file at this path, where <LABKEY_HOME> is the root of your LabKey enlistment:
<LABKEY_HOME>/dist/Registration
Mobile Client API
This section is under construction.
The FDA MyStudies mobile client api provides enrollment services and data storage for mobile phone client applications. Participants, using a mobile application, can request enrollment in a study, withdraw from a study, and optionally, have their data deleted upon un-enrollment.
Topics
- Web Configuration Portal API: The Web Config Portal services provide access to Gateway, Study and Activities meta data and configurations.
- WCP - Schemas and Structures: Consolidated schema and structures for the Web Configuration Portal (WCP).
- User Registration Server API: User/Registration Services provide mechanisms to register users, manage their profiles, settings, preferences, activity and progress in the app.
- Response Server API: Response services provide ways to enroll participant in a study, submit responses, and fetch responses from the Response Server.
Appendix 1 - Phase 2A Changes Description
| Keys | Description | Optional? | Empty | Type | Server |
|---|
| schedulingType | The type of scheduling set by admin each activity.
'Regular' OR 'AnchorDate' | No | No | String | WCP |
| scheduling | Will have the scheduling detail of activity | No | No | Object | WCP |
| startTime | Represent the start time of activity. | No | Yes | String | WCP |
| endTime | Represent the end time of activity. | No | Yes | String | WCP |
| anchorDate | Will have the anchor date detail.
This will be present in case 'schedulingType = AnchorDate' | Yes | No | Object | WCP |
| sourceType | Child Node of 'anchorDate'
Represents the anchor date source.
'EnrollmentDate' OR 'ActivityResponse'
EnrollmentDate: Date of user enrollment.
ActivityResponse: Response of date type question. | No | No | String | WCP |
| sourceActivityId | Child Node of 'anchorDate'
Value of activity ID.
Will be empty if sourceType == EnrollmentDate | No | Yes | String | WCP |
| sourceKey | Child Node of 'anchorDate'
Value of question key.
Will be empty if sourceType == EnrollmentDate | No | Yes | String | WCP |
| start & end | Will have the elapsed days from anchor date (positive value) or days before anchor date (negative value) and time | Yes | No | Object | WCP |
| anchorDays | Child Node of 'start' or 'end'
elapsed days from anchor date, positive or negative | No | No | Integer | WCP |
| time | Child Node of 'start' or 'end'
time of the anchor date. | No | No | String | WCP |
| anchorRuns | Will have the elapsed days from anchor date (positive value) or days before anchor date (negative value) and time
This will be present for frequency == Manual Scheduled | Yes | No | Object | WCP |
| startDays | Child Node of 'anchorRuns'
elapsed days from start anchor date, positive or negative | No | No | Integer | WCP |
| endDays | Child Node of 'anchorRuns'
elapsed days from end anchor date, positive or negative | No | No | Integer | WCP |
| propertyMetadata | The details of this object are used to get participant properties from response server to calculate start date, enddate and runs for the activity.
This will be present in case 'schedulingType = AnchorDate' and ‘sourceType’=ParticipantProperty | Yes | No | Object | WCP |
| addNewRuns | This is used to identify whether to add new runs or update the run if frequency = Manual Scheduled and 'schedulingType = AnchorDate' and ‘sourceType’=ParticipantProperty | Yes | No | String | WCP |
| activityStartDate | Added this field to support participant property feature. This is used to save the start date of the activity. | Yes | No | String | Registration |
| activityEndDate | Added this field to support participant property feature. This is used to save the end date of the activity. | Yes | No | String | Registration |
| anchorDateVersion | Added this field to support participant property feature. This is used to save the anchor date version. | Yes | No | String | Registration |
| lastModifiedDate | Added this field to support participant property feature. This is used to save the last modified date of the modified of activityStartDate/activityEndDate. | Yes | No | String | Registration |
| anchorDatecreatedDate | Added this field to support participant property feature. This is used to save the anchor date created date. | Yes | No | String | Registration |
| customScheduleRuns | Added this field to support participant property feature. This is used to save the runs for manual schedule frequency type activity. | Yes | No | Object | Registration |
| allowDataSharing | This is used to share the user's input on sharing their data to third parties. | No | No | String | Registration |
Web Configuration Portal API
This topic is under construction.
WCP Services
The Web Config Portal services provide access to Gateway, Study and Activities meta data and configurations.
Learn about Phase 2A Changes to this API in this topic:
Mobile Client API.
Headers for WCP Services
Request header for all WCP requests:
| HeaderParams | Values |
|---|
| Authorization | Basic bundleid:apptoken |
| applicationId | AppId(String) |
| orgId | OrgId(String) |
Response header for all WCP requests:
| HeaderParams | Values |
|---|
| status | http status code |
| StatusMessage | string |
GetGatewayAppResourcesInfo
Service to get Gateway info and Gateway resources data.
Request:
Response:
| Params | Values |
|---|
| message | string |
| info | [
{
"image":string, link
"title":string,
"text":string,
"videoLink":string
}
] |
| resources | [
{
"resourceId":string,
"title":string,
"type":string, html/pdf
"content":string text/pdf link
}
] |
GetStudyList
Service to get all the configured studies from the WCP.
Request:
Response:
| Params | Values |
|---|
| message | string |
| studies | [
{
"studyId":string,
"studyVersion": string,
"title":string,
"category":string,
"sponsorName":string,
"tagline":string,
"status":string, active/upcoming/closed
"logo":string, link
"settings": {
"enrolling":bool,
"platform":string, ios/android/all
"rejoin":bool
}
}
] |
GetStudyBasicInfo
Service to get all the configured studies from the WCP.
Request:
| Params | Values |
|---|
| studyId | string |
Response:
| Params | Values |
|---|
| message | string |
| studies | [
{
"studyId":string,
"studyVersion": string,
"title":string,
"category":string,
"sponsorName":string,
"tagline":string,
"status":string, active/upcoming/closed
"logo":string, link
"settings": {
"enrolling":bool,
"platform":string, ios/android/all
"rejoin":bool
}
}
] |
GetEligibilityConsentMetadata
Get eligibility and consent info for the provided study identifier.
Request:
| Method | URL |
|---|
| GET | /eligibilityConsent |
| Params | Values |
|---|
| studyId | string |
| language | string |
Response:
| Params | Values |
|---|
| message | string |
| eligibility | {
"type":string, token/test/combined
"tokenTitle":string,
"test": [
<refer to "WCP - Schema and Structures" for step structures>
],
"correctAnswers": [
{
"key":string,
"answer":bool
}
]
}
Step Structures can be found in the topic: WCP - Schemas and Structures |
| consent | {
"version":string,
"visualScreens": [
{
"type":string,
"title":string,
"text":string,
"description":string,
"html":string,
"url":string,
"visualStep":bool
}
],
"comprehension": {
"passScore":Integer,
"questions": [
{
<refer to "WCP - Schema and Structures" for step structures>
}
],
"correctAnswers": [
{
"key":string,
"answer":[string],
"evaluation":string any/all
}
]
},
"sharing": {
"title":string,
"text":string,
"shortDesc":string,
"longDesc":string,
"learnMore":string,
"allowWithoutSharing":bool
},
"review": {
"reasonForConsent":string,
"reviewHTML":string,
"consentByLAR":string,
"additionalSignature":string,
"signatures":string array
}
}
Step Structures can be found in the topic: WCP - Schemas and Structures |
GetConsentDocument
Get consent document by passing the consent version or the activity id and activity version for the provided studyId.
Request:
| Method | URL |
|---|
| GET | /consentDocument |
| Params | Values |
|---|
| studyId | string |
| consentVersion | string |
| activityId | string |
| activityVersion | string |
| language | string |
Response:
| Params | Values |
|---|
| message | string |
| consent | {
"version": string,
"type":string, text/html
"content": string
} |
GetResourcesForStudy
Get resources metadata for the provided study identifier.
Request:
| Params | Values |
|---|
| studyId | string |
| language | string |
Response:
| Params | Values |
|---|
| message | string |
| resources | [
{
"title":string,
"type":string, html/pdf
"resourcesId":string,
"content":string, text/pdf link
"audience":string, all/limited
"availability":{
"availableDate":string, availability start date
"expiryDate":string, availability end date
"startDays":integer, elapsed days from anchor date (positive value) or
days before anchor date (negative value)
"endDays":integer, elapsed days from anchor date (positive value) or
days before anchor date (negative value)
"availabilityType": string, Regular/AnchorDate
"sourceType": string, EnrollmentDate/ActivityResponse/ParticipantProperty
"propertyMetadata": {
"propertyType": string, PreEnrollment / PostEnrollment,
"propertyId": string,
"propertyDataFormat": string,
"shouldRefresh": bool, true/false
"dataSource": string, ExternalSystem / Other
"status": string, active / deactivated
"externalPropertyId": string,
"dateOfEntryId": string
},
"sourceActivityId":string,
"sourceKey":string,
"sourceFormKey": string,
"startTime": string, HH:mm:ss
"endTime": string HH:mm:ss
}
}
] |
GetStudyInfo
Get study metadata for the provided study identifier.
Request:
| Params | Values |
|---|
| studyId | string |
| language | string |
Response:
| Params | Values |
|---|
| message | string |
| studyWebsite | string link |
| info | [
{
"type": string, video
"image":string, link
"title":string,
"text":string,
"videoLink":string
}
] |
| anchorDate | {
"type": string, enrollment-date/date-question
"questionInfo": {
"activityId":string,
"activityVersion": string,
"key": string question key
}
} |
| withdrawalConfig | {
"type":string, delete_data/ask_user/no_action
"message":string
} |
GetStudyActivityList
Get all the activities in the provided study identifier.
Request:
| Method | URL |
|---|
| GET | /activityList |
| Params | Values |
|---|
| studyId | string |
| authorization | string |
| language | string |
Response:
| Params | Values |
|---|
| message | string |
| activities | [
{
"activityId":string,
"activityVersion":string,
"title":string,
"type":string, task/questionnaire
"startTime": string,
"endTime": string,
"branching":bool,
"lastModified":string,
"state": string,
"taskSubType":string, towerOfHonoi/spatialSpanMemory/fetelKick
"schedulingType": string, Regular/AnchorDate
"anchorDate": {
"sourceType": string, EnrollmentDate/ActivityResponse/ParticipantProperty
"sourceActivityId": string, activityId
"sourceKey": string, question Key
"sourceFormKey": string,
"propertyMetadata": {
"propertyId":string,
"propertyType": string, PreEnrollment / PostEnrollment
"propertyDataFormat": string,
"shouldRefresh": bool, //true/false
"dataSource": string, ExternalSystem / Other
"status": string, active / deactivated,
"externalPropertyId": string,
"dateOfEntryId": string
},
"start": {
"anchorDays": integer,
"time": string HH:mm:ss
},
"end": {
"anchorDays": integer,
"repeatInterval": integer,
"time": string HH:mm:ss
}
}
"frequency":
{
"type":string,
"addNewRuns": bool,
"runs": Array of runs for within a day and manual type
[
{
"startTime":string,
"endTime":string
}
]
}
"anchorRuns": [{
"startDays": integer,
"endDays": integer,
"time": string HH:mm:ss
}]
}
] |
GetStudyActivityMetadata
Get the activity metadata for provided study and activity identifier.
Request:
| Params | Values |
|---|
| studyId | string |
| activityId | string |
| activityVersion | string |
Response:
| Params | Values |
|---|
| message | string |
| activity | |
GetStudyDashboardInfo
Get dashboard metadata for the provided study identifier.
Request:
| Method | URL |
|---|
| GET | /studyDashboard |
| Params | Values |
|---|
| studyId | string |
Response:
| Params | Values |
|---|
| message | string |
| dashboard | {
"statistics":[
{
"title":string,
"displayName":string,
"statType":string,
"unit":string,
"calculation":string,
"dataSource":
{
"type":string, questionnaire/active task
"key":string, step key
"activity": {
"activityId": string,
"version": string
}
}
}
],
"charts":[
{
"title":string,
"displayName":string,
"type":string,
"scrollable": bool,
"configuration": {
"subType": string,
"settings": [
{
"barColor": string
}
]
},
"dataSource":
{
"type":string, questionnaire/active task
"key":string, step key
"activity": {
"activityId": string,
"version": string
}
"timeRangeType":string, days_of_week/days_of_month/weeks_of_month/months_of_year/runs
"startTime":string,
"endTime":string
}
}
]
} |
GetTermsPolicy
Get terms and policy for the provided study identifier.
Request:
Response:
| Params | Values |
|---|
| message | string |
| terms | string |
| privacy | string |
GetNotifications
Fetch available notifications.
Request:
| Method | URL |
|---|
| GET | /notifications |
| Params | Values |
|---|
| skip | integer; skip these number of notifications |
Response:
| Params | Values |
|---|
| message | string |
| notifications | [
"notificationId":string,
"type":string,
"subtype":string,
"studyId":string,
"audience":string,
"title":string,
"message":string,
"date":string
] |
GetAppUpdates
Check for app updates
Request:
Response:
| Params | Values |
|---|
| android | {
"latestVersion": string,
"forceUpdate": string
} |
| ios | {
"latestVersion": string,
"forceUpdate": string
} |
GetStudyUpdates
Check for study updates
Request:
| Method | URL |
|---|
| GET | /studyUpdates |
| Params | Values |
|---|
| studyId | string; |
| studyVersion | string; current study version in app |
Response:
| Params | Values |
|---|
| message | string |
| updates | {
"consent":bool,
"activities": bool,
"resources": bool,
"info": bool,
"status": string
} |
| currentVersion | string; current study version |
GetParticipantProperties
Get list of ParticipantProperties for the study
Request:
| Method | URL |
|---|
| GET | /participantProperties |
| Params | Values |
|---|
| studyId | string; |
| studyVersion | string; current study version in app |
Response:
| Params | Values |
|---|
| message | string |
| metadata | {
"studyId":string,
"studyVersion": string
} |
| participantProperties | [
{
"propertyId": string,
"propertyName": string,
"propertyType": string,
"propertyDataType": string,
"shouldRefresh": bool,
"dataSource": string,
"status": string,
"version": string
}
] |
Related Topics
WCP - Schemas and Structures
This topic is under construction.
This document covers the consolidated schema and structures for the Web Configuration Portal (WCP).
Updates
Mar 20,2019 v1.7
- Added “other” in Question Step of multiple choice
Nov 20,2017 v1.6
- Added “operator” in Question Step for each destination
- Added “kickCount” for Fetel Kick Active Task Format
- Added “dateRange” for Date Type Question Format
Mar 16, 2017 v1.5
- Expanded text choices array for text scale, text choices and value pickers.
Mar 5, 2017 v1.4
- Added Destinations structure for question step
- Updated Form Step result structure. It is array of array(iterations) of question results.
- Removed configuration from the activity metadata.
Feb 22, 2017 v1.3
- Added TowerOfHanoi and SpatialSpanMemory in supported active task types.
- Updated Active Task type to ‘task’ from ‘activeTask’
Feb 16, 2017 v1.2
- Changed Active Task Step result to “grouped” result
- Added activityRunId to activity result metadata
Feb 09, 2017 v1.1
- Changed ‘info’ to ‘metadata’ in Activity Metadata Structures
- Changed ‘response’ to ‘data’ in Activity Result Structures
- Changed ‘description’ to ‘text’ in Active Task Step
Feb 08, 2017 v1.0
- Consolidated schema and structure document
Steps
Instruction Step
| Param | Value |
|---|
| "type" | String; "instruction" |
| "resultType" | null |
| "key" | String |
| "title" | String |
| "text" | String |
| "skippable" | Boolean; false |
| "groupName" | String; null |
| "repeatable" | Boolean; false |
| "repeatableText" | String; null |
| "destinations" | Array |
Question Step
| Param | Value |
|---|
| "type" | String; "question" |
| "resultType" | String; QuestionResultType |
| "key" | String |
| "title" | String |
| "text" | String |
| "skippable" | Boolean |
| "groupName" | String |
| "repeatable" | Boolean; false |
| "repeatableText" | String; null |
| "destinations" | [
{
"condition": string, default for no condition
"destination": string, completion for last
"operator": string e/gt/lt/gte/lte/range/ne for formula based branching
}
] |
| “healthDataKey” | String |
| "format" | Dictionary; QuestionFormat |
QuestionResultType:
- scale
- continuousScale
- textScale
- valuePicker
- imageChoice
- textChoice
- boolean
- numeric
- timeOfDay
- date
- text
- email
- timeInterval
- height
- location
QuestionFormat:
- Scale
- "maxValue" - Int; Max:10000
- "minValue" - Int; Min:-10000
- "default" - Int
- "step" - Int; Min:1, Max:13
- "vertical" - Bool
- "maxDesc" - String
- "minDesc" - String
- "maxImage" - Image
- "minImage" - Image
- ContinuousScale
- "maxValue" - Number
- "minValue" - Number
- "default" - Number
- "maxFractionDigits" - Integer
- "vertical" - Bool
- "maxDesc" - String
- "minDesc" - String
- "maxImage" - Image
- "minImage" - Image
- TextScale
- "textChoices" -
[
  {
      "text": string,
      "value": string,
      "detail": string, nil
      "exclusive": bool  true
  }
]; Min:2, Max:8
- "default" - Int
- "vertical" - Bool
- ValuePicker
- "textChoices" -
[
  {
    "text": string,
    "value": string,
    "detail": string,  nil
    "exclusive": bool, true
  }
];
- ImageChoice
- "imageChoices" -
[
  {
    "image": string,
    "selectedImage": string,
    "text": string,
    "value": string
  }
];  Image Size 45px-60px
- TextChoice
- "textChoices" -
[
  {
    "text": string,
    "value": string,
    "detail": string, nil
    "exclusive"	: bool,
    "other": {
      "placeholder": string,
      "isMandatory": bool,
      "textfieldReq": bool
    }
  }
];
- "selectionStyle" - String; Single/Multiple
- Numeric
- "style" - String; Integer/Decimal
- "unit" - String
- "minValue" - Number
- "maxValue" - Number
- "placeholder" - String
- Date
- "style" - String; Date/Date-Time;
- "minDate" - Date; "yyyy-MM-dd'T'HH:mm:ss.SSSZ"
- "maxDate" - Date; "yyyy-MM-dd'T'HH:mm:ss.SSSZ"
- "default" - Date
- “dateRange” - String; (untilCurrent/afterCurrent/custom)
- Text
- "maxLength" - Int; =0 -> No max length
- "validationRegex" - String
- "invalidMessage" - String
- "multipleLines" - Bool
- "placeholder" - String
- Email
- TimeInterval
- "default" - Number
- "step" - Integer; In minutes 1-30
- Height
- "measurementSystem" - String; Local/Metric/US
- "placeholder" - String
- Location
- "useCurrentLocation" - Bool
Question Result:
- "resultType" - String; QuestionResultType
- "key" - String
- "startTime" - String; "yyyy-MM-dd'T'HH:mm:ss.SSSZ"
- "endTime" - String; "yyyy-MM-dd'T'HH:mm:ss.SSSZ"
- "skipped" - Boolean
- "value" - ResultFormat
ResultFormat:
- Scale
- ContinuousScale
- TextScale
- ValuePicker
- ImageChoice
- TextChoice
- Boolean
- Numeric
- TimeOfDay
- "value" - String; "HH:mm:ss"
- Date
- "value" - String; "yyyy-MM-dd'T'HH:mm:ss.SSSZ"
- Text
- Email
- TimeInterval
- Height
- Location
- "value" - String; (lat,long)
Form Step
| Param | Value |
|---|
| "type" | String; "form" |
| "resultType" | String; "grouped" |
| "key" | String |
| "title" | String |
| "text" | String |
| "skippable" | Boolean |
| "groupName" | String; null |
| "repeatable" | Boolean |
| "repeatableText" | String |
| "destinations" | Array |
| "steps" | Array; [Question] |
Form Result:
- "resultType" - String; "grouped"
- "key" - String
- "startTime" - String; "yyyy-MM-dd'T'HH:mm:ss.SSSZ"
- "endTime" - String; "yyyy-MM-dd'T'HH:mm:ss.SSSZ"
- "skipped" - Boolean
- "value" - [[QuestionResult]] Array of number of iterations of Q-results
Active Task Step
| Param | Value |
|---|
| "type" | String; "task" |
| "resultType" | String; ActiveTaskType |
| "key" | String |
| "text" | String |
| "options" | [ActiveTaskOptions] |
| "format" | Dictionary; ActiveTaskFormat |
ActiveTaskType:
- fetalKickCounter
- spatialSpanMemory
- towerOfHanoi
ActiveTaskOptions:
- excludeInstructions
- excludeConclusion
- excludeAccelerometer
- excludeDeviceMotion
- excludePedometer
- excludeLocation
- excludeHeartRate
- excludeAudio
ActiveTaskFormat:
- FetalKickCounter
- "duration" - Number; in hours
- “kickCount” - Number
- SpatialSpanMemory
- “initialSpan” - Integer
- “minimumSpan” - Integer
- “maximumSpan” - Integer
- “playSpeed” - Integer
- “maximumTests” - Integer
- “maximumConsecutiveFailures” - Integer
- “customTargetImage” - Image
- “customTargetPluralName” - String
- “requireReversal” - Bool
- TowerOfHanoi
- "numberOfDisks" - Integer;
Active Task Result:
- "resultType" - String; ActiveTaskType (“grouped”)
- "key" - String
- "startTime" - String; "yyyy-MM-dd'T'HH:mm:ss.SSSZ"
- "endTime" - String; "yyyy-MM-dd'T'HH:mm:ss.SSSZ"
- "value" - ActiveTaskResult
ActiveTaskResult:
- FetalKickCounter
[
  {
    "resultType": string,  numeric
    "key": string,  duration
    "startTime": string, null
    "endTime": string, null
    "skipped": bool, false
    "value": double
  } ,
  {
    "resultType": string,  numeric
    "key": string,  count
    "startTime": string, null
    "endTime": string, null
    "skipped": bool, false
    "value": double
  }
]
- SpatialSpanMemory
[
  {
    "resultType": string,  numeric
    "key": string,  score
    "startTime": string, null
    "endTime": string, null
    "skipped": bool, false
    "value": Integer
  } ,
  {
    "resultType": string,  numeric
    "key": string,  number of games
    "startTime": string, null
    "endTime": string, null
    "skipped": bool, false
    "value": Integer
  },
  {
    "resultType": string,  numeric
    "key": string,  number of failures
    "startTime": string, null
    "endTime": string, null
    "skipped": bool, false
    "value": Integer
  }
]
- TowerOfHanoi
[
  {
    "resultType": string,  numeric
    "key": string,  puzzle was solved
    "startTime": string, null
    "endTime": string, null
    "skipped": bool, false
    "value": bool
  } ,
  {
    "resultType": string,  numeric
    "key": string,  number of moves
    "startTime": string, null
    "endTime": string, null
    "skipped": bool, false
    "value": Integer
  }
]
Activity
Questionnaire
| Param | Value |
|---|
| "type" | String; "questionnaire" |
| "metadata" | Dictionary; {
"studyId": string,
"activityId": string,
"name": string,
"version": string,
"lastModified": string,
"startDate": string,
"endDate": string
} |
| "steps" | [Steps]; Does not contain ActiveTaskStep |
Questionnaire Result:
- "type" - String; "questionnaire"
- "metadata" - Dictionary;
{
  "studyId": string,
  "activityId": string,
  "version": string,
  "activityRunId": string
},
- "participantId" - String
- "data" - Dictionary;
{
  "startTime": string,
  "endTime": string,
  "results": [StepResult]
}
Active Task
| Param | Value |
|---|
| "type" | String; "task" |
| "metadata" | Dictionary {
"studyId": string,
"activityId": string,
"name": string,
"version": string,
"lastModified": string,
"startDate": string,
"endDate": string
} |
| "steps" | [Steps]; Contains ActiveTaskStep |
Active Task Result:
- "type" - String; "task"
- "metadata" - Dictionary;
{
  "studyId" string,
  "activityId" string,
  "version" string,
  "activityRunId" string
},
- "participantId" - String
- "data" - Dictionary;
{
  "startTime": string,
  "endTime": string,
  "results": [StepResult]
}
Related Topics
User Registration Server API
This topic is under construction.
User/Registration Services
User/Registration Services provide mechanisms to register users, manage their profiles, settings, preferences, activity and progress in the app.
Learn about Phase 2A Changes to this API in this topic:
Mobile Client API.
Headers for User/Registration Services
Request header for all user/registration requests (auth and userId is not required for login/registration/forgot password)
| HeaderParams | Values |
|---|
| auth | string; authentication token |
| userId | string |
| orgId | string |
| applicationId | string |
Response header for all user/registration requests
| HeaderParams | Values |
|---|
| status | http status code |
| StatusMessage | string |
RegisterUser
Register new user.
Request:
| Params | Values |
|---|
| emaiId | string |
| password | string |
Response:
| Params | Values |
|---|
| message | string |
| userId | string |
| verified | bool |
| auth | string |
| refreshToken | string |
ConfirmRegistration
Confirm user registration.
Request:
| Params | Values |
|---|
| emailId | string |
| code | string |
Response:
| Params | Values |
|---|
| message | string |
ResendConfirmation
Resend confirmation email.
Request:
| Method | URL |
|---|
| POST | /resendConfirmation |
| Params | Values |
|---|
| emailId | string |
Response:
| Params | Values |
|---|
| message | string |
LoginUser
Login user.
Request:
| Params | Values |
|---|
| emailId | string |
| password | string |
Response:
| Params | Values |
|---|
| message | string |
| userId | string |
| verified | bool |
| auth | string |
| refreshToken | string |
| resetPassword | bool; true if login with temporary password |
LogoutUser
Logout user.
Request:
| Params | Values |
|---|
| reason | string; user_action/error/security(jailbroken/rooted) |
Response:
| Params | Values |
|---|
| message | string |
ForgotPassword
Request to reset password.
Request:
| Method | URL |
|---|
| POST | /forgotPassword |
| Params | Values |
|---|
| emailId | string |
Response:
| Params | Values |
|---|
| message | string |
ChangePassword
Request to change password.
Request:
| Method | URL |
|---|
| POST | /changePassword |
| Params | Values |
|---|
| currentPassword | string |
| newPassword | string |
Response:
| Params | Values |
|---|
| message | string |
GetUserProfile
Fetch saved user profile from the server.
Request:
Response:
| Params | Values |
|---|
| message | string |
| profile | |
| settings | {
"remoteNotifications": bool,
"localNotifications" :bool,
"touchId" :bool,
"passcode" :bool,
"locale" :string,
"reminderLeadTime": string
} |
UpdateUserProfile
Update user profile on server.
Request:
| Method | URL |
|---|
| POST | /updateUserProfile |
| Params | Values |
|---|
| settings | {
"remoteNotifications": bool,
"localNotifications": bool,
"touchId": bool,
"passcode": bool,
"reminderLeadTime" :string,
"locale": string
} |
| info | {
"os": string, android/ios
"appVersion": string,
"deviceToken": string
} |
| participantInfo | {
"studyId": string,
"participantId": string,
"enrolledDate": string
} |
Response:
| Params | Values |
|---|
| message | string |
GetStudyState
Fetch studies state
Request:
Response:
| Params | Values |
|---|
| message | string |
| studies | [
{
"studyId": string,
"status": string,
"enrolledDate": string,
"participantId": string,
"bookmarked": bool,
"completion": integer,
"adherence": integer,
}
] |
UpdateStudyState
Update study state
Request:
| Method | URL |
|---|
| POST | /updateStudyState |
| Params | Values |
|---|
| studies | [
{
"studyId": string,
"status": string,
"enrolledDate": string,
"participantId": string,
"bookmarked": bool,
"completion": integer,
"adherence": integer
}
] |
Response:
| Params | Values |
|---|
| message | string |
UpdateEligibilityConsentStatus
Update eligibility and consent status.
Request:
| Method | URL |
|---|
| POST | /updateEligibilityConsentStatus |
| Params | Values |
|---|
| studyId | string; |
| eligbibility | bool; eligible/not eligible |
| consent | {
"version": string, consent version
"status": string, completed/pending
"pdf": string base-64 encoded string
} |
| sharing | string; |
Response:
| Params | Values |
|---|
| message | string |
GetConsentDocument
Download consent PDF from server by passing studyId and consent version. If no consent version is provided, latest version of consent should be returned.
LabKey will also use this service, in that case, user id in header params should be treated as app token/participant id.
Request:
| Method | URL |
|---|
| GET | /consentDocument |
| Params | Values |
|---|
| studyId | string |
| consentVersion | string |
Response:
| Params | Values |
|---|
| message | string |
| consent | {
"version":string, consent version
"type": string, application/pdf
"content": string base-64 encoded string
} |
| sharing | string; |
UpdateActivityState
Update activity state.
Request:
| Method | URL |
|---|
| POST | /updateActivityState |
| Params | Values |
|---|
| studyId | string; study identifier |
| activity | [
{
"activityId": string, activity identifier
"activityVersion": string, activity version
"activityRunId": string, activity run identifier
"activityState": string, activity state
"bookmarked": bool,
"activityStartDate": string,
"activityEndDate": string,
"anchorDateVersion": string,
"anchorDatecreatedDate": "string",
"lastModifiedDate": string,
"customScheduleRuns": [{
"runStartDate": string,
"runEndDate": string
}],
"activityRun": {
"total" :integer,
"completed" :integer,
"missed" :integer
}
}
] |
Response:
| Params | Values |
|---|
| message | string |
GetActivityState
Fetch activity state.
Request:
| Method | URL |
|---|
| GET | /activityState |
| Params | Values |
|---|
| studyId | string; study identifier |
Response:
| Params | Values |
|---|
| message | string |
| activities | [
{
"activityId": string,
"activityVersion": string,
"activityRunId": string,
"activityState": string, activity state
"bookmarked": bool,
"activityStartDate": string,
"activityEndDate": string,
"anchorDateVersion": string,
"lastModifiedDate": string,
"anchorDatecreatedDate": string,
"customScheduleRuns": [{
"runStartDate": string,
"runEndDate": string
}],
"activityRun": {
"total":integer,
"completed":integer,
"missed":integer
}
}
] |
WithdrawFromStudy
Delete user’s study info from server.
Request:
| Params | Values |
|---|
| studyId | string; study id |
| deleteData | bool: should delete study data |
Response:
| Params | Values |
|---|
| message | string |
Deactivate Account
Request:
| Method | URL |
|---|
| DELETE | /deactivate |
| Params | Values |
|---|
| deleteData | string array(array of studyIds) |
Response:
| Params | Values |
|---|
| message | string |
Feedback
Provide feedback about the app.
Request:
| Params | Values |
|---|
| subject | string |
| body | string |
Response:
| Params | Values |
|---|
| message | string |
ContactUs
Reach out to app owner
Request:
| Params | Values |
|---|
| subject | string |
| body | string |
| firstName | string |
| email | string |
Response:
| Params | Values |
|---|
| message | string |
Refresh Token
Get new accesstoken and refreshtoken.
Request:
| Method | URL |
|---|
| POST | /refreshToken |
| Params | Values |
|---|
| refreshToken | string |
Response:
| Params | Values |
|---|
| message | string |
| userId | string |
| auth | string |
| refreshToken | string |
Send Notification
For sending notifications.
Request:
| Method | URL |
|---|
| POST | /sendNotification |
| Params | Values |
|---|
| notifications | [
{
"customStudyId": string,
"notificationText": string,
"notificationTitle": string,
"notificationType": string,
"notificationSubType": string
}
] |
Response:
| Params | Values |
|---|
| message | string |
App Properties
For setting the properties of the app.
Request:
| Method | URL |
|---|
| POST | /appPropertiesUpdate |
| Params | Values |
|---|
| appId | string |
| orgId | string |
| androidBundleId | string |
| androidServerKey | string |
| iosBundleId | string |
| iosCertificate | string |
| iosCertificatePassword | string |
| email | string |
| emailPassword | string |
| registerEmailSubject | string |
| registerEmailBody | string <refer to Appendix - Email Body> |
| forgotPassEmailSubject | string |
| forgotPassEmailBody | string <refer to Appendix - Email Body> |
| feedbackEmail | string |
| contactUsEmail | string |
| appName | string |
| methodHandler | string |
Response:
| Params | Values |
|---|
| message | string |
Appendix - Email Body
The body of the emails need to be in HTML format and the <<< TOKEN HERE >>> part represents an identifier for the verification code or temporary password dynamically generated for that email. All fields in the API are mandatory.
Register Email Body
Email subject for signup mail, replace ‘xxxxxx’ with your organization’s name that is offering the app, or other suitable text.
<html>
<body>
<div style='margin:20px; padding:10px; font-family: sans-serif;font-size: 14px;'>
<span>Hi, </span><br/><br/>
<span>Thank you for registering with us! We look forward to having you on board and actively taking part in<br/>research studies conducted by xxxxxx.
</span><br/><br/>
<span>Your sign-up process is almost complete. Please use the verification code provided below to<br/>complete the Verification step in the mobile app.
</span><br/><br/>
<span><strong>Verification Code:</strong> <<< TOKEN HERE >>>
</span><br/><br/>
<span>This code can be used only once and is valid for a period of 48 hours only.
</span><br/><br/>
<span>Please note that registration (or sign up) for the app is requested only to provide you with a <br/>seamless experience of using the app. Your registration information does not become part of <br/>the data collected for any study housed in the app. Each study has its own consent
process <br/> and no data for any study will be collected unless and until you provide an informed consent<br/> prior to joining the study </span><br/><br/>
<span>For any questions or assistance, please write to <a>Contact Email Address</a> </span><br/><br/>
<span style='font-size:15px;'>Thanks,</span><br/>
<span>The xxxxxx Team</span><br/>
<span>----------------------------------------------------</span><br/>
<span style='font-size:10px;'>PS - This is an auto-generated email. Please do not reply.</span>
</div>
</body>
</html>
Forgot Password Email Body
Email Body for Password Help email, replace ‘xxxxxx’ with your organization’s name that is offering the app, or other suitable text.
<html>
<body>
<div style='margin:20px;padding:10px;font-family: sans-serif;font-size: 14px;'>
<span>Hi,</span><br/><br/>
<span>Thank you for reaching out for password help.</span><br/><br/>
<span>Here is a temporary password which you can use to sign in to the (app name) App.<br/> You will be required to set up a new password after signing in.</span><br/><br/>
<span><strong>Temporary Password:</strong> <<< TOKEN HERE >>>
</span><br/><br/>

<span>Please note that this temporary password can be used only once and is valid for a period of 48 hours only.</span><br/><br/>
<span>For any questions or assistance, please write to <a> Contact Email Address </a> </span><br/><br/>
<span style='font-size:15px;'>Thanks,</span><br/><span>The xxxxxx Team</span><br/>
<span>----------------------------------------------------</span><br/>
<span style='font-size:10px;'>PS - This is an auto-generated email. Please do not reply. In case you did not request password help, please visit the app and change your password as a precautionary measure.
</span>
</div>
</body>
</html>
Related Topics
Response Server API
LabKey's mobile client API provides enrollment services and data storage for mobile phone client applications. Participants, using a mobile application, can request enrollment in a study, withdraw from a study, and optionally, have their data deleted upon un-enrollment. The response may include an optional language property in the metadata, which is stored for analyst use.
Survey responses are stored in dynamically generated tables on the server.
Upgrade note: In earlier versions, the controller name "mobileAppStudy" was used. This has been changed to "response" as of release 21.3 (March 2021). The old name will still work, but should be updated for future releases.
Response Services - API Details
Response services provide ways to enroll participant in a study, submit responses, and fetch responses from the Response Server.
Enroll
Enrolls a participant in a study on the server. The response includes a globally unique
participantId (as "appToken" or <application-token>). This participantId is used in subsequent communication with the mobile app.
Request:
| Method | URL |
|---|
| POST | /response-enroll.api |
| Parameters | Type | Values/Description |
|---|
| studyId (required) | string | study identifier: A pre-existing study on the server. |
| token (required) | string | enrollmentToken: Enrollment token string provided by the participant. Token validation is case-insensitive. The token is used only once for enrollment; previously enrolled tokens cannot be used again. |
| allowDataSharing (required) | string | Whether the participant consents to sharing data with third parties. Valid values: "true", "false", "NA" |
| language | string | Optional code for user-language. English (en) and Spanish (es) are supported. |
Response:
| Params | Values |
|---|
| success | boolean |
| exception | string; |
| data | {
"appToken": string (the participant ID)
} |
| errors | [
{
"msg": string,
"field": string,
"id": string, token,
"message": string,
"severity": string
}
] |
Afterwards, all submissions to the server are done using the participantID (returned as the "appToken").
ValidateEnrollmentToken
Validates an enrollment token, but does not actually enroll the participant. When successful, returns a JSON object that includes the names and values of all
pre-enrollment participant properties associated with that participant.
Request:
| Method | URL |
|---|
| GET | /response-validateEnrollmentToken.api |
| Params | Type | Values/Description |
|---|
| studyId (required) | string | study identifier: A pre-existing study on the server. |
| token (required) | string | enrollmentToken: Enrollment token string provided by the participant. Token validation is case-insensitive. The token is used only once for enrollment; previously enrolled tokens cannot be used again. |
| language | string | Optional code for user-language. English (en) and Spanish (es) are supported. |
Response:
| Params | Values |
|---|
| success | boolean; false |
| exception | string; |
| errors | [
{
"msg": string,
"field": string,
"id": string, token
"message": string,
"severity":string
}
] |
ProcessResponse
Saves survey responses from an activity to the study. No parameters in the URL string, but the JSON object provided in the POST body contains the participantId.
Request:
| Method | URL |
|---|
| POST | /response-processResponse.api |
| Params | Values |
|---|
| response | {
"type": string, questionnaire or activetask
"metadata": dictionary; activity info
{
"studyId": string, study identifier
"activityId": string, activity identifier
"name": string, activity name
"version": string, activity version
"activityRunId":string run id for the activity
}
"participantId": string, participant identifier
"data": dictionary; activity info
{
"startTime": string, start time of activity
"endTime": string, end time of activity
"resultType": string;,
"results": array results of each step in activity <refer to the "WCP - Schemas and Structures" topic>>
}
} |
Details of the
results array contents can be found here:
WCP - Schemas and StructuresResponse:
| Params | Values |
|---|
| success | boolean |
WithdrawFromStudy
Withdraw (un-enroll) a participant from a study. Option to retain or delete data.
Request:
| Method | URL |
|---|
| POST | /response-withdrawFromStudy.api |
| Params | Type | Values/Description |
|---|
| participantId (required) | string | participant identifier; The "appToken" value returned at enrollment. |
| delete (optional) | boolean | Optional boolean to delete the withdrawn participant's response data. Defaults to FALSE. |
Response:
| Params | Values |
|---|
| exception | string |
| success | boolean |
| status | string |
Resolve Enrollment Token
This API is used to search the study using enrollment token. Given a valid enrollment token, returns the studyId associated with the folder where the token was generated, whether or not that token has already been used for enrollment.
Request:
| Method | URL |
|---|
| POST | /response-resolveEnrollmentToken.api |
| Parameter | Type | Values |
|---|
| token (required) | string | Enrollment token provided by the participant. |
Response:
| Params | Values |
|---|
| exception | string |
Query APIs
Two LabKey Query APIs are important when working with MyStudies. Both employ special authentication and filtering to just the current participant. Learn more here:
Query Example: Get Participant Response
To fetch responses for a provided question, activity and study identifiers, you can use LabKey’s executeSQL api.
Request:
| Method | URL |
|---|
| POST | /response-executeSQL |
| Parameter | Type | Values/Description |
|---|
| sql | string | query to retrieve response |
| participantId | string | |
Response:
Depending on sql query, response varies.
Examples
Example URLs to invoke:
http://localhost:8080/response-enroll.api?studyId=<study-id>&token=<enrollment-token>&allowDataSharing=NA

http://localhost:8080/response-validateEnrollmentToken.api?studyId=<study-id>&token=<enrollment-token>&allowDataSharing=NA

http://localhost:8080/response-withdrawFromStudy.api?participantId=<participantId>&delete=<boolean>

http://localhost:8080/response-processResponse.api? (The <participantId> is provided in the posted JSON body.)
On Success
When an action is successful, the server responds with a JSON object with the following format.
{
    "success" : true
    "data" :
    {
        "appToken" : string, participantId
    }
}
In the case of
validateEnrollmentToken, pre-enrollment properties will be returned.
{
  "success": true,
  "data": {
    "preEnrollmentParticipantProperties": [
      {
        "propertyId": string,  ExternalConsentStatus
        "value": string  Fully Consented
      }, {
        "propertyId": string,  Cohort
        "value": string  Traditional Diet
      }
    ]
  }
}
On Error
Error responses have the following format:
{
    "exception" : string,  message
    "success" : false,
    "errors" : [
        {
            "msg" : string,  message,
            "field" : string,  form/studyId/token
            "id" : string,  form/studyId/token",
            "message" : string   message
        }
    ]
}
As an example, an invalid enrollment token might generate:
{
  "success": false,
  "exception": string,  InvalidToken
  "errors": [{
    "message":: string,  Invalid token supplied
    "field": : string,  EnrollmentToken
    "id": : string
  }]
}
Error Cases
The following error cases are handled:
| Message | Field | Cause |
|---|
| Invalid input format | form | The data provided in the API could not be deserialized properly. |
| StudyId is required for enrollment | form | Empty or no studyId provided. |
| Study with studyId "XXX" does not exist | studyId | Invalid studyId provided. |
| Token already in use | form | The provided token already has a participant id associated with it in the study's container. |
| Invalid token: "YYY" | token | The checksum for the token is incorrect. |
| Unknown token: "ZZZ" | token | The token provided has a valid checksum but it is not associated with the given studyId. |
| Token is not associated with a study ID | token | There is no study associated with the submitted token. |
| Token is required. | form | The study associated with the given studyId requires an enrollment token and none was provided. This message is returned unless the language is set to Spanish. |
| Se requiere un token. | form | The language is set to Spanish, the study associated with the given studyId requires an enrollment token, and none was provided. |
Participant Properties
The WCP (web configuration portal) can provide definitions for participant properties to be included with other information in the mobile app study. For example, if an application wants to survey participants prior to a next appointment, data needs to be stored for each participant about the timing of appointments for that particular participant. When provided, the list of participant property definitions is stored in the study folder, and this list can be queried via the standard selectRows API. In the example, the mobile app is able to ascertain when to send the next survey.
Properties can be either pre- or post-enrollment; though query is typically done only of post-enrollment properties. When the application retrieves values from participant properties, they will see only the properties for the specific participant they are viewing.
Participant properties are keyed on the enrollment token, and post-enrollment properties can also be queried by participantID. The specific participant properties available for a given application will vary. You can see the listing in the MobileAppResponse schema, under Participant Properties.
Participant Property Attributes
When participant properties are defined and passed to the response server, they have the following attributes:
| Attribute | type/values | Description |
|---|
| propertyId | string | A unique identifier under study for participant property. |
| propertyName | string | A user friendly name for participant property. eg: Date Of Appointment. |
| propertyType | PreEnrollment/PostEnrollment | This defines what type of participant property it is. |
| propertyDataType | string | The type of the property (string, boolean, etc) |
| shouldRefresh | boolean | Whether to refresh participant property value periodically or not. |
| dataSource | ExternalSystem/Other | Defines from where the value will be populated. |
| status | active/deactivated | Status of participant property |
| value | depends on type | value of participant property sent by external system |
Multiple Language Support
Studies may be configured to support user-facing communication in multiple languages. At present, English is the default and Spanish language is also supported.
Note that all administrative actions for setting up the study and resources for researchers/data analysts will be presented in English. The multiple language support applies only to the information and messages shown to the user of the mobile app.
The Response Server collects free-text responses as entered by the participant. The response JSON includes an optional language property in the metadata. This gets parsed, translated into a friendly name, and saved in a new column in the Response table. Language codes and names are sourced from
Both the
Enroll and
ValidateEnrollmentToken APIs accept the language parameter in order to return a language specific error message if a token is not supplied.
- English: Token is required.
- Spanish: Se requiere un token.
Related Topics
Survey Designs and Responses
Survey Designs
Client developers design a survey in JSON and provide either an API that can be used to retrieve this JSON or a JSON file located in a particular directory that can be read when processing responses.
Example
Survey Response Documents
The survey responses are submitted to the server as a JSON object. See example below:
The tables where LabKey stores the survey responses are dynamic generated, meaning the tables are automatically created based on a given survey design. For this reason, the way you structure your survey questions, determines the list schemas on the server, which in turn determines how analysts query the data.
Example
Survey Questions
Electronic data capture surveys are composed of a variety of question types. Review the options available in the core LabKey documentation:
Using the "Other" Option
Mobile App surveys support the option to have questions with an "Other" answer option for multiple choice questions, including those where many answers are allowed. The submitting user checks "Other" and also has the option to enter arbitrary text.
For example, a question "What medications are you taking?" could list a few common options, as well as an "Other" option for unlisted entries. Parameters in the definition of an "other" question are:
- textfieldReq: (Boolean) Whether custom text input is shown to the respondent
- placeholder: (String) The string to show in an empty field (prior to entry).
- isMandatory: (Boolean) Whether completion of the text field is required if the Other option is checked.
The metadata for a multiple choice question including an "Other" option will take this form:
"textChoices" -
[
    {
        "text" - String
        "value" - String
        "detail" - String; nil
        "exclusive" – Boolean
        "destination" - String
        "other": {
            "textfieldReq" - Boolean
            "placeholder" - String
            "isMandatory"- Boolean
        }
    }
];
"selectionStyle" - String; Single/Multiple
The name of all the selected values, including the "Other" option is stored in the main result column. Any text entered as part of the Other option is stored in another column named with a _text extension. i.e. "ResponseColumn_text". If the user did not enter text, or if the Other option hasn’t been selected, this column is null.
Submitting Survey Responses to the Server
Mobile apps submit data to the server using a POST URL, with the body of the POST being a JSON survey response document.
Related Topics
Data Sharing Consent
The Web Configuration Portal supports a
Data Sharing Consent workflow for capturing the participant's willingness to share data with with third parties for research. This is in addition to the primary consent they provide to the organization conducting the study.
There is a separate documentation site for the FDA COVID-19 MyStudies app, with information about using that application for the electronic consent portion of this functionality.
When in use, the mobile app needs to provide the collected flag value to the Response server, and then the Response server needs to store the provided value, associate it with that participant’s record, and provide the value to analysts when they view or retrieve response data. Note that the Response server simply conveys the value of the flag; it has no ability to enforce behavior. The onus is on the analyst to take the appropriate action (e.g., filtering on the flag column, sharing data or not).
Functional Design
The Response server stores the allowDataSharing flag values in the column: mobileappstudy.Participant.AllowDataSharing. The Participant table is already available in the response lists, so this new column is also available for adding to grids via Customize Grid.
Checking the box for "Allow Data Sharing" in Customize Grid makes that column available in the grid for viewing, filtering, sorting, export, API querying, etc. LabKey SQL queries can also use this column.
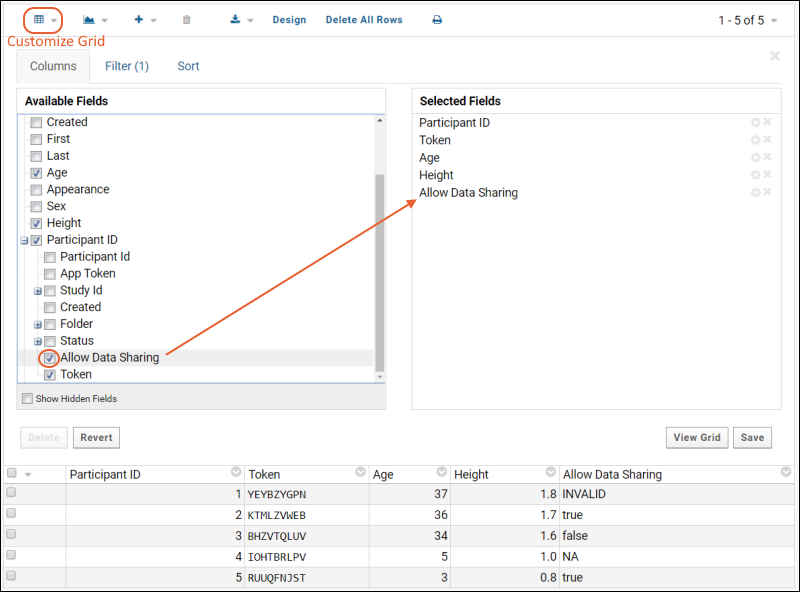
Related Topics
Testing the Response Server
This topic explains how to manually test the enrollment and data submissions methods described in the topic
Mobile Client API.
Assumptions
We assume that you have already completed the following set up steps, all described in the topic
7: Response Server Setup:
- A parent project has been created.
- A subfolder of type 'Mobile App Study' has been created.
- A StudyId has been specified and data submission has been enabled in the subfolder.
- Enrollment tokens have been generated.
Set Up a Test Environment
To set up a testing environment:
- Complete all of the steps above in Assumptions.
- And follow steps below:
When manually testing the submission method, it is useful to get a complete view of the enrollment tokens, participant ids, and app tokens in one grid. To make this grid do the following:
- Go to the study folder to be tested.
- In the panel Enrollment Token Batches, select a batch of (already generated) enrollment tokens. (Click a value in the Batch Id column.)
- On the Enrollment Tokens grid, select (Grid Views) > Customize Grid.
- Under Available Tokens check the box for Show Hidden Fields.
- Open the node Participant Id, and place checkmarks next to Participant Id and App Token.
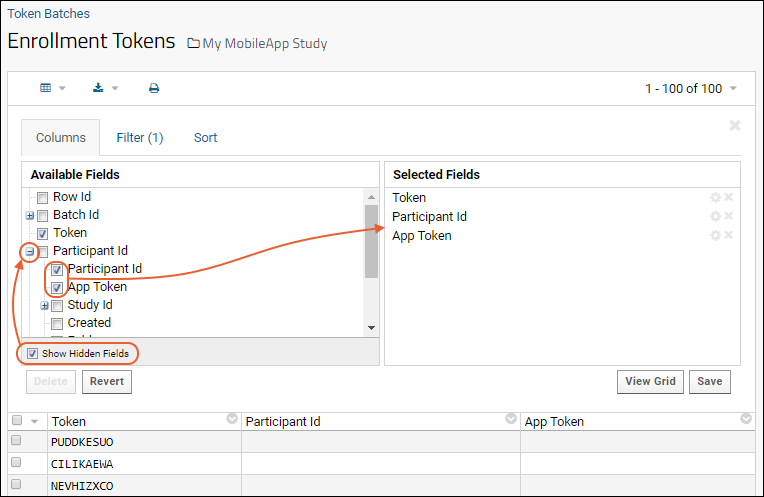
- Click Save and save the grid as the default view.
- Now you have a table of available App Tokens to use in testing.
It is also convenient to add the Lists web part and the mobileappstudy schema to your study folder, so you can easily track submitted data and any errors that arise.
- To add the Lists web part:
- Enter > Page Admin Mode.
- In the lower left corner of the page, click the dropdown Select Web Part, and select Lists. Click the Add button. (Before the submission of data there are no Lists yet. Once data has been submitted and processed, the data, partitioned into Lists, will appear here.)
- To add the mobileappstudy schema:
- Again click the dropdown Select Web Part, and select Query.
- For Web Part Title enter 'mobileappstudy'.
- On the Schema dropdown select mobileappstudy.
- Click Submit.
- Click Exit Admin Mode to hide the page editing tools.
Test Enrollment
- To test your set up, enroll a fictional participant in the study by calling an URL like the following.
- For <server>, if you are working on a local machine use 'localhost:8080'. Or substitute the domain name appropriate for your set up, such as 'myserver.labkey.com'.
- For <study-id>, substitute the value you have specified for the target subfolder.
- For <enrollment-token>, substitute one of the enrollment token values generated in that folder.
https://<server>/response-enroll.api?studyId=<study-id>&token=<enrollment-token>
- Successful enrollment will produce a response like the following:
{
   "data" : {
       "appToken" : "2b277794d8f209a05e9259b076362bda"
   },
   "success" : true
}
- Copy the appToken value for further testing. LabKey Server uses this appToken value in all future communications to figure out (1) where to save submitted data and (2) which participant the data pertains to.
Test Data Submission
LabKey Server provides a
built-in tool for testing the submission process:
- The built-in tool is located at the following URL, substituting <server> as appropriate to your environment.
- Note: we have also had success testing via the Chrome plugin Postman.
https://<server>/query-APITest.view
- In Post URL enter an URL like the following:
https://<server>/response-processResponse.api
- In Post Body enter the survey responses as a JSON object. Download a sample object is available at: InitialSurvey_v2.2.1.json
- In the JSON object, substitute the participantId value with one of the appTokens (not enrollment token) provided to you on successful enrollment of a participant.
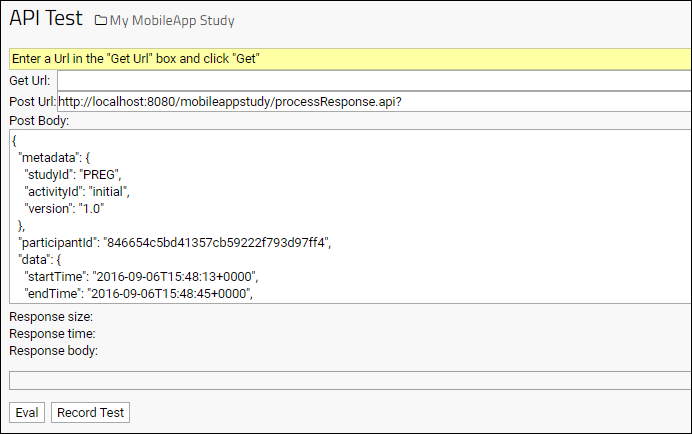
- Click the Post button.
- On successful submission, the Response body panel will display the following:
Withdraw From a Study
When testing is completed, you may wish to delete the test data from the tables so that it is not mixed in with future participant response data. When a participant withdraws from the study, their data will be deleted.
To withdraw the fictional participant, and delete any submitted survey responses, call the action withdrawFromStudy.api, where <appToken> is the appToken for the withdrawing participant.
https://<server>/response-withdrawFromStudy.api?delete=TRUE&participantId=<appToken>
Withdrawing from a study is available in the app inself under
Resources > Leave Study.
Troubleshooting
If your test does not produce a success message, an admin or troubleshooter can check the Response table for possible error status messages:
- Select (Admin) > Go To Module > Query.
- Open the mobileappstudy schema and click the Response table.
- Click View Data.
- Scan or filter the Status column for any errors, and for these, check the Error Message column.
An admin can also check the site error logs:
- Select (Admin) > Site > Admin Console.
- Click View Site Errors Since Reset or View All Site Errors.
- Search from the bottom for the most recent errors and warnings.
To check module properties, go to the container where you expect to see data and select
(Admin) > Folder > Management. Click the
Module Properties tab.
Incorrect Module Properties: MetadataServiceBaseUrl
Error: If you see an Error Message similar to
There were problems storing the configuration. Received response status 400 using uri https://SERVER_NAME/StudyMetaData/activity?%2FparticipantProperties&studyId=STUDYID_001"
: Notice the "%2F" in the path - this encoded slash indicates an incorrect creation of the full URI. Check the setting of the module property "MetadataServiceBaseUrl" to confirm that it ends with "StudyMetaData" and does not end with a question mark.
Incorrect Module Properties: MetadataServiceAccessToken
Error: If you see an error with Response status 401 and a correct-looking path for results including the studyId, like:
https://SERVER_NAME/StudyMetaData/participantProperties?studyId=STUDYID_001"
: Check the module property "MetadataServiceAccessToken" to confirm that it did NOT inadvertently get set to the AppId or StudyId. This property should only have a site-level setting that is an apparently random long string.
Related Topics
Response Processing
Submitted data, in the form of JSON objects, is stored in the
Response table. The Response table holds the raw JSON objects before they are parsed into the individual data tables. The Response table also forms a dashboard for viewing errors associated with parsing and for manually kicking off reprocessing of responses.
Parsing and Processing
The Responses table keeps track of whether responses were parsed successfully or not. Unsuccessfully parsed responses can be re-processed. Common errors in processing include:
- A question’s answer is not the expected type.
- A table name doesn’t match any List in the schema.
- A column in the response does not exist in the expected List.
- The format of the response JSON does not match the expected format.
To view the Responses table:
- Go to (Admin) > Developer Links > Schema Browser, open the schema mobileappstudy, and click Response, then View Data.
- To create a handy link on your study page, add a Query web part to display the mobileappstudy schema. For details see Set Up a Test Environment.
Reprocessing
From the Response table, editors can see the status of an event and can reprocess only responses that have not previously been successfully processed. Reprocessing is useful if the errors were caused by bugs in the processing code that have since been fixed. To reprocess, select the checkbox of a record(s) and click
Reprocess.
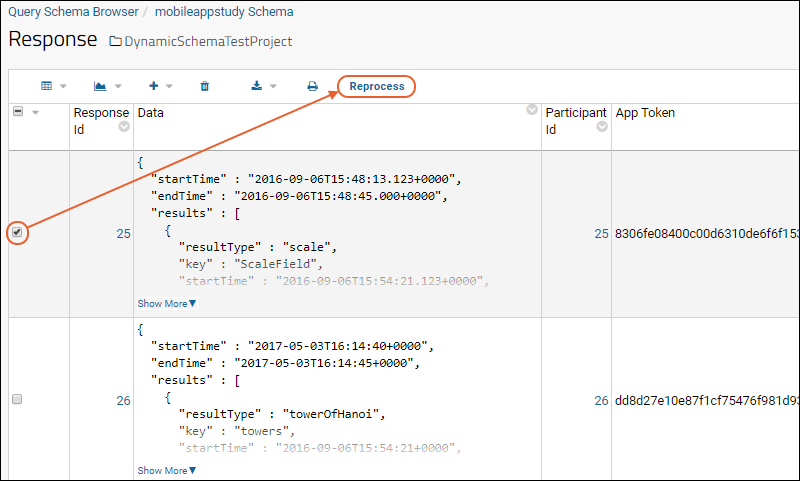
Editing
To edit, hover over a row to expose the
(pencil) icon for editing. There is no ability to edit the responses before reprocessing.
Processed Data and Dynamic List Creation
Successfully processed data is stored in simple tables called "Lists". The names of the tables and their columns are determined by the shape of the survey document submitted.
There is a List for each activity (e.g., InitialSurvey, WeeklySurvey, MonthlySurvey, ActiveTask1, etc.). The activity List contains the participantId and a column for each single-valued response in the survey. These are responses whose type is one of the following:
- scale
- continuousScale
- textScale
- valuePicker
- boolean
- numeric
- timeOfDay
- date
- text
- email
- timeInterval
- height
- location
For these responses, the column name is the same as the key value for the question.
For example, the response JSON submitted under the activity "InitialSurvey":
"results" : [
    {
      "resultType" : "date",
      "key" : "dueDate",
      "value" : "2017-10-17"
    }
  ]
results in a List named "InitialSurvey" with a field "DueDate":
For each multi-valued response (i.e., those of type imageChoice, textChoice, or grouped), there is a separate List with a name that follows the pattern <survey name><key>.
For example, the following response JSON:
"results" : [
    {
      "resultType" : "textchoice",
      "key" : "supplements",
      "skipped" : false,
      "value" : [
        "Q10",
        "B12"
      ]
    }
  ]
results in the following tables and fields:
InitialSurvey
InitialSurveySupplements
    Supplements
For grouped results in which each response in the group is single-valued, there is a new List created that corresponds to the grouped response’s key and with a column in the table for each response within the group. For imageChoice and textChoice fields, there is a List for the response with the column name corresponding to the response key.
For grouped results in which there are responses that are multi-valued, there is a List created that corresponds to the grouped response’s key value with a column in the table for each single-valued response in the group. There is also a separate List created for each multi-valued response in the group. The name of the List is <survey name><group response key><response key> and it contains a foreign key to the grouped result List.
For example, the following response JSON:
"results" : [
    {
      "resultType" : "grouped",
      "key" : "rx",
      "value" : [
        {
          "resultType" : "textchoice",
          "key" : "medName",
          "value" : [
            "Acetaminophen"
          ]
        }
      ]
    }
  ]
results in the following Lists and fields
InitialSurvey
InitialSurveyRx
InitialSurveyRxMedName
    MedName
The following three active task types are supported as special grouped results for which certain specific fields will be created in their corresponding Lists.
| resultType | Fields |
|---|
| fetalKickCounter | count (Integer), duration (Integer) |
| towerOfHanoi | puzzleWasSolved (Boolean), numberOfMoves (Integer) |
| spatialSpanMemory | score (Integer), numberOfGames (Integer), numberOfFailures (Integer) |
When a survey design contains one of the resultTypes shown above, a List will be created just as with a grouped result containing the fields indicated.
For grouped results within grouped results, we’ll generate Lists recursively according to the above pattern.
The List structure is denormalized so all Lists contain the ParticipantId column, which makes it easier to perform filtered queries on any of the Lists. (This is the rowId from the participant table in the mobileAppStudy schema.)
Lists natively support many data analysis and reporting features, including
- Filtering survey results by a particular participant to track changes to that participant’s responses over time.
- Unioning multiple Lists based on a participant id to view all of that participant’s responses from multiple surveys.
- Creating plots and visualizations.
- Exporting all or filtered results to Excel, text, or other common formats.
- Using the SAS API, Rlabkey API, or other language bindings to extract responses into SAS, R, or another tool/language.
Response Forwarding
An administrator can configure the Response Server to forward responses to another server. For instance, copying processed responses to a remote Salesforce server might be required in a particular kind of study.
Folder administrators can enable and disable response forwarding for a given folder with two types of authorization:
- Basic Authorization: Provide a username and password, plus the endpoint URL.
- OAuth: Provide a token request URL, token field, header name, and endpoint URL.
- Disabled: (Default) Disable forwarding.
- Select (Admin) > Folder > Management.
- Click the Response Forwarding tab.
- By default, forwarding is disabled. To enable, choose one of the options and enter the required information.
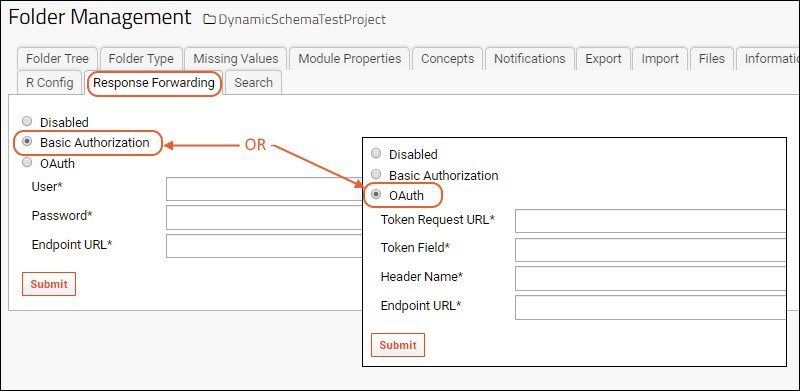
Once response forwarding is enabled, a pipeline job is enabled to post the responses to the configured external server. This job will run every 5 minutes as well as after every successful response processing, as long as the job is 'succeeding'. The forwarding status is recorded in the Responses table.
- Processed: A response that has been processed but not yet successfully forwarded.
- Forwarded: A response that has been successfully forwarded.
- Error: An error was seen at the last processing attempt.
The pipeline job queries the Response table for every row whose status is "PROCESSED", but not yet "FORWARDED". For each such row, post the response JSON and the corresponding enrollment token to the configured URL, authorizing the request by conveying configured credentials via basic authentication;
wait for the external system to respond:
- If the external system responds with "success", the status of the corresponding row in the Response table is updated to "FORWARDED" and this response will be never sent again.
- If any failure occurs (can't connect, timeout, failure response), the job exits immediately and the Response server will wait and re-try that post at the next 5 minute interval.
If a full batch of responses is sent successfully, the external system will be flagged as "succeeding", otherwise, it will be flagged as "failing."
Responses that have been already forwarded successfully will not be reforwarded.
Related Topics
Querying the Response Server
This topic explains how to retrieve data from the server in order to create reports and visualizations.
Data can be read from the server using two methods in LabKey's mobile app study API:
- selectRows: read response values from one or more columns with options to filter and sort the rows
- executeSQL: execute an arbitrary SQL SELECT query on the response schema, allowing for complex joins and transformations on the data
All data retrieval is filtered to a single participant (the participant corresponding to the app token accompanying the retrieval request). Also, all data retrieval is constrained to a single schema on the server named "MobileAppResponse". This means you cannot SELECT or JOIN to other tables outside this schema.
selectRows
Uses all the parameters from
LABKEY.Query.selectRows, with the following differences:
- schemaName is ignored, since MobileAppResponse is hardcoded in this context.
- participantId is added. Its value is the <appToken>.
The general pattern for invocation is:
http://<server>/response-selectRows.api?participantId=<appToken>&queryName=<queryName>
where:
- <appToken> is the unique string associated with a given participant and study folder. The <appToken> is provided to the mobile app when a participant successfully enrolls in the study.
- <queryName> is the name of some table in the schema MobileAppResponse.
An example invocation:
http://myserver.com/response-selectRows.api?participantId=a1f4960d78bcc08295807901a3b74ad&queryName=InitialSurvey
The server will respond with the data in JSON format:
{
  "schemaName" : "MobileAppResponse",
  "queryName" : "InitialSurvey",
  "formatVersion" : 8.3,
  "metaData" : {
    "importTemplates" : [ {
      "label" : "Download Template",
      "url" : "/labkey/query/MyProject/MyStudy/exportExcelTemplate.view?schemaName=list&query.queryName=InitialSurvey&headerType=Name"
    } ],
    "root" : "rows",
    "totalProperty" : "rowCount",
    "description" : null,
    "id" : "Key",
    "fields" : [ {
      "ext" : { },
      "name" : "ParticipantId",
      "align" : "right",
      ...
executeSql
Uses all the parameters from
LABKEY.Query.executeSql, with the following differences:
- schemaName is ignored, since MobileAppResponse is hardcoded in this context.
- participantId is added. Its value is the <appToken>.
The following parameters are required:
The general pattern for invocation is:
http://<server>/response-selectRows.api?participantId=<appToken>&sql=<sqlQuery>
where:
- <appToken> is the unique string associated with a given participant and study folder. The <appToken> is provided to the mobile app when a participant successfully enrolls in the study.
- <sqlQuery> is some query on a table or tables in the schema MobileAppResponse. SQL queries passed via the URL should be URL encoded.
For example, the following queries the InitialSurvey table with 'SELECT * FROM InitialSurvey', shown in its URL encoded form:
http://myserver.com/response-executeSQL.api?participantId=ca1f4960d78bcc08295807901a3b74ad&sql=SELECT%20*%20FROM%20InitialSurvey
The following example adds a date filter 'SELECT * FROM InitialSurvey WHERE DueDate = '2017-12-12'', shown in its URL encoded form:
...response-executeSQL.api?
participantId=ca1f4960d78bcc08295807901a3b74ad&
sql=SELECT%20*%20FROM%20InitialSurvey%20WHERE%20DueDate%20=%20%272017-12-12%27
Complex joins and unions can be provided in the sql parameter, for example, the following joins to the InitialSurveyRxGroup table:
SELECT InitialSurvey.ParticipantId,
InitialSurvey.DueDate,
InitialSurvey.PlannedPregnancy,
InitialSurvey.FolicAcid,
InitialSurveyRxGroup.Medication AS MedicationName
FROM InitialSurvey
INNER JOIN InitialSurveyRxGroup ON InitialSurvey.ParticipantId = InitialSurveyRxGroup.ParticipantId
Related Topics
Reference
Learn more in the GitHub documentation here:
External Documentation Resources
Other technical documents and set up guides:
There is a separate documentation site for the FDA COVID-19 MyStudies app, with information about using that application for the electronic consent portion of this functionality.


 Once the build is successful, click the icon in your IDE.Use this link to ping the local server after it is started, to verify that the web services are running locally:
 Step 2: Select (Admin) > Folder > Management, click the Folder Type tab and make sure that the FdahpUserRegWS module is checked.
 Step 3: Still in the folder management section, click the Module Properties tab and add the OrgID as used on the WCP in the value of StudyId for the new project you just created, also named with the "OrgID" used on the WCP. Save this change.
 Step 4: In the project, create a subfolder to hold all the data for this app - each organization may have one or more AppIDs in use on the WCP. For each one, you need a folder named the same as the "AppID". Use the "Collaboration" type and accept other defaults.Step 5: Select (Admin) > Folder > Management, click the Folder Type tab and make sure that the FdahpUserRegWS module is checked. Click the Module Properties tab and add the AppID of the application in the value of StudyId for the new folder you just created, also named AppID. Save this change.
 Step 6: Next, within the AppID folder, create a subfolder to hold all the study level data. The name of this folder must be the same as the "StudyID" used on the WCP. Use the "Collaboration" type and accept other defaults.Step 7: In the new folder, select (Admin) > Folder > Management, click the Folder Type tab and make sure that the FdahpUserRegWS module is checked. On the Module Properties tab, enter the StudyID value used on the WCP as the value of StudyId for the new folder also named the same StudyID value.
 Step 8: To view the data, create external schemas. Select > Developer Links > Schema Browser. Click Schema Administration, then New External Schema.
 Step 9: Enable the below tables in the schema to view app level data (i.e. at the AppID level):
 Step 10: Enable the below tables in the schema to view study level data (i.e. in the StudyID subfolder):
 Step 11: Add a Query web part and choose the schema to view the data. Add a Files web part to view the associated files. Do this at both the project level (App level data) and subfolder level (Study level data). The two levels are shown below:


 6. Build and run the project.


 Enrollment is accomplished by the use of enrollment tokens. A set of enrollment tokens are generated for a given study and distributed to prospective participants as tickets for enrollment in that study. Upon successful enrollment, the server provides the mobile client with a globally unique application token, which the server uses to identify the appropriate study folder and participant on all subsequence communications.


 Configure how to load metadata. An option to load metadata from files is provided for local testing. For operational servers, you'll use Load metadata from WCP server.


 Enrollment is accomplished by the use of enrollment tokens. A set of enrollment tokens are generated for a given study and distributed to prospective participants as tickets for enrollment in that study. Upon successful enrollment, the server provides the mobile client with a globally unique application token, which the server uses to identify the appropriate study folder and participant on all subsequence communications.
 Enrollment is accomplished by the use of enrollment tokens. A set of enrollment tokens are generated for a given study and distributed to prospective participants as tickets for enrollment in that study. Upon successful enrollment, the server provides the mobile client with a globally unique application token, which the server uses to identify the appropriate study folder and participant on all subsequence communications.

 The following screenshot illustrates using a local directory only applying the path to the current study subfolder (most useful for development and local testing):
 Enrollment is accomplished by the use of enrollment tokens. A set of enrollment tokens are generated for a given study and distributed to prospective participants as tickets for enrollment in that study. Upon successful enrollment, the server provides the mobile client with a globally unique application token, which the server uses to identify the appropriate study folder and participant on all subsequence communications.

 The following screenshot illustrates using a local directory only applying the path to the current study subfolder (most useful for development and local testing):


 Test this URL:
Once the build is completed, you will find the distribution file at this path, where <LABKEY_HOME> is the root of your LabKey enlistment:


 Withdrawing from a study is available in the app inself under Resources > Leave Study.
Solution: Notice the "%2F" in the path - this encoded slash indicates an incorrect creation of the full URI. Check the setting of the module property "MetadataServiceBaseUrl" to confirm that it ends with "StudyMetaData" and does not end with a question mark.
Solution: Check the module property "MetadataServiceAccessToken" to confirm that it did NOT inadvertently get set to the AppId or StudyId. This property should only have a site-level setting that is an apparently random long string.


 results in a List named "InitialSurvey" with a field "DueDate":For each multi-valued response (i.e., those of type imageChoice, textChoice, or grouped), there is a separate List with a name that follows the pattern <survey name><key>.For example, the following response JSON:results in the following tables and fields:For grouped results in which each response in the group is single-valued, there is a new List created that corresponds to the grouped response’s key and with a column in the table for each response within the group. For imageChoice and textChoice fields, there is a List for the response with the column name corresponding to the response key.For grouped results in which there are responses that are multi-valued, there is a List created that corresponds to the grouped response’s key value with a column in the table for each single-valued response in the group. There is also a separate List created for each multi-valued response in the group. The name of the List is <survey name><group response key><response key> and it contains a foreign key to the grouped result List.For example, the following response JSON:results in the following Lists and fieldsThe following three active task types are supported as special grouped results for which certain specific fields will be created in their corresponding Lists.
 Once response forwarding is enabled, a pipeline job is enabled to post the responses to the configured external server. This job will run every 5 minutes as well as after every successful response processing, as long as the job is 'succeeding'. The forwarding status is recorded in the Responses table.
