Sample Types help you organize samples in your lab and allow you to add fields that help you describe attributes of those samples for easy tracking of data. Each individual
Sample has a unique ID and is a member of one Sample Type. This topic assumes you are starting from an "empty" application and walks you through creating a "Tutorial Samples" type and populating it with a set of samples to use in the next steps.
Create a New Sample Type
Create the first Sample Type in the system by clicking the linked word
here in the empty Dashboard Insights panel or by selecting
Create a sample type from the main menu under Sample Types.

Once one or more Sample Types have been created on your server, you will click the
Sample Types heading from the main menu, then click
Create Sample Type.
Define Sample Type Properties
- Enter the Name: "Tutorial Samples"
- Replace the default contents of the Naming Pattern box with the following, so that samples of this type will be clearly identified as part of this tutorial:
Tutorial-${genId:number('000')}
- You can now hover over the tooltip for the Naming Pattern field to confirm that the pattern has been validated and see an example name that might be generated.
- Click Add Parent Alias to tell the system the name of the column where we will include information about parent samples with our data.
- Enter "ParentSample" as one word to match our spreadsheet.
- Select "(Current Sample Type)"
- If you also see a button for Add Source Alias you can ignore it for now.
- Click the Label Color selector to choose a color to associate with samples of this type. Our images show orange, but you can select any color you like by clicking, entering a hex value, or individual RGB values.
- Display stored amount in: Select "mL (milliliters)". Notice that a variety of built-in solid and liquid unit measurements are available, as well as "unit" for cases where each sample is tracked independent of amount.
- Barcodes: Ignore this setting for this tutorial. Learn more about barcodes in this topic: Barcode Fields

Define Sample Fields
- Click the Fields section to open it.
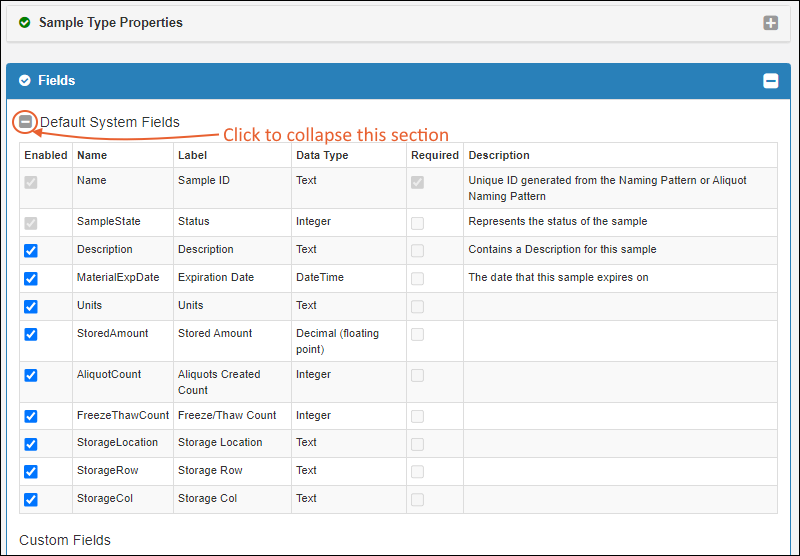
- You'll see Default System Fields that are automatically included in every Sample Type.
- Click the to collapse this section for the tutorial.

The
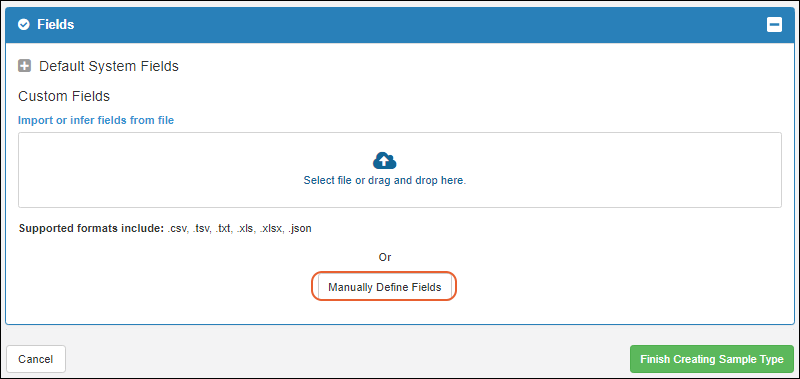
Custom Fields section lets you either
import or infer fields from file.
- For this tutorial, click Manually Define Fields.

- In the field editor:
- For this tutorial, disregard the blue banner about adding a Unique ID field for barcodes.
- Enter the name "Provider" and leave the default type "Text" selected.
- Click Add Field to add another row, enter then name "Concentration" and select "Decimal (floating point)" as the data type.

- Click Finish Creating Sample Type.
You will now see the details page for this new Sample Type and are ready to create your first samples in the system.
Import Samples from File
Once you have defined the Sample Type for your samples, you can import them by typing directly into a grid, bulk entering values, or by importing a spreadsheet of sample information, as used in this tutorial.
Learn more about importing samples from a file in this topic:
Import Samples from File
Other Ways to Import and Create Samples
You can also add samples manually, in a grid or using bulk insert methods. Learn more in this topic:
View Sample Details
You can view details about your samples by clicking the
Sample ID. For example, scroll down and click
Tutorial-018.
On the details page, you have several tabs with information:
- Overview: basic details including the values of all sample properties and fields as well as the storage location (if any)
- Lineage: parentage and source information (Tutorial-018 has both parent and child sample linkages provided in our example file)
- Aliquots: any aliquots created from this sample
- Assays: all data about this sample
- Jobs: all jobs that involve this sample
- Timeline: a history of events for this sample (so far only registration has occurred)
Browse the information on these tabs before continuing to the next tutorial step.
Related Topics
 The Custom Fields section lets you either import or infer fields from file.