This topic covers the administration and management of
Sources you have defined.
View all Source Types
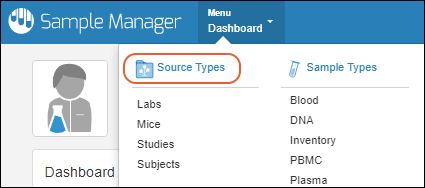
The top level menu lists the name of source types that are defined in the system. Click
Source Types to see the full listing:
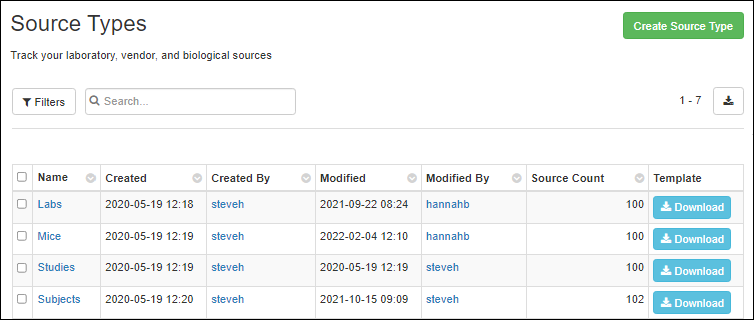
You'll see the name and description of each source type, as well as the number of sources that have been created. Click to download a
Template for any source type to make importing data from a file easier.
Manage a Source Type
Click the name of a Source Type to manage details of that particular type. You can use the grid view or the top menu to switch which source page you are viewing.
Use the
Manage menu to select:
- Edit Source Type Design: Reopen the source type creation wizard to change details or fields. Note that you changes to the design of the source type will not be 'propagated' to change the name of any existing sources.
- Delete Source Type: Delete this type of source completely. This will delete the type, all sources of this type, and all dependencies. Deletion cannot be undone.
- View Audit History: See the history of actions on this source type.
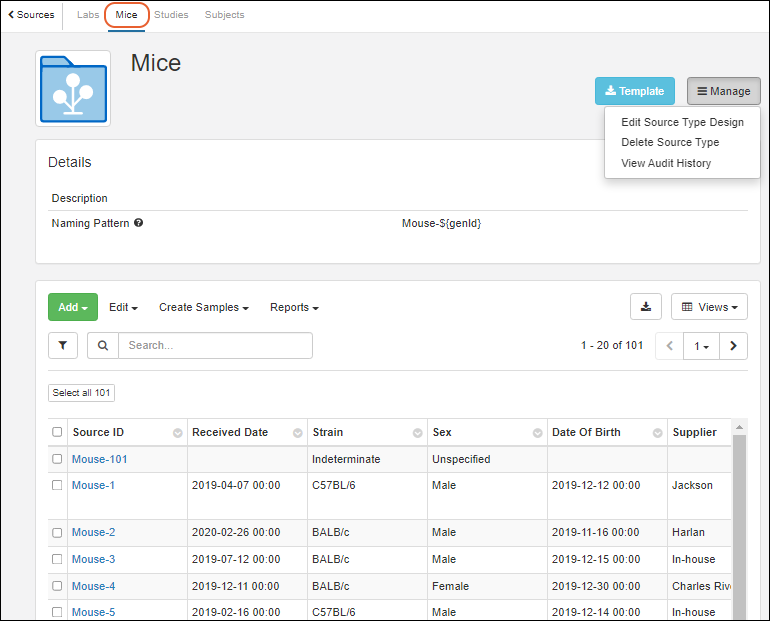
The grid of Sources of this type is shown below. Filter sort and use the available menus to:
- Add new sources of this type.
- Edit or delete one or more samples.
- Create Samples using any selected source row(s) as parent(s)
- Reports: Select one or more sources, then choose Find Derivatives in Sample Finder to open the Sample Finder showing all the samples created from any selected source(s). Any filters on the grid are also included in the Sample Finder.
Manage a Single Source
Click the
Source ID to see details for a particular source.
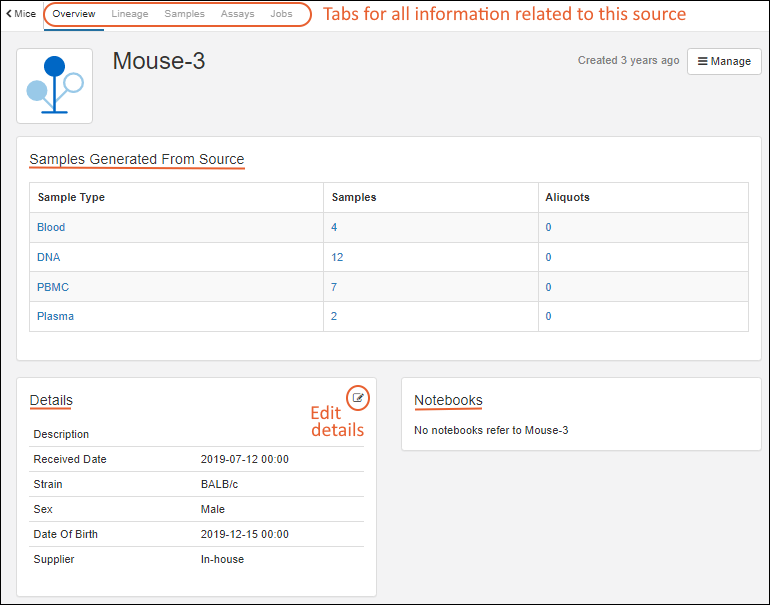
- In the top panel you will see all the Samples generated from this specific source of any type.
- Below, a panel lists all the details and offers authorized users an edit link.
- If this Source is referenced in any Notebooks, you'll see links to them here.
- Tabs along the top row let you click for all the Lineage, Samples, Assays, and Jobs that involve this source.
You can also create new samples associated with this source directly from the overview tab by selecting
Manage > Create Samples. To associate existing samples with this source, see this topic:
Associate Samples with Sources.
View Lineage, Samples, Assays, and Jobs
Use the
Overview, Lineage, Samples, Assays, and Jobs tab for a source to see the other information associated with this particular source.
Lineage: See the lineage of samples associated with this source. Learn more about browsing lineage graphs and grids
here.
Samples: This tab lists the direct children, grandchildren, and further descendants from this source, including any aliquots. Learn more
below.
Assays: On the
Assay tab, the data you see is what has been uploaded for any samples associated with this source, not for the source itself.
Jobs: See workflow jobs associated with samples from this source.
Samples Created from this Source
On the
Samples tab for a given source, you will see all samples (up to a maximum of 5 generations) associated with this source, including any
aliquots of those samples. The
All Samples tab shows samples of every type, with properties common to any sample, like storage information and status. Samples of each individual type can also be viewed on a separate tab, with the properties specific to that type.
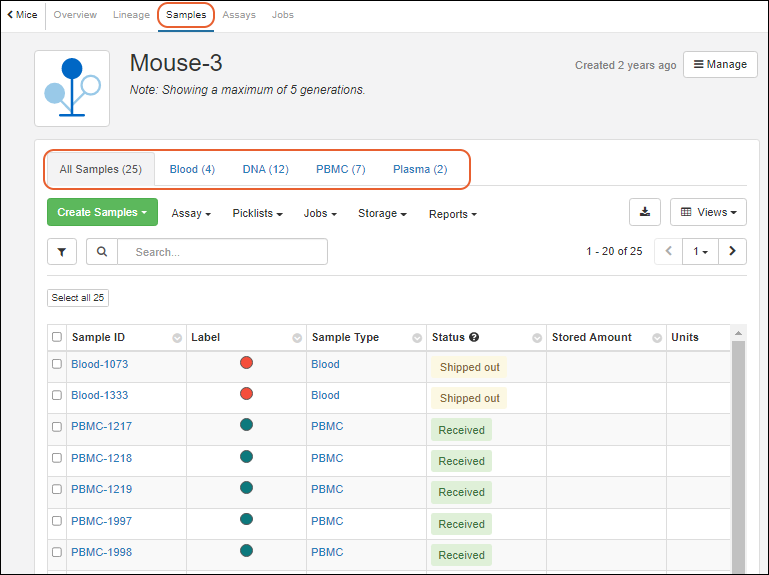
When viewing the tab containing samples of all types, many
sample grid menus and actions are available. When viewing samples on a sample-type specific tab,
additional menus for editing and deriving new samples are available.
- Create Samples:
- Menu sections for Assay/Picklist/Jobs/Storage/Reports:
Edit Sources
Edit Single Source
You can edit the details of a single source by clicking the
Source ID and clicking the
edit icon.
Edit Multiple Sources
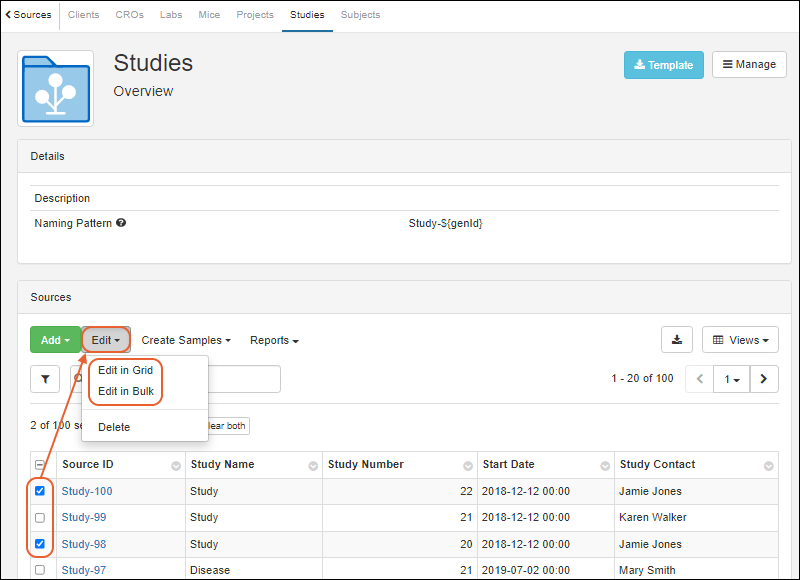
You can bulk edit several sources at once by selecting them in the source type view and selecting either:
- Edit > Edit in Grid: Edit values directly in a grid.
- Edit > Edit in Bulk: Assign the same value to one or more fields in the batch of selected rows.
Delete Sources
A Source cannot be deleted if it has descendants, i.e. any samples associated with it (or derived from it). You also cannot delete a source that is referenced from an
Electronic Lab Notebook. Deleting a source cannot be undone.
Delete a Single Source
You can delete a single source from it's details page by selecting
Manage > Delete Source.
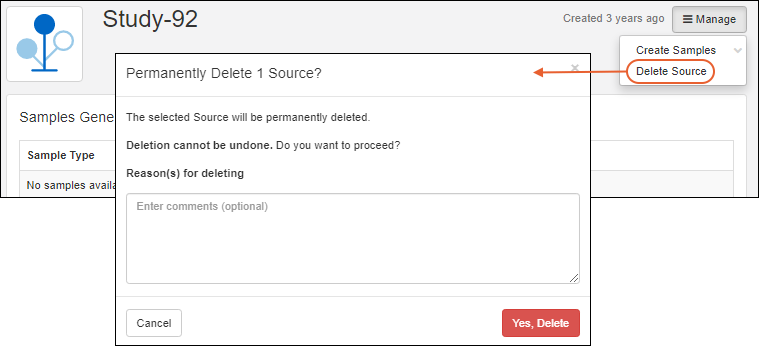
- In the popup, you can enter Reason(s) for deleting which will be included in the audit log.
- Confirm the deletion by clicking Yes, Delete.
If the source has descendants or is referenced from a notebook, this menu option will not be activated, as shown below.

Delete Multiple Sources
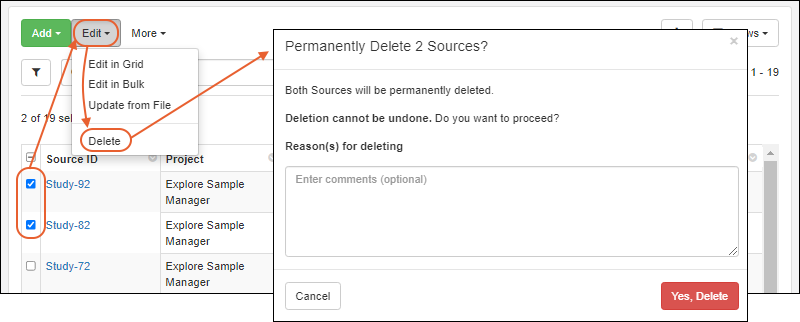
Multiple sources that do not have descendants can be deleted directly from the source type page by selecting the desired sources and selecting
Edit > Delete. Again, you can enter a deletion comment for the audit log before confirming.
If the group of selected sources includes any that cannot be deleted, you will see a popup message indicating possible reason(s). If some sources can be deleted, you have the option to complete the partial deletion.
Deletion of sources cannot be undone.
Related Topics
 If the group of selected sources includes any that cannot be deleted, you will see a popup message indicating possible reason(s). If some sources can be deleted, you have the option to complete the partial deletion.Deletion of sources cannot be undone.