This topic describes how to integrate LabKey applications, including Sample Manager and Biologics LIMS, with
BarTender for printing labels for your samples. Note that an administrator must complete the one-time steps to configure BarTender Automation edition before use. Once configured any user may send labels to the web service for printing.
Print BarTender Labels for Samples
Before you can print labels, an administrator must have completed
the one-time setup steps detailed below, and
configured LabKey to print labels. The admin will have identified a site wide default label file. When printing, the user can specify a different variant to use.
After configuring BarTender, all users will see the options to print labels in the user interface.
Print Single Sample Label
Open the Sample Type from the main menu, then open details for a sample by clicking the SampleID.
Select
Print Labels from the
Manage menu.
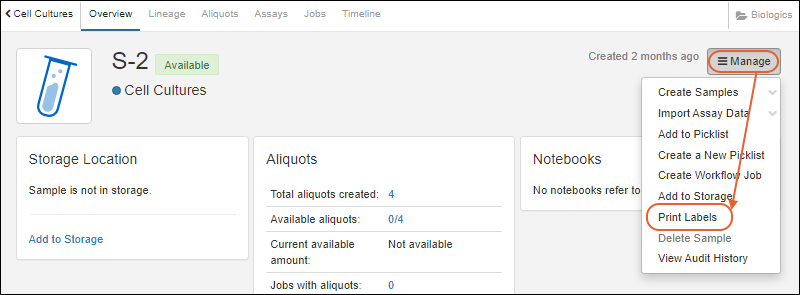
In the popup, specify (or accept the defaults):
- Number of copies: Default is 1.
- Label template: Select the template to use among those configured by an admin. You can type ahead to search. The default is the label template file configured above.

- Click Yes, Print to send the print request to BarTender.
Print Multiple Sample Labels
From the Sample Type listing, use checkboxes to select the desired samples, then select
Label from the
(Export) menu.
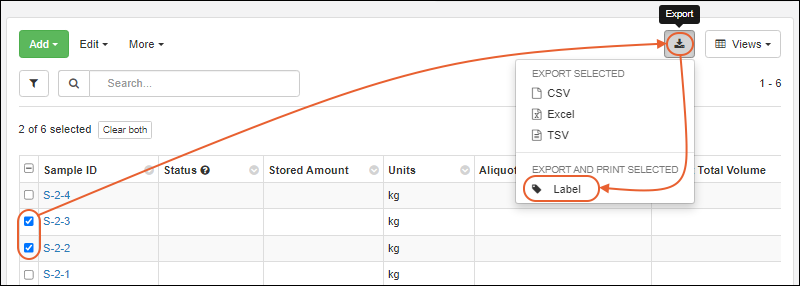
In the popup, you have the following options:
- Number of copies: Specify the number of labels you want for each sample. Default is 1.
- Selected samples to print: Review the samples you selected; you can use the Xs to delete one or more of your selections or open the dropdown menu to add more samples to your selection here.
- Label template: Select the template to use among those configured by an admin. You can type ahead to search. The default is the label template file configured above.

- Click Yes, Print to send the print request to BarTender.
The labels will be sent to the web service. See below for information about
error reporting
Configure BarTender Integration
BarTender integration is supported for BarTender Automation edition. We have tested versions 2019 and 2021.
Note that these docs were written for BarTender 2019, which contains Print Portal by default. To configure BarTender 2021, also review the section below:
Additional Setup for BarTender 2021Begin in the BarTender application where you will identify the web service URL and create the label file(s) for printing. The label file has the extension .btw. LabKey applications accept a site-wide default label file, but also allow the user to specify a different variant at the time of printing.
Enable HTTPS Endpoint for BarTender
Current versions of BarTender do not natively support the Https secure endpoint. Until BarTender is able to provide this support, you must use a self-signed certificate and complete these additional steps in your BarTender installation:
- Install and set up BarTender Print Portal web application from the exe/msi installer.
- Setup the BarTender Print Portal with HTTPS in IIS 7. This guide provides step-by-step instructions on how to do this, including obtaining the certificate and configuring the SSL port:
- (Optional) Enable HTTPS in Print Portal under the administrative setup->security->enable authentication over HTTPS
- This just verifies that SSL is setup, but is otherwise optional since we aren't doing any auth.
- Setup your web service integration in Integration Builder and deploy it as usual.
- Key step: Deploy the Integration service on port 80, instead of a custom port.
- This is a stock file that just needs deployment via the BarTender tooling
- Setup the Label template folder location(s) in the Administration console
- The BarTender portal service URL is then:
https://<your host>/Integration/<integration service name>/Execute
- For versions prior to BarTender 2021, use this URL:
https://<your host>/BarTender/API/Integration/<integration service name>/execute
Special Set Up for BarTender 2021
If you are using BarTender 2021, the Print Portal is not installed by default. To add Print Portal to an existing installation of BarTender, re-open the original installer file, select Modify, and select BarTender with Print Portal.
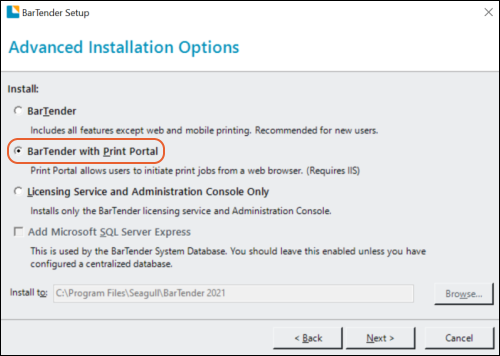
Additionally, in BarTender 2021, https requests to the BarTender API are disabled by default. This creates an issue with LabKey Server, since it requires an https connection. A workaround is available by following the instructions below, specifically enabling the "Passthrough" functionality of the BarTender Print Portal:
1. First following these steps:
Turning on Integration Passthrough 2. Use this BarTender URL in LabKey:
https://<BarTender host>/BarTender/API/IntegrationServicePassthrough?targetURL=<service URL>
Example BarTender Configuration File
Download this example to help you get started with BarTender 2021:
For versions
prior to BarTender 2021, use this example:
Once deployed using the BarTender deployment wizard, the LabKey application would access at the following location (unless you edit the service name):
https://localhost/Integration/LabKeyBarTenderService/Execute
For versions prior to Bartender2021, use this URL:
https://localhost/BarTender/API/Integration/LabKeyBarTenderService/Execute
Configure LabKey to Print BarTender Labels
Return to the LabKey application (Sample Manager or Biologics LIMS) and select the
Administration option from the user menu, then click the
Settings tab.
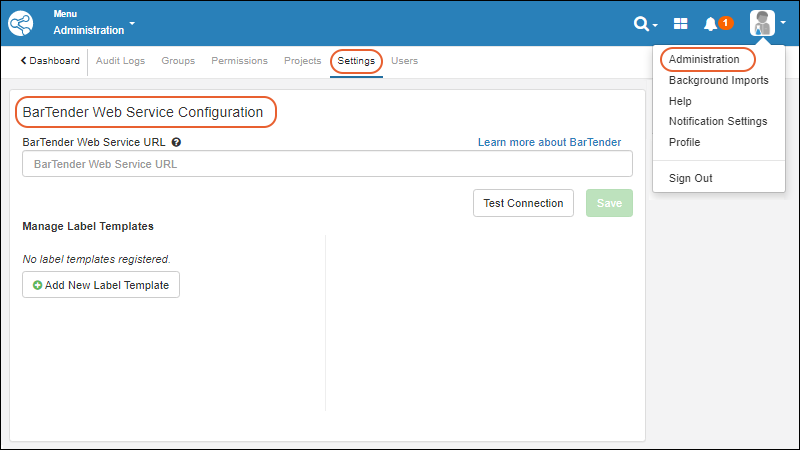
In the
BarTender Web Service Configuration panel, enter:
- BarTender Web Service URL: This is the URL of the web service to use when printing BarTender labels.

- Use Test Connection to test your configuration.
- Click Save to save it.
Manage Label Templates
Click
Add New Label Template for each template you want your users to be able to use. Give the template an identifying name and provide the path to the label file to use. The path should be relative to the default folder configured for the BarTender web service specified above.

Once templates are defined, you can return to this page to manage them. Click a template name to see or update details. Select and then click
Delete to delete a template.

Error Reporting
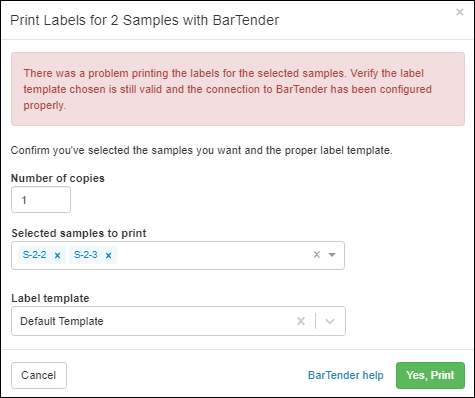
If there is a problem with your configuration or template, you will see a message in the popup interface allowing you a chance to verify or change the label template you've selected. If a change needs to be made to the underlying URL configuration, contact an administrator to retry the
configuration process.
Related Topics
 Additionally, in BarTender 2021, https requests to the BarTender API are disabled by default. This creates an issue with LabKey Server, since it requires an https connection. A workaround is available by following the instructions below, specifically enabling the "Passthrough" functionality of the BarTender Print Portal:1. First following these steps: Turning on Integration Passthrough 2. Use this BarTender URL in LabKey: