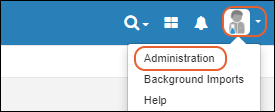
This topic covers management of user access in LabKey Sample Manager. Administrators can perform these actions via the
Administration option on the user menu.
 Related Topics
:
Add Users
To add one or more new users, an administrator first selects
Administration from the user menu, then clicks
Users, then
Create.
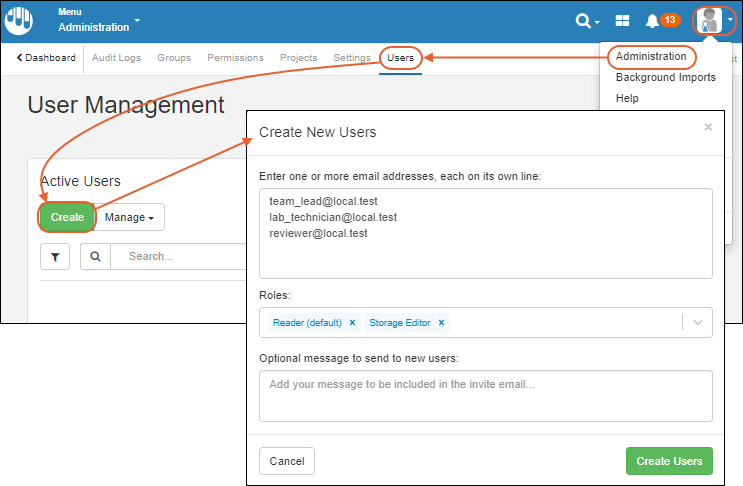
In the popup:
- Enter one or more email addresses, each on its own line for each user you want to create.
- Select the desired Roles for the users you are creating:
- You can assign multiple roles at once. Delete a role by clicking the 'X' for the item.
- Learn more about the available roles here: Permission Roles
- Note that all users added at once are assigned the set of roles you select. You can change these role assignments later.
- Optional Message: You can add an optional additional message to include in the invitation email to your new users.
- Click Create Users.
You will see the new user(s) added to the grid.
The new user will receive an email with a link to set a password and log in. If the new user should lose their initial invitation email, an admin can trigger the sending of another by selecting the row for that user and clicking
Reset Password in the user details. See
below.
View User Details
Within the application, when an administrator (or user with the "See User and Group Details") clicks a username, such as in a sample grid or ELN, they will see a popup showing the full name, email, description, as well as effective roles and groups this user is a member of.
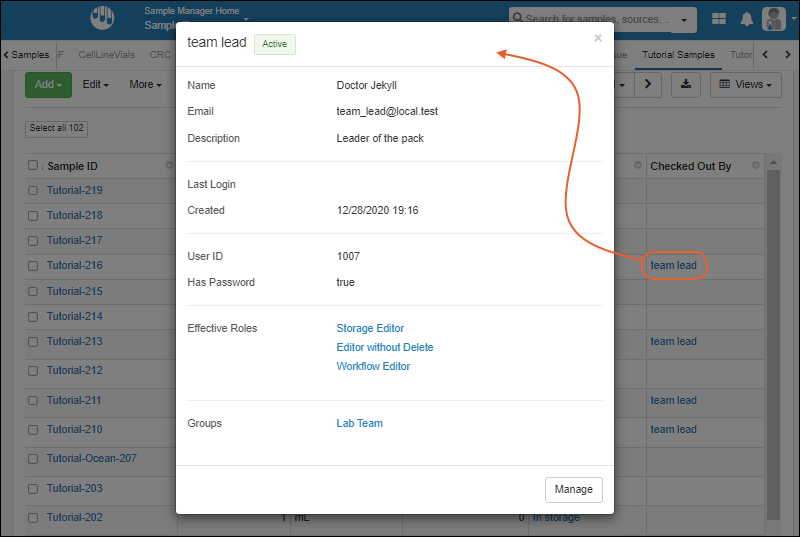
Click
Manage in the popup to go to the
user management page.
Non-administrators will see only their own username as a link to their profile details. For other users, they will see only a non-linked username.
Manage Users
To manage users, an administrator selects
Administration from the user menu, then clicks
Users.
You will see a grid of the active users already present in your Sample Manager project. You can use
search, sort, and filter options on this user grid.
User Details Panel
To view the details for any user in the grid, check the box for that user. Details including effective roles are shown in a panel to the right.
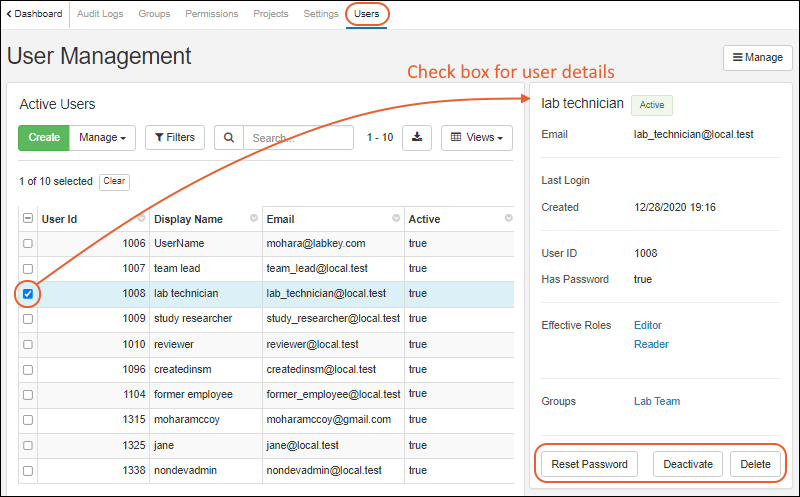
From this panel, an administrator can click the buttons at the bottom to perform these actions on this individual user.
- Reset Password: Send this user an email with a link to set a new password in order to access the site.
- Deactivate
- Delete
Deactivate Users
Deactivated users may no longer log in, but their display name and group membership information will be retained for display and audit purposes. If the user is reactivated at a later time, this information will be restored. Deactivation is the recommended action for former employees, for example.
To deactivate a user, an administrator has two options:
- Check the box to select a single user you want to deactivate. Click Deactivate in the User Details panel on the right.
- You may also select one or more users simultaneously using the checkboxes in the grid, then select Manage > Deactivate Users.
For either option, you will be asked to confirm that this is the action you want to take by clicking
Yes, Deactivate in a popup.
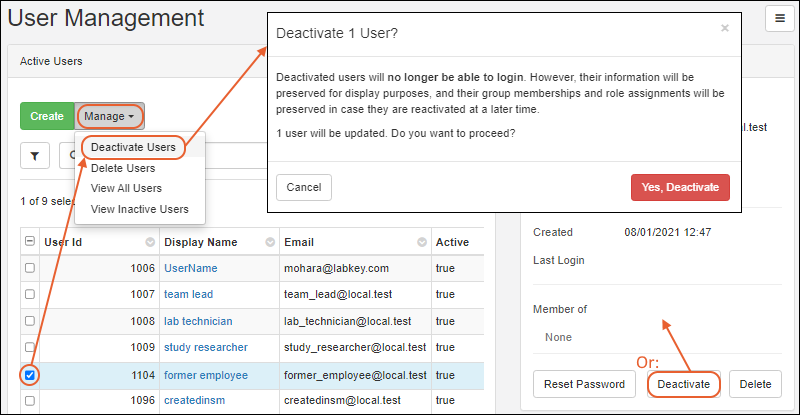
Note that if you are using Sample Manager with a Premium Edition of LabKey Server, you may want to remove this user's access to the Sample Manager project by
revoking all permission roles, instead of deactivating them completely from the system.
Delete Users (Not recommended)
Deletion of a user is
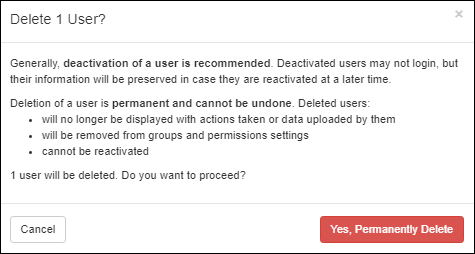
permanent and cannot be undone; it is generally not recommended. A deleted user's display name will no longer be shown with any assignments or actions taken by that user. A deleted user cannot be reactivated to restore any information.
Instead of deleting,
deactivation is recommended for any user who has performed any work in the system in the past.
One scenario in which deletion might be appropriate is if you originally create a new user with an incorrect email address or other error.
To delete a user, an administrator has the same two options as for deactivation:
- Check the box to select a single user you want to delete. Click Delete in the User Details panel on the right.
- You may also select one or more users simultaneously using the checkboxes in the grid, then select Manage > Delete Users.
You will be warned that deletion is permanent and need to click
Yes, Permanently Delete to proceed.
View Inactive Users
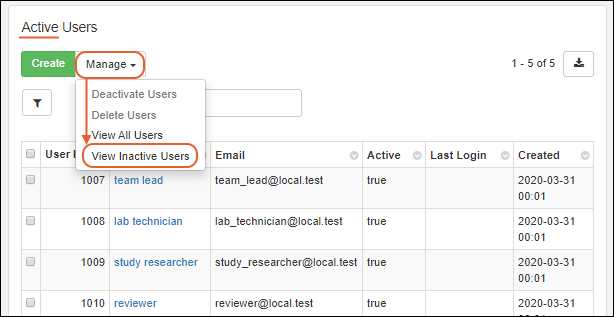
Notice that the grid reads
Active Users by default. To view the grid of deactivated users instead, select
Manage > View Inactive Users.
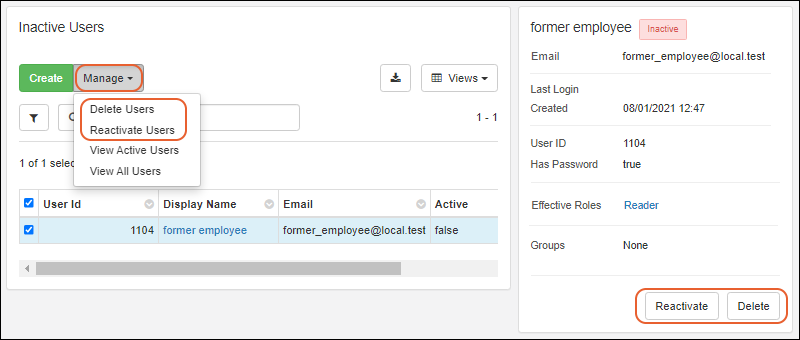
You can check a box to see details for inactivated users, and buttons are offered to
Reactivate and
Delete a single user.
On the grid of inactive users, the
Manage menu actions are also slightly different. You can select one or more rows to reactivate or permanently delete users. You can also switch back to the grid of active users.
Use
Manage > View All Users from either view to see the combination of active and inactive users.
User Limit Alerts
When the number of active users approaches the application limit, administrators will see a warning message on the
Administration > Users page.
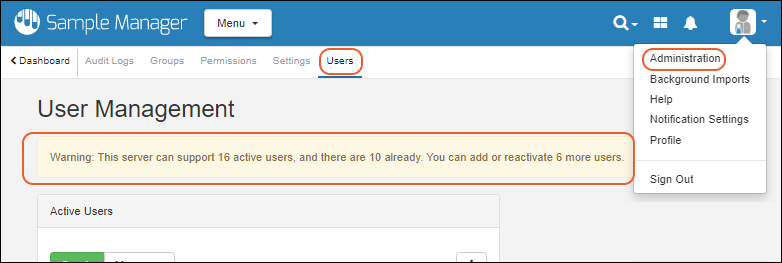
Users of Premium Editions of LabKey Server can learn more in this topic:
Related Topics