Premium Feature — Available in the Professional Edition of Sample Manager and all Premium Editions of Biologics LIMS.
Learn more or
contact LabKey.
This topic covers the details about how the Sample Manager and Biologics LIMS products handle actions across
Folders.
Cross-Folder Actions
Summary of Functionality
When Folders are in use, the following summarizes the high-level behavior of actions for Samples and Sources (or other Data Classes), collectively referred to as "entities". A given user may have different permissions assigned in different folders, as well as at the application-level, i.e. in the Home folder.
Reading of entities: You can read the current folder's entities as well as the ones in the Home and other folders you have permissions to read.
Connecting entities with lineage relationships: Entities can have ancestor entities in the current folder and the Home, provided you have the necessary permission. Entities defined in the Home cannot have ancestors in a subfolder.
Creating entities: Entities are created by default in the folder the user is viewing at the time the action is initiated. Users with appropriate permissions can choose to create entities in other folders they have access to when using the grid to create them. Importing entities from file will create them in the folder where the import is initiated, unless the file includes a "Container" column (which can also be labelled "Folder").
Updating entities: An entity can be updated from the folders in which it was created. Users with appropriate permissions can also update entities across folders. The folder to which the entity is assigned is shown 'read only' when editing entities from multiple folders in a grid. Moving entities between folders should be done separately.
Deleting entities: An entity can be deleted from the folder in which it was created. Users with appropriate permissions can also delete entities defined in different folders.
Lookups: You can look "UP" but not down the folder hierarchy in lookup fields. In the Home folder you will see only values defined in the Home itself. In a child folder you will see values in both the current and Home folder.
- Lookups from one child folder to another child folder may display as expected when viewed from the Home folder. If a user attempts to edit such a cross-folder lookup value from the Home folder, they may see an error that the target is "no longer a valid value". To support such 'sibling' folder lookups, an experimental "Less Restrictive Lookups" feature can be enabled.
Detailed Cross-Folder Actions
When Folders are in use, these notes apply to how some cross-folder actions are handled:
- Samples:
- Individual sample creation in a grid allows parent types from the current folder and folders above it. You cannot select parents from a "child" folder of the current one.
- Grid edit and sample deletion: Works for entities in the current folder. With appropriate permissions users can also edit and delete entities defined in different folders.
- Sample derivation, pooling, and aliquoting: Works for entities in the current folder. Users with appropriate permissions can also select samples from the Home and up to one folder for these actions. The derivatives or aliquots will be created in the folder where they are derived/aliquoted, or if in the Home with a folder selected, they will be created in the folder.
- File import only allows sample parent type and parent selection from the current folder.
- Editing parent details for an individual sample only works when adding parents from the current folder or the Home.
- Sources (as well as Bioregistry and Media entities in Biologics LIMS):
- Creating entities, either in a grid or via file import, allows parents and related entities to be chosen from the current folder or folders above it in the hierarchy. You cannot select parents from a "child" folder of the current one.
- Editing in a grid or in bulk is allowed for entities in the current folder. Users with permission can also edit entities from any folder they have access to. You do not need to be in the folder the entity belongs to, but you must have edit permission there.
- Deleting is allowed for entities in the current folder and other folders the user has access to.
- Deriving samples from a data class (source, registry source, or some media) allows parent data class objects from only the current folder or a folder above it.
- Assay:
- Imported assay data can reference samples in the current folder or any 'higher' (parent) folder, but cannot reference samples in sibling or 'lower' (child) folder.
- Imported assay data can also reference samples defined in the /Shared project.
- When assay runs and/or results are editable, users with appropriate permissions can select from multiple folders for editing.
- Storage:
- Freezers (or other storage) can only be defined in the Home folder.
- Samples from multiple folders can be selected at once for adding to storage.
- Learn more about shared storage below
- Workflow:
- Creation of workflow jobs using samples from different folders is possible both from any folder.
- The job that is created will belong to the folder in which it was created, regardless of the samples included.
- When the job is opened, the user is navigated to the folder in which it is defined, to ensure that actions performed as part of the tasks are in the correct folder.
- Additional samples from all visible folders can be added to existing jobs.
- Picklists:
- Creation of picklists using samples from different folders is possible from any folder.
- The picklist that is created will belong to the folder in which it is created, regardless of the samples included.
- The picklist will be visible in only the folder in which it was created.
- Additional samples from all visible folders can be added to existing picklists in the current folder.
- Notebooks:
- Notebooks can reference entities from all folders visible in the current context.
- Notebooks created from a parent folder are also visible from any child folder, and vice versa.
- Notebooks created in any folder can be submitted for review, or accessed for review, from any folder.
Restricted Visibility of Inaccessible Data
When a user has access to a subset of folders, there can be situations where this user should be restricted from seeing data from other folders, including identifiers such as Sample IDs that might contain restricted details. In detail pages, listing pages, and grids, entities a user does not have access to will show "unavailable" in the display instead of a name or rowid.
As an example, if a
notebook contains references to any data a user cannot access, they will not be able to access that notebook. It will not be included on the "All Notebooks" listing and if they happen to directly access it, such as through a saved URL, they will see only a banner message reading "You cannot view notebook [notebook title] because it contains references to data you don't have permission to view. The references may be in active or archived entries."

As another example, when a
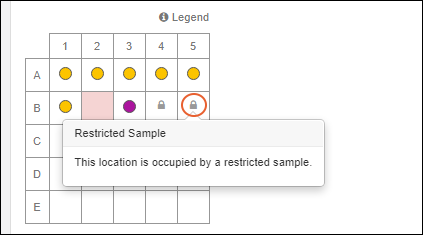
storage unit contains samples you cannot view, you'll see the space occupied by a lock icon and a hover message will explain "This location is occupied by a restricted sample."
In
timelines, the names of entities the user does not have access to, such as the parent of an entity they can access, will be redacted from the timeline events.
Add or Edit Entities Across Folders
When the user has the appropriate permissions, samples and sources can be added to a folder the user is not currently in by using the
Folder dropdown to select the target folder.
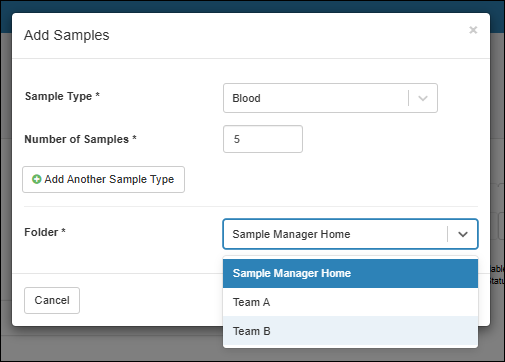
With appropriate permissions, a user can edit Samples and Sources that belong to different folders in bulk or in a single grid. When Assay results or runs are editable, the same cross-folder editing behavior applies.
- When editing in bulk, the folder is not shown (and not editable).
- When editing in a grid, the folder to which the sample belongs will be shown read-only. If any selected Samples that belong to folders the user is not authorized to edit, they will not be listed for editing.

Note that users cannot edit the parents or sources for Samples from multiple folders.
Move Samples, Sources, and Assay Runs Between Folders
If a user has access to multiple folders and accidentally adds something to the wrong folder, or later wants to change folder affiliation, they can use
Edit > Move to Folder to move Samples, Sources, or Assay Runs between folders. Entities currently belonging to multiple folders can be selected at once to be moved to a new folder.
Sample, Source, and Assay Run moves require that the user must have update permissions in the current container and insert permission in the target container. If selected entities cannot be moved, the user will see a warning, but authorized moves will proceed.
Note that there are some situations in which data cannot be moved:
- Samples with a "Locked" status
- Samples with status values that are not defined in the Home folder. This is an uncommon scenario, and is prevented in the current application.
- Assay Runs with QC states that are not defined in the Home folder.
From the grid, select the desired (eligible) rows, then select
Edit > Move to Folder.
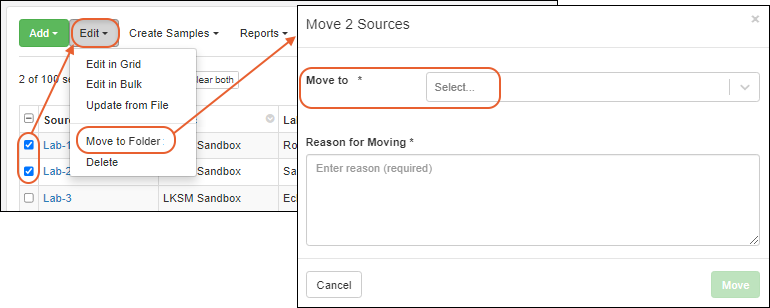
In the popup, select the folder to
Move to from the dropdown. If the
application has been configured to require a reason, you must enter a
Reason for Moving, otherwise it is optional. Click
Move.
The move is audited, tracked in the
Timeline for the entity, and parentage and derivation lineage connections are maintained.
Move from Details Page
You can also move a single Sample, Source, or Assay Run from the details page via
Manage > Move to Folder.

Move Notebooks Between Folders
Notebooks can be moved from one folder to another provided the user starts in the folder where the notebook is defined and has insert permission in the target folder. One exception is that once a notebook has been approved, it can no longer be moved.
Click the
for the current Folder setting in the header section of the notebook.
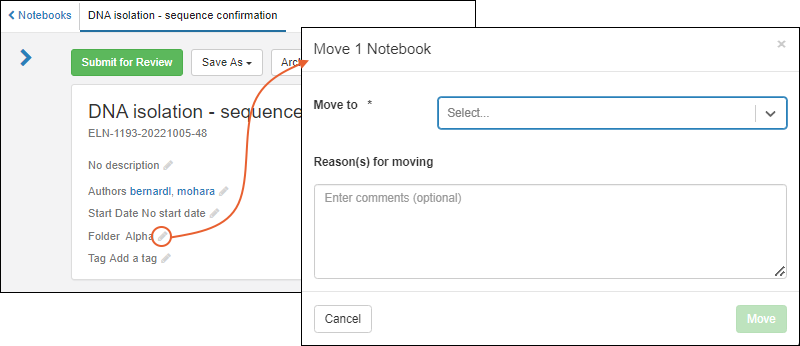
In the popup, select the folder to
Move to from the dropdown, enter a
Reason for Moving if required or desired, then click
Move.
Storage Shared Across Folders
Set Up Shared Storage
To share storage, create it in the Home folder, defining the properties and hierarchies as usual. It will then be visible in all subfolders.
Users with the "Storage Editor" role in any folder will then be able to use the freezer to store and manage samples. Access to sample details is always dependent upon permissions in the container where the sample is defined.
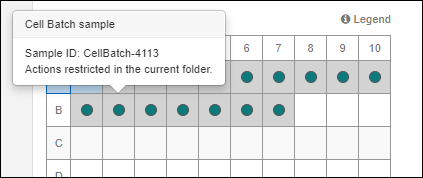
In shared storage where a user has permission to see data from all folders using it, the user will see data from all containers as if all the samples were local. When viewing a sample from another folder, you'll see a note "Actions restricted in the current folder" in the hovertext.
Storage Occupied by Inaccessible Samples
In shared storage where a user does not have permission to read data from other folders, storage views will show a spaces as occupied, but instead of revealing any data about the sample, will show a
icon. This means the space is occupied by a "restricted sample".
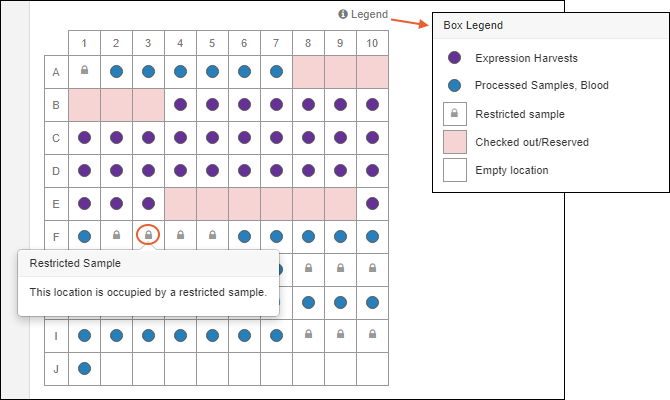
The
Legend will give more detail about symbols and colors in the grid.
Related Topics