To view the details of what can be found in a specific storage system, click the name on the main menu or the
Storage Dashboard. There are two tabs in the view of a storage system, plus a
Manage menu:
Note that to add samples to storage, and perform other sample storage actions, the user must have been granted the
Storage Editor and/or Storage Designer roles. This topic assumes the user has both.
Overview Tab
The overview page for a storage system shows a high level view of
storage status and
contents.

Storage Status

Next to the storage name, the current status is shown in a colored block. Click the
to select among the options: "Active, Defrosting, Backup".
Storage Details
Hover over the
Details link to see the properties, including the temperature (if set), usage of this storage, and any advanced settings defined for this storage.
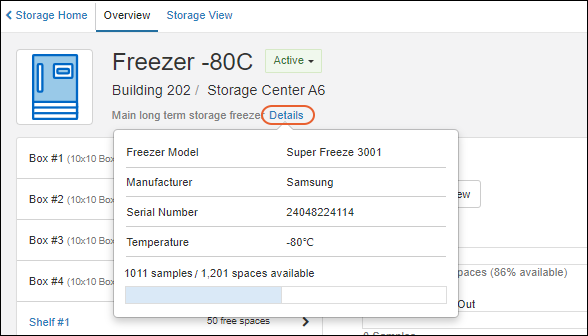
Overall capacity is shown in a bar, with the 'in-use' capacity as a shaded portion and the number of used and unused sample storage spaces listed above it.
Storage Contents
Below the header, you will see a split panel where you can browse the storage hierarchy and contents.
On the
left, expandable sections for the top level storage units let you 'browse' the structure of this storage.
- Click the to expand a section. (It will become a that you can click to collapse it again.)
- You'll see the terminal storage unit type displayed, typically the size of the unit.
- Click a section on the left to see the details for it on the right.
On the
right, you see the details for the region of the storage selected on the left. If no section is selected, the overall storage details are shown. Here, we are looking at the details for a particular box:

- A 'breadcrumb' trail along the top identifies the location of the unit being shown. Above we see a box on a rack in a shelf in a freezer.
- You can click any level of this breadcrumb to open the details for that unit on the on the Storage View tab.
- You can copy this "path" including the slash separators, and paste it to make it easier to build spreadsheets for import or other use.
- A button to Go to Storage View is displayed. Click to open this unit on the Storage View tab.
- Visual bars follow, summarizing the contents of this storage unit. They are colored using the label colors assigned to Sample Types.
- Capacity: The shaded section indicates used spaces. The number and percent available are listed.
- Sample Types: The breakdown of types of samples in this unit is shown visually using the label colors assigned. Hover over the bar to see which colors represent which types of sample.
- Samples Checked Out: The number checked out is shown, under a bar indicating the type that are checked out.
Storage View Tab
The
Storage View presents a more detailed look into the contents of this storage. Below the
Storage Status and
Storage Details panels, the storage section lets you browse through the storage hierarchy.
- Select which level of storage to view.
- Choose whether to view all samples, or only selected samples in the grid.
- Switch to a tab for a specific sample type of interest. Here you can perform the same sample menu actions as on other sample grids.
- Check the box for a specific sample to see its details on the right.

Sample Information in Grids
All storage units, from the overall storage system to a shelf to a plate or bag, show information about Samples in a grid in the Storage View, as shown above. Scroll to the right to see additional columns.
Select whether to view
All Samples or
Selected Samples in the grid. You can also use the tabs to select whether to view samples of all types ("All Samples" or samples of a chosen type; numbers on the tabs indicate how many of each type are available at this storage level. As with any grid, you can then
sort and filter them or search to find a subset of interest.
The terminal storage units with assigned locations, i.e. boxes, plates, and tube racks, also include a
layout interface with the sample grid below it.
Select Storage to View
The top row of the panel shows what location you are viewing and lets you select into the nested levels of the storage hierarchy.
- Use the to open a menu of locations available.
- Select one to view it. And if desired, go further by using the to select from the next level 'into' the storage.
- When all of the locations are of the same type, such as when Shelf #1 only contains Boxes below, the menu will have the label of the type; when storage units are mixed, "Location" will be shown.

You can also 'jump' into a nested storage location from the buttons and breadcrumbs on the
Overview tab.
Box, Plate, Tube Rack Detail Views
When looking at the Storage View for a Box, Plate, or Tube Rack, you will see a layout of rows and columns matching the definition of the storage unit, and color coded indications of the specifics of each cell, or place, in that layout.
- Rows and columns are labeled alphabetically or numerically, depending on how you defined the storage unit.
- The 'occupied' positions will show a color-coded dot.
- Shading indicates positions that are reserved for samples that are currently checked out.
- Hover over the Legend to see it.

- Hover over any position in the grid to see a popup with details about it.
View Selected Samples in Box, Plate, or Tube Rack
- Click any position (cell) to select the sample in it and see details, as well as actions, on the right.
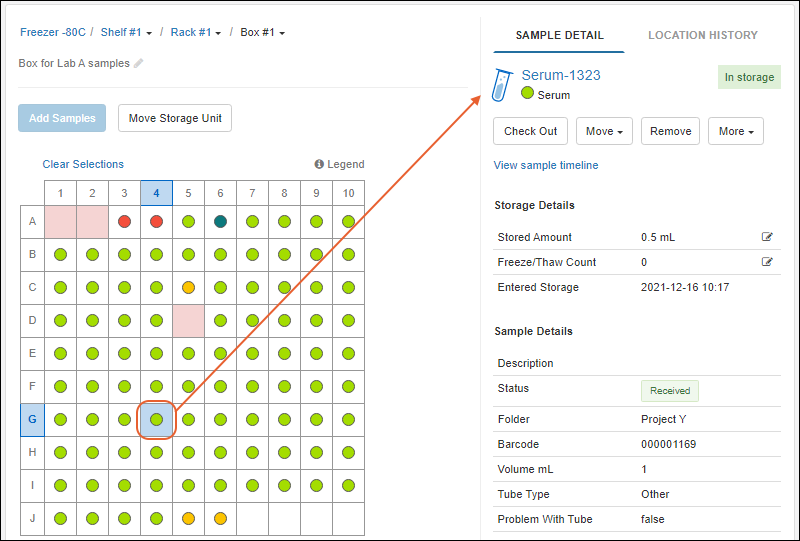
- The clicked/selected position is shaded blue, and if it contains a sample, the corresponding row is also selected in the data grid below the graphical layout.
- If you select a position where a sample is checked out, shaded pink, you will see details about the sample that "belongs" in that position but is currently checked out, including a link to View sample timeline where you can learn more about who checked it out, when, and why.
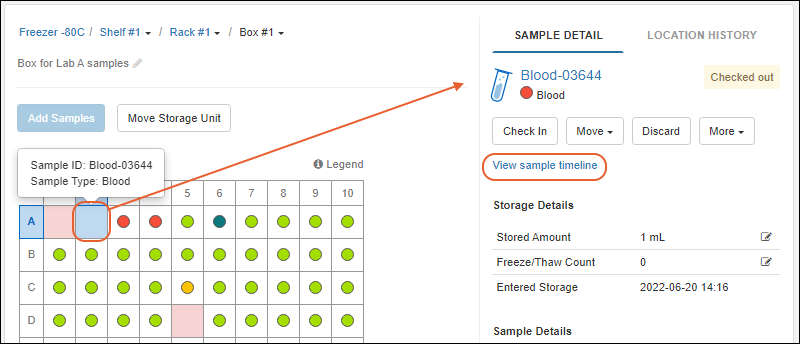
- If you are a storage editor or administrator, you will also see additional action buttons here.
If you select a range of spaces in a structured layout, any samples in those spaces will also be selected in the data grid below. You will see summary information in the details panel, and action buttons for users with sufficient permissions.
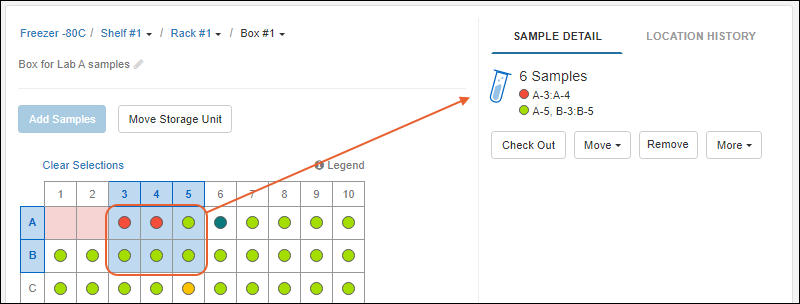
Hover over the colored dot for a tooltip about which Sample Type it represents, or use the
Legend.
Sample Actions
Location History
When in the
Storage View, if no specific position is selected, use the
Location History tab to see a timeline of events for the storage unit you are viewing. For example, viewing a box after it has moved, you would see two events: the original creation, and later movement to elsewhere in the hierarchy.
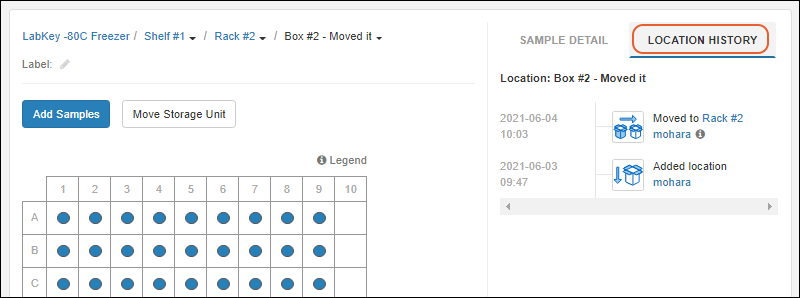
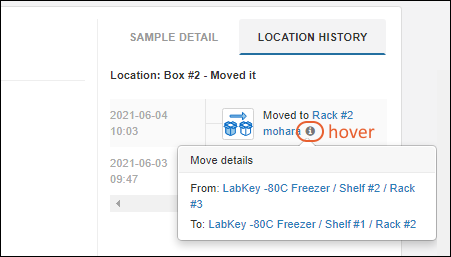
Hover over the
to see details for moves.
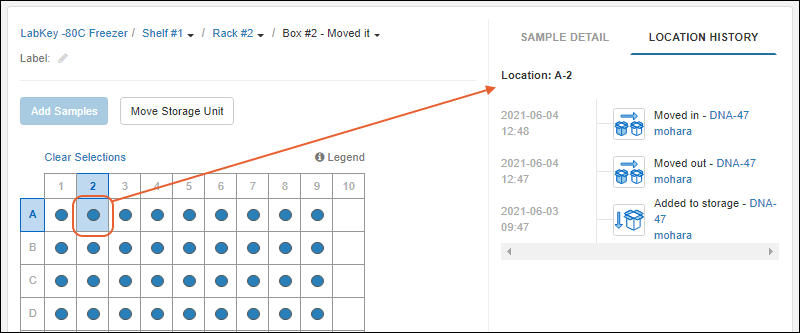
If a specific position in a box, plate, or tube rack is selected when you view the
Location History tab, you will see the location history for that position in the layout. For example, here a sample was moved out and then back into the A-2 location:
Storage Description Labels
It may be useful to provide descriptions of individual storage units for your users. You can
customize the name of the unit itself, or from within the Storage View, you can add a more verbose label or edit an existing one. For example, you could include more text from box labels here, or names of investigators or groups.
Below the name of the unit, click the
to edit. Type the new label (or edit the existing label). Hit enter to save.

You can also define storage unit labels when you create the storage hierarchy, as described here:
Storage unit labels are shown with the unit name, and also in hover text when you hover over the 'breadcrumb trail' for the storage hierarchy.
Manage Menu
Use the
Manage menu for the following actions:

Copy Storage Definition
Select
Copy Storage Definition from the
Manage menu of the storage you want to duplicate. Use this option to create a new storage system with the same initial properties and hierarchy. No storage contents will be copied.
You can use this as a shortcut to creating many similar storage systems, or adding a new one as you need additional storage capacity. Once copied, customize the new storage definition. At a minimum, each storage system must have a unique name. The default name of copied storage appends "(Copy)" to the end of the original name.
Delete Storage
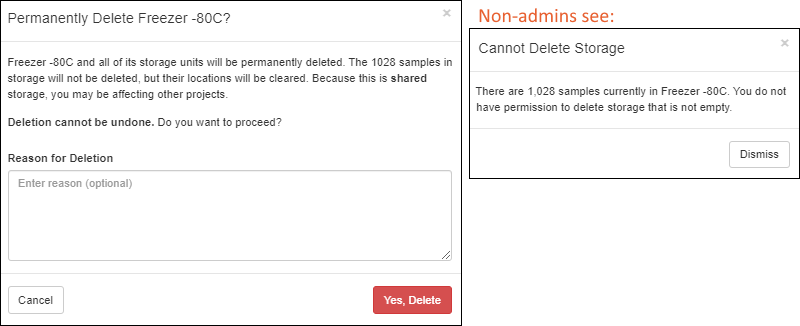
Deletion of a storage system is permanent and cannot be undone.
- The storage definition and all of its storage units will be permanently deleted.
- If any samples are stored in it, you must have an "Administrator" role to delete the storage.
- You will see a count of how many are stored. The samples themselves (the sample data) will not be deleted if you proceed, but all of the location information for those samples will be cleared.
- Non-administrators must remove all the samples from storage before they can delete a storage system.
Select
Delete Storage from the
Manage menu while viewing the details for that storage system. Users authorized to delete will be asked to provide a
Reason for Deletion if required or desired. Confirm by clicking
Yes, Delete.
Deletion actions are recorded in the
Storage Management Events section of the
audit history.
Related Topics