Premium Feature — Available in the Professional Edition of Sample Manager and with the Starter Edition when used with a Premium Edition of LabKey Server.
Learn more or
contact LabKey.
This topic describes how to work with assay data runs and results within the Sample Manager application.
Manage Runs
First open the assay design of interest, by using the main menu or assay dashboard then then clicking the assay design name. You'll land on the
Runs tab by default.
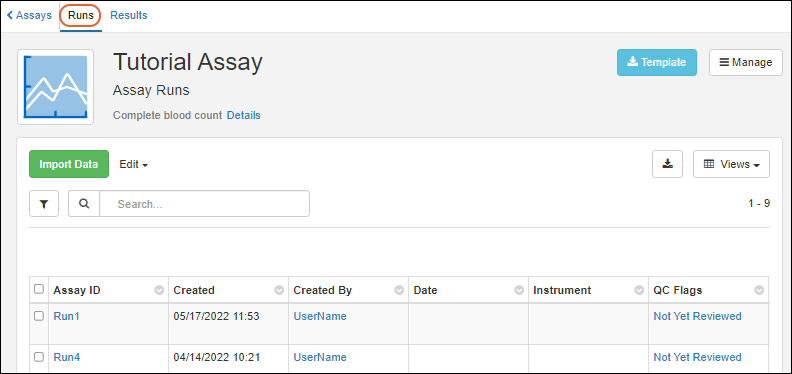
Click the name of an individual run to manage it. From this run details page, users with "Editor" or "Admin" access can reimport a run, and see and manage results for that run.

Edit Run Properties
If your assay has
editable runs and you have sufficient permissions, you can edit run details.
To edit run properties for a single run, click the name of the run, then use the
(Edit) icon in the
Run Details panel to open them for editing. You will see an entry panel you can use to make changes.

Users can provide a
Reason for Update if desired
or required before clicking
Save Run Details when finished.
Bulk Edit Run Properties
Provided your assay has
editable runs and you have sufficient permissions, you can also edit run properties in bulk.
- Make sure you're on the Runs tab.
- Select one or more runs, then choose either:
Learn about these interfaces
in the section below about editing Result data.
Re-Import Run
If you have a change of data or metadata after importing a run, and have editable runs and/or results, you may be able to make the change directly. However, if your runs/results are not editable, you can import a revised version of the run as follows. LabKey Sample Manager will track run re-imports and maintain data integrity.
Opening the run details (shown above) and select
Manage > Re-Import Run.

You will see the
interface from when you originally imported the run, including the values and datafile previously entered. Make changes as needed, provide a
Reason for Update if desired
or required before clicking
Re-Import.
A note about event logging:
When you re-import an assay run,
two new assay events are created:
- Assay Data Re-imported: This event is attached to the "old run" that is being replaced.
- Assay Data Loaded: This event is for the "new run" you import.
Delete Run
To delete a run, either:
- Start from the run details page and use Manage > Delete Run
- Start from the Runs tab, select one or more runs and choose Edit > Delete.
- In the popup, enter the Reason for Deleting if required or desired. It will be included in the audit log.
- Confirm the deletion by clicking Yes, Delete.
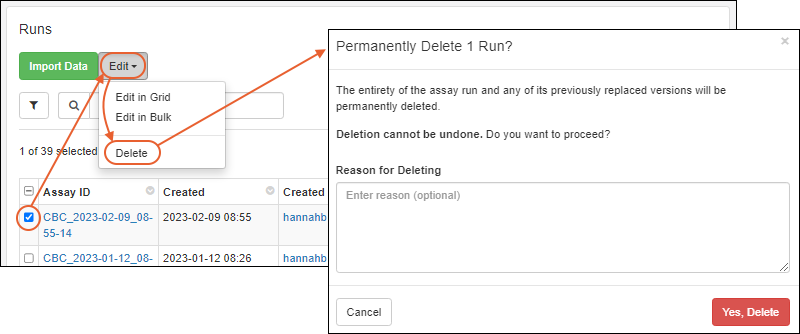
Note that a run cannot be deleted if it is referenced in an
Electronic Lab Notebook. You will see a message indicating why the option is unavailable.

Manage Results
The result data for your assay is available on the
Results tab. Results are individual rows within runs. You cannot add results rows within the user interface. To do so, either import a new run containing the results, or add them to an existing run by
reimporting the run after adding the additional rows to the run data file.
You may want to include one or more of the
Created/CreatedBy/Modified/ModifiedBy fields in the
assay result grid view for tracking when and by whom results are edited.
Edit Selected Results in Grid
If your assay has
editable results, and you have sufficient permissions, you can select one or more rows using checkboxes and select
Edit > Edit in Grid.
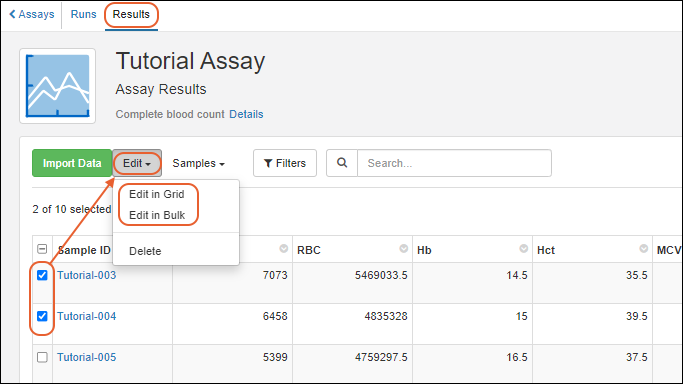
A grid will be shown, with a row for each row you selected, allowing you to edit the necessary values. Users can provide a
Reason for Update if desired
or required before clicking
Finish Updating # Results to save changes.
Learn more about using editable grids in this topic:
Edit Selected Results in Bulk
If you are editing a number of rows to insert shared values, select the desired rows with checkboxes and select
Edit > Edit in Bulk.
An editing popup will let you select which field or fields you want to batch update. By default, all fields are disabled; enabling a field using the toggle will let you enter a value to assign for that field in all rows. Shown here, the MCV field will be updated with a shared value, but all other fields left unchanged.
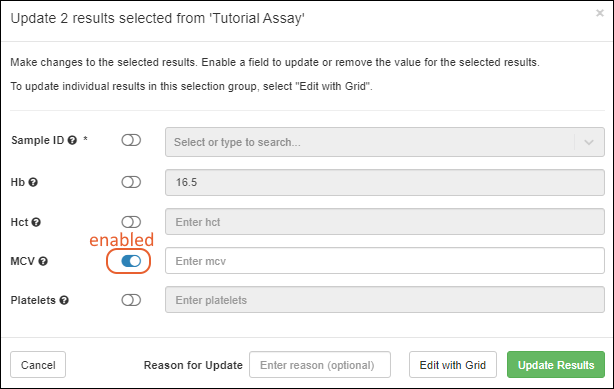
After entering updated values, you can Users can provide a
Reason for Update if desired
or required before leaving the bulk popup using either:
- Edit with Grid to switch to updating in a grid format (with the bulk changes you just made already applied). Use this option if you want to make individual as well as bulk row changes.
- Be sure to click Finish Updating # Results when finished with the grid update to save both the bulk changes AND individual changes you made.
- Update Results if no further editing is needed. The bulk updates will be saved.
Delete Results
To delete one or more rows of results within any run, either open the run from the Runs tab or find the desired rows on the Results tab. Use
sorting and filtering to help you isolate rows of interest.
Check the box(es) for the row(s) you want to delete and select
Edit > Delete. In the popup, enter the
Reason for Deleting if required or desired. It will be included in the audit log. Confirm the deletion by clicking
Yes, Delete.
Note that you can only delete 1,000 assay results in one operation. To delete more than that, perform the deletion in batches.
Work with Samples from Assay Results
From the page of assay results, you can select a desired set of rows and then use the
Samples menu to work with the set of samples mapped to those results.

View Assay Data for a Sample
On the details page for any Sample, click the
Assays tab to see data about that specific sample. There is an
Assay Run Summary tab showing the number of runs per assay type. In addition, a tab for each assay type lets you browse the collected profile of results.

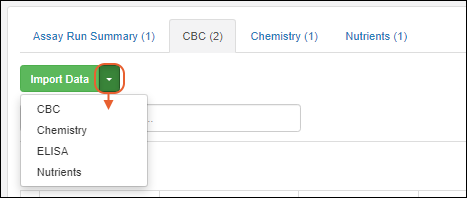
From any assay-specific tab, you can also
Import Data for any assay that can be linked to samples of this type, regardless of whether there are runs of that type yet.
View Assay Results for Selected Samples
From a grid of samples, including tabbed grids showing multiple sample types like picklists, you can select desired samples, then choose
Reports > View Assay Results for Selected.

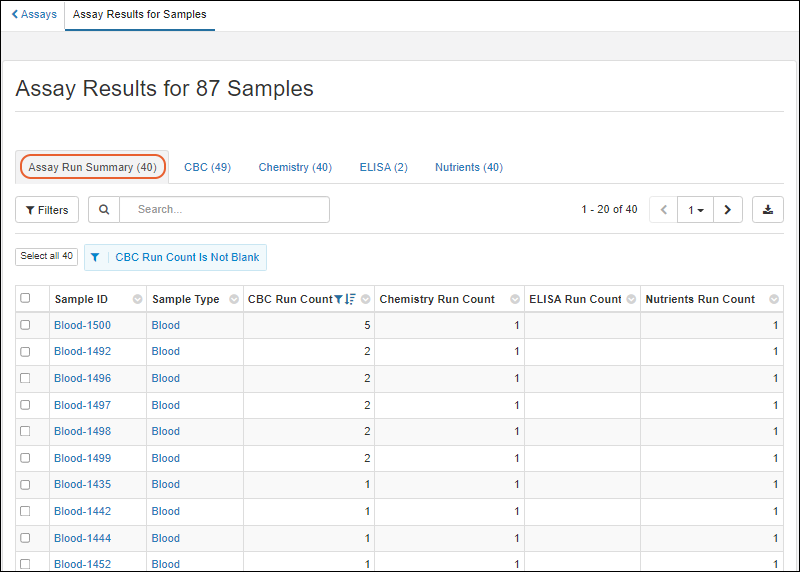
The report includes an
Assay Run Summary tab, showing the count of runs of each assay type for each sample. This can provide a handy dashboard for confirming that data analysis is on track for a mixed set of samples.
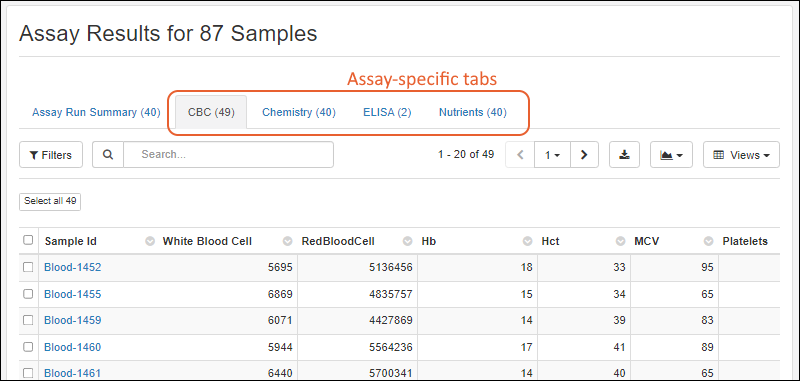
On assay-specific tabs, you can see all the assay results for your selected group of samples.
Exporting any tab from this report to Excel offers the option to include any or all of the tabs. Multiple tabs will be exported as a
multi-sheet Excel file.
Related Topics