This topic describes how to define and explore sample lineage and parentage among samples.
Add a Parent
Within the definition of a Sample Type, you can indicate one or more columns that will generate a parentage relationship with the samples being created. The parent(s) can exist in the same or different Sample Type than the one you are creating. Adding a parent and providing a
File Import Column Name (aka a "Parent Alias") in the definition of a Sample Type creates the linkage to parent samples during import. You can opt to make this relationship
Required if desired. Note that the column alias/import column name is not actually added to the Sample Type, instead the system pulls data from it to determine parentage relationships.
For example, if you have a group of "Vial" samples like the following, where v1 has two 'children', v1.1 and v1.2:
| SampleID | MyParent |
|---|
| v1 | |
| v1.1 | v1 |
| v1.2 | v1 |
...you could indicate the parent column name "MyParent" as part of the definition of this Sample Type, so that these relationships would be represented in lineage immediately upon import.
- You can add the parent relationship:
- During initial Sample Type creation.
- After creation by reopening the type for editing via Manage > Edit Sample Type Details.
- Click Add a Parent.

- Parent Type: Select the sample type of the parent. This may be in the "(Current Sample Type)" or another one that has been defined.
- File Import Column Name: Enter the parent column name for import. The column name is case sensitive.
- Check the Required box if you want every sample of this type to require a parent of this type.

- You can add additional parentage columns if applicable by clicking Add a Parent and repeating the process.
- Click Save.
You will see the
Parent Import Alias(es) listed on the
overview tab for the Sample Type.
Add a Source
Within the definition of a Sample Type, you can indicate one or more columns that will indicate a
Source of the samples being created. Adding a source of a given type in the definition of a Sample Type creates the linkage to sources during import, rather than requiring sources be added later.

As for sample parents, you'll select the type, give a
File Import Column Name (a "Source Alias"), and can optionally check the
Required box if you want every sample to have a source of this type. You can include multiple source aliases as needed. When you
use an import template or
add samples manually in a grid, columns for all source aliases will be included.
You will see the
Source Import Aliases listed on the
overview tab for the Sample Type.
Learn more about sources in this section:
Define Lineage When Creating Samples
When creating samples, you can include parent/source information based on the
Lineage Settings in the sample type, i.e. for any parents or sources included. When you
use a template to import from file columns for all parent/source lineage relationships will be included. As shown below, the "MyParent" column contains the parent identifier.

If you
add samples manually in a grid, a parent of the selected type will included by default, though the "File Import Column Name" you gave will not be shown in the UI. Instead it will be named for the selected sample type plus the word "Parents", i.e. "Vial Parents".
The system will capture and generate lineage for the parent(s) of the samples you have created. Learn more about using the
Lineage tab in sample details
below.
Require Lineage Relationships (Optional)
If you want to require that all samples of a given type have a given type of parent or source entity, use the checkbox in the Sample Type definition:

When you add new samples, this column will be required. Note that if you are using a grid method, you won't see the "MyParent" column name, you'll see the type of the parent that must be provided.

Create Aliquots, Derivatives, and Pooled Samples
Once you have created the parent samples in the system and want to create new samples with specific parents (i.e. aliquot, pool, or derive new samples), you can do so from the Samples grid or by importing from a file referencing the parent sample IDs.
Create from Samples Grid
Within the application, you can create new samples from any grid of parent samples. Note that if you select more than 1000 rows, the option to create samples with those parents is disabled.
- Select the Sample Type of interest from the main menu.
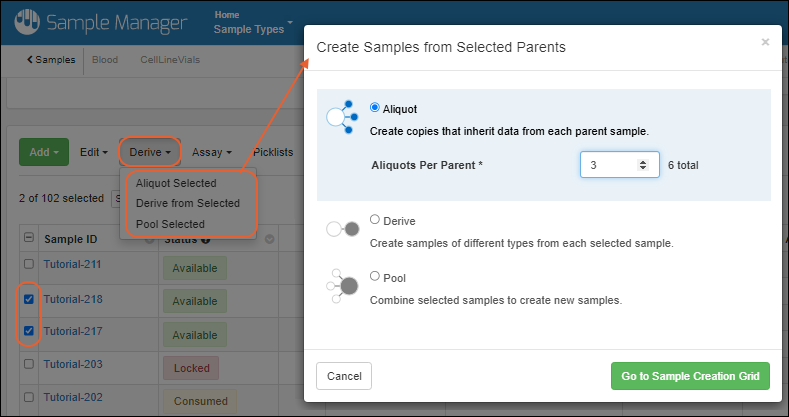
- Select the parent sample(s) using the checkbox(es).
- Select the desired option from the Derive menu. On narrower browsers, this will be a section of the More menu:
- Aliquot Selected: Create aliquot copies from each selected sample.
- Derive from Selected: Create multiple output samples per selected parent sample. Select the type to derive.
- Pool Selected: Created one or more pooled outputs from the selected samples.
- Add the desired number of new samples and click Go to Sample Creation Grid.
Learn more about providing the required information to
Finish Creating the selected type of child sample in this topic:
Create from Selected Sources
If you have already created the Sources in the system and want to create new samples from specific sources, you can do so from the Sources grid.
- Select the Source Type of interest from the main menu.
- Select the desired source(s) using the checkbox(es).
- Select Derive > Samples.
- Choose the Sample Type and enter the desired number of samples in the popup.

- Click Go To Sample Creation Grid.
- You will see the selected Sources prepopulated in the column for that type of source in the grid.
- Enter remaining sample information before clicking to Finish Creating the samples.
Import from File
After creating the parent samples, you can create new derivatives, pooled samples, and aliquots by importing from a file, referencing the parent samples you already created. Obtain the expected
import format template, then populate it to indicate the relationships.
- Select the Sample Type of interest from the main menu.
- Select Add > Import from File.
- Click Template to download the template of fields.
- Populate the spreadsheet as needed to indicate the intended relationships, then import it to create the new samples.
You can also update existing samples with parent and source relationships, or merge both existing and new samples using the
Edit > Update from File option.
Learn more about the specific fields to populate in this topic:
Aliquots, Derivatives, and Sample Pooling
Include Ancestor Metadata in Sample Grids
You can include fields from ancestor samples and sources in
customized grid views. Any user can make their own named custom views, selectively sharing them with the rest of the team, and administrators can customize the default view everyone sees.
For example, if you had a "PBMC" sample type and wanted to include in the grid both the "Draw Date" field from the parent "Blood" sample type AND the "Strain" field from a "Mouse" source, you would add the following:
| Sample Type: PBMC |
|---|
| Parent Type | Parent Field | Label | Position |
| Blood (a Sample Type) | Draw Date | Blood Draw Date | right of Processing Operator |
| Mice (a Source Type) | Strain | Mouse Strain | right of Blood Draw Date |
The selection of the Mouse Strain field would look like this, with
Ancestor and
Mice nodes expanded:
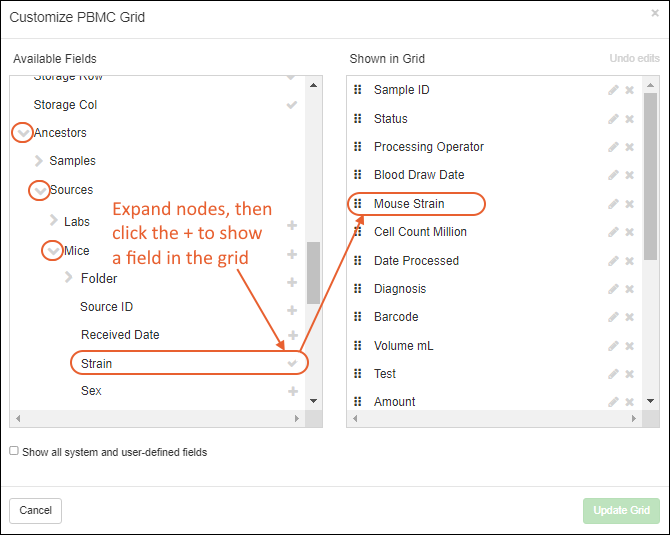
Save the updated grid view, and you can then filter, sort, and search based on that parent metadata. Shown below, we're showing only samples that come from "BALB/c" mice.
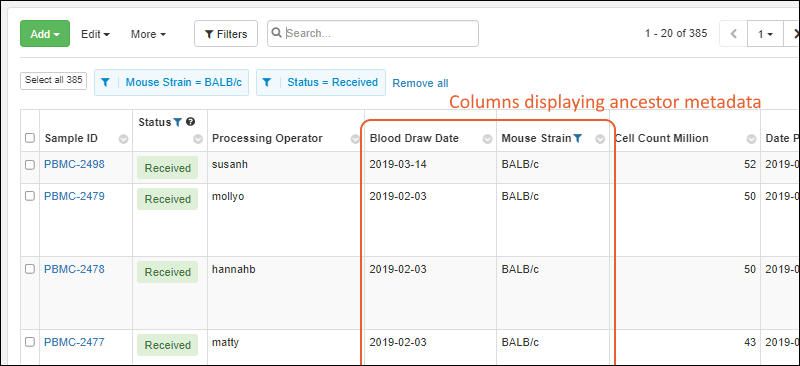
Up to 20 levels of ancestor can be traversed and displayed in a grid.
Lineage across multiple sample types in one tabbed grid can be viewed using the
Ancestor node on the
All Samples tab. Note that when viewing some grids, such as picklists, the
Ancestor node will be under the
Sample ID instead of at the top level in the customizer.
Explore Sample Lineage Graph
Viewing any sample detail page, you will see a tab for
Lineage in the header bar. For example:
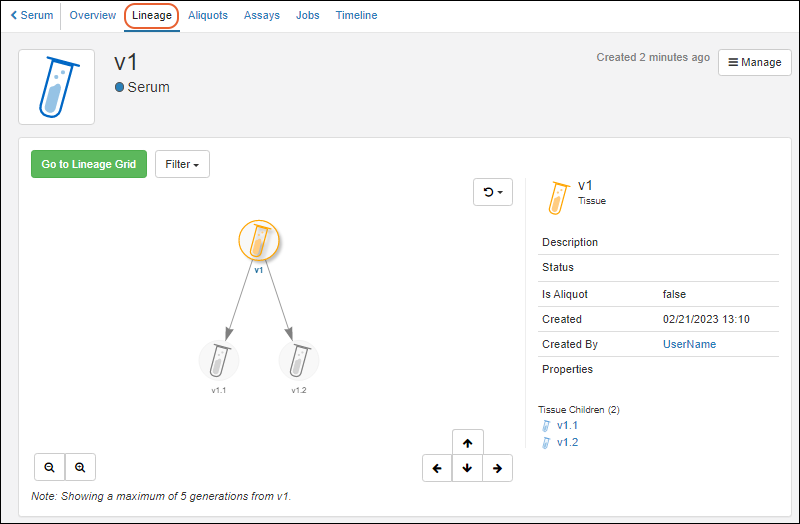
The lineage graph lets you explore a visual representation of the parentage of samples.
- Click anywhere in the graph and drag to reposition it in the panel.
- Click any node to see details in the panel to the right.
- Double-click any node to shift focus to that node, which will also adjust to show up to 5 generations from that node.
- This allows you to view the "siblings" of a sample of interest by first double-clicking the common "parent", and then single clicking each sibling node for details.
- Zoom out and in with the and buttons in the lower left.
- Step up/down/left and right within the graph using the arrow buttons.
- Refresh the image using the button. There are two options:
- Reset view and select seed
- Reset view

- On the right of the graph, a side panel lists the children as links.
- Click any sample to reset the graph focus in the left hand panel.
- Hover over a link to reveal direct links to the overview page or lineage view for that child. A tooltip will also show the Sample Type name.
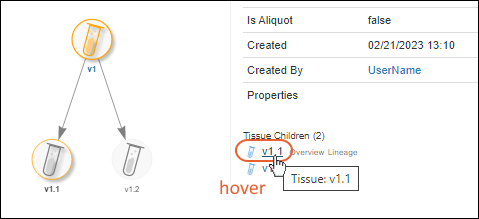
Note that only five generations will display on the lineage graph. To see additional generations, walk the tree up or down to see more levels in either direction.
You can switch to the grid view of the lineage by clicking the green
Go To Lineage Grid button.
Lineage Generations in Graph
When lineage is complex, different "generations" are shown horizontally aligned.

Lineage Grid
The lineage grid can be especially helpful when viewing lengthy lineages or derivation histories. By default, the children of the currently selected sample, aka the "seed", are shown.
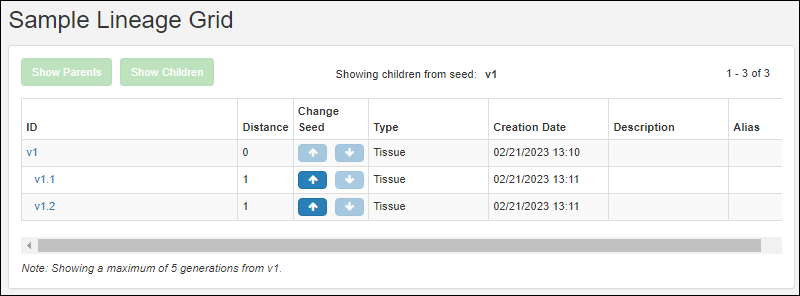
If this sample has parents, the
Show Parents button will be enabled and you can click it to see them. If the sample has children that are not shown, the
Show Children button will be enabled and you can click it to see them.
Entries in the
Names column are clickable and connect to the overview page for the sample.
The
Distance column specifies the number of generations between each row and the selected seed sample.
Use the arrow buttons in the
Change Seed column to change the focus of the grid, expanding and collapsing lineage hierarchies to focus on a different seed.
Troubleshooting
In situations where sample names are only strings of digits, you may see unexpected lineage results if those "number-names" overlap with row numbers of other samples. In such a situation, when there is ambiguity between sample name and row ID, the system will presume that the user intends to use the value as the name.
Related Topics