LabKey uses a role-based permissions model. This topic covers the permission roles available in Sample Manager and the process for assigning them to the appropriate users and groups.
Available Roles
Once users and groups have been defined, an administrator can assign them one (or more) of the available permission roles:
- Administrators: Have full control over the application including user management, permission assignments, storage editor and designer tasks, creating and editing sample types, assays, and job templates.
- Application Administrator is the name of this role when Sample Manager is used as a standalone application.
- When Sample Manager is used with a Premium Edition of LabKey Server, there are two levels: Project Administrators and Folder Administrators. Learn more in the core LabKey Server documentation.
- Editors: May add, edit, and delete data related to samples, assays, and jobs, but not storage information. May assign workflow jobs and tasks to other users, but not to project groups.
- Editor without Delete: May add and edit, but not delete, data related to samples, assays, and jobs. May not edit storage information. Learn about limited exceptions here.
- Readers: Have a read-only view of the application.
- Storage Editors: Have read permission for sample data. They may also add, edit, and remove samples from storage. They can move storage units, provided they have the role in the top level folder. They can create, update, and delete their own picklists, and participate in workflow jobs. Learn more here.
- Storage Designers: May read, add, edit, and delete data related to storage locations. Learn more here.
- Workflow Editor: This role includes the ability to read all data, and allows users to be able to add, update, and delete picklists and workflow jobs. Workflow editors can assign jobs and tasks to groups as well as individual users.
- It does not include the ability to add or edit job templates or any sample, source, or assay data.
- Note that this role does allow a user to delete tasks from a workflow job, as part of having the ability to edit the job.
Additional Permissions: The following roles do not include general "Reader" access, so should be assigned in conjunction with one of the above roles. Note that users with these roles cannot delete a Sample Type, Source Type, or Assay Design if there is data present for it.
- Sample Type Designer: Create and design new Sample Types or change existing ones.
- Source Type Designer: Create and design new Source Types or change existing ones.
- Assay Designer: Create and edit Assay Designs.
Assign Roles to Users and Groups
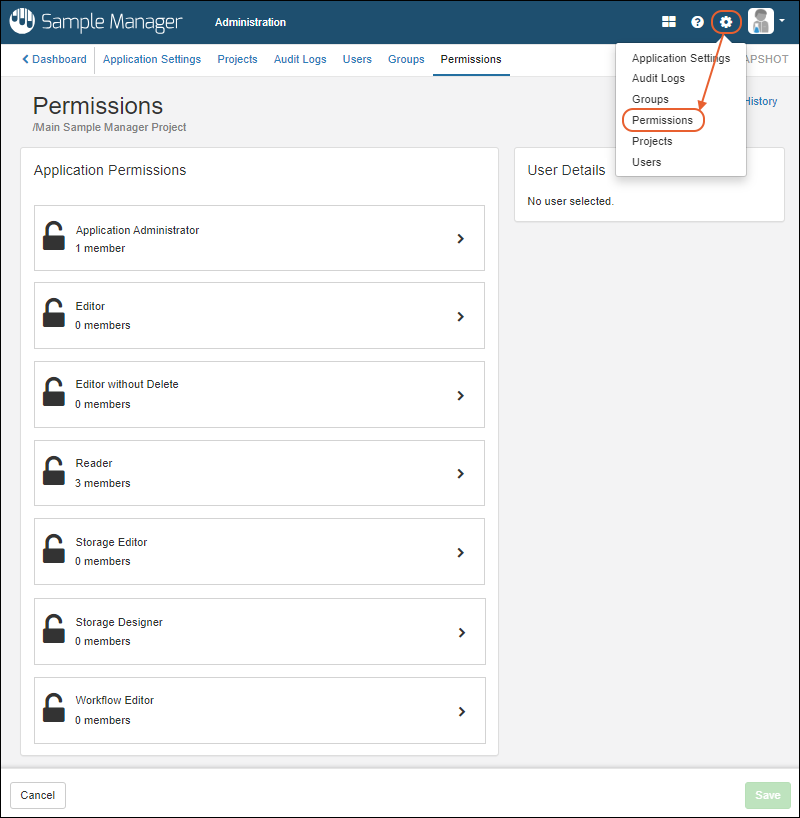
Open permissions management by selecting
> Permissions.

To add a user or group to any role:
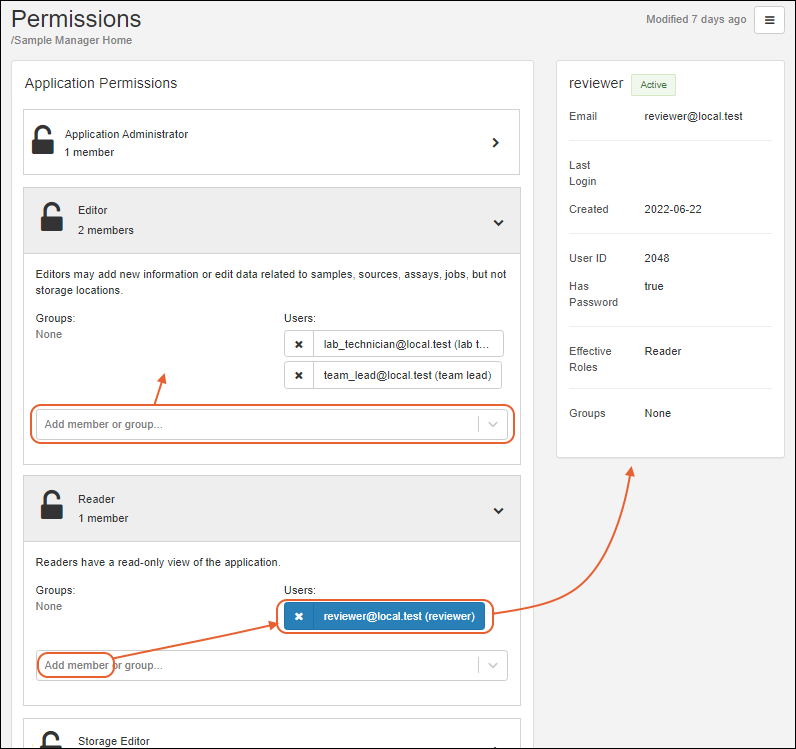
- First click the role section. You'll see the current members of that role.
- Click the Add member or group dropdown and start typing a user's email address or the name of a user group.
- Click the user email or group name to add to the role.
- Selected users and groups will be shown in the panel for the role as you go.
- Each time you select a user, the details for that user will be shown on the right to assist you.
- In the image below, the Editor role is being granted to users named "team lead" and "lab technician"; the Reader role is being granted to the "reviewer".

Click
Save.
Remove Users and Groups from Roles
To remove a level of access for a given user or group, reopen the interface for granting that role and click the X for the user or group you want to delete from the role. Removing a user from a role does not deactivate or remove the user account itself.
A note about role-based permissions: Users can be assigned multiple roles in the system, either independently or via groups, and each is independent. If a user is both Editor and Reader, removing them from the Reader role will not in fact remove that user's ability to read information in the system, because they will still have that access via the Editor role.
Related Topics