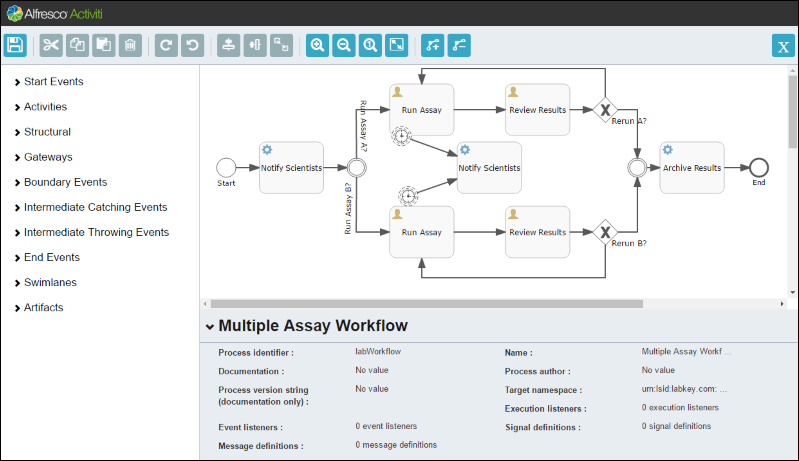
In this step, we explore the Activiti Workflow browser which offers graphical editing of workflow process diagrams.
If you did not do so already,
set up the Activiti Workflow Engine locally.
Explore Process Definition
Process definitions have a unique
process identifier, a short string used as part of the file name. The file is named:
[process identifier].bpmn20.xml
It is placed in the "/resources/workflow/model" directory of the module for your workflow; in our example:
...[LabKey Home]/server/optionalmodules/labWork/resources/workflow/model/[process identifier].bpmn20.xml
You can directly edit the xml file or use the graphical Activiti Explorer to edit; iterating between them gives you many options to refine workflows. Here we explore the sample workflow using the graphical Activiti Explorer.

- Click Import.
- Select the sample file [labWork]/resources/workflow/model/labWorkflow.bpmn20.xml. You can find this file in the sample package you downloaded, or it will now also be installed in your server/optionalmodules directory on the same path.
- Click Open.
- Click Edit to see the process diagram.

- Open the labWorkflow.bpmn20.xml file in a separate text editor window to compare the xml version of the workflow with the Activiti diagram.
This workflow begins with a system notification of scientists to run one or both of two assays. Each assay path includes user tasks to run the assay and review results. Decision points, or gateways, offer a possible rerun of the assay. An intermediate catching event, in the form of a timer, is set on each assay run step to notify the scientists if the task is not completed in a timely manner. Once the necessary assays have been run and reviewed successfully, the results are archived and the process ends.
In the next step, we'll make a few changes.