Using tabs within a project or folder can essentially give you a new page within the folder to help better organize the functionality you need. You can have different web parts available on different tabs to provide tools for specific roles and groups of activities. For an example of tabs in action, explore the
interactive example study.

Some folder types, such as study, come with specific tabs already defined, but with administrative permissions, you can also add and modify tabs to suit your needs.
Default Display Tab
As a rule of thumb, when multiple tabs are present, the leftmost tab is displayed by default when a user first navigates to the folder. Exceptions to rule are the "Overview" tab in a study folder and the single pre-configured tab created by default in most folder types, such as the "Start Tab" in a collaboration folder. To override these behaviors, see below:
- "Overview" - When present, the Overview tab is always displayed first, regardless of its position in the tab series. To override this default behavior, hide the "Overview" tab and place whichever tab you want to display by default in the leftmost position. Any web parts lost when
- "Start Tab"/"Assay Dashboard" - Similar behavior is followed for the single, pre-configured tab that is created with each new folder, for example, "Start Tab" for Collaboration folders and "Assay Dashboard" for Assay folders. This single pre-configured tab, when present, will always take display precedence over other tabs regardless of its position on the tab series. To override this default behavior, hide the pre-configured tab and place whichever tab you want to be displayed by default in the leftmost position.
Tab Edit Mode
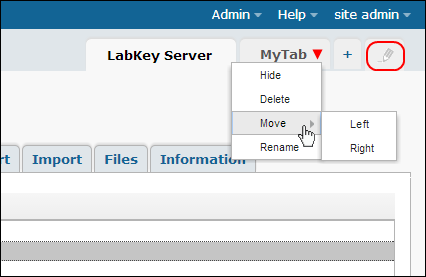
By clicking the pencil icon next to the rightmost tab, you can toggle
Tab Edit Mode which will enable a triangle pulldown menu on each tab for editing, as well as a
+ tab for adding new tabs.

Add a New Custom Tab
When edit mode is active, create a new custom tab by clicking the
+ tab between the pencil and rightmost current tab. Provide a name and click
OK. Add new webparts to the new tab as desired.
Hide Tabs
You can hide tabs from view by non-admin users by using the
Hide link on any tab menu, including custom tabs you have added. When you hide a tab, the contents of that tab are not deleted. Only admins can see the hidden tab, and could later change it back to no longer be hidden. The intent of hiding tabs is to simplify user display, not to provide secure storage of private data.
Delete Tabs
Tabs you have added may be deleted. You cannot delete tabs built in to the folder type (such as the default
Start Page tab in a project or the tabs in a default study), but they can be hidden from non-admin view.
Rearrange Tabs
In tab edit mode, pull down the triangle menu and choose
Move > Left or
Move > Right to change the order tabs appear.
Rename Tabs
In tab edit mode, pull down the triangle menu and choose
Rename to change tab's text.
Custom Tabbed Folders
Developers can create custom folder types, including tabbed folders. For more information, see
Modules: Folder Types.
