Administrators can customize the Files web part in the following ways:
- Customize the user interface
- Define metadata properties
- Configure email alerts
To customize the
Files web part, click the
Admin button on the toolbar.

Customize the User Interface
Actions Tab
The
Actions tab lets you add common design action and data import options such as importing datasets, specimen data, creating assay designs, etc. The
Import Data button is always visible to admins, but you can choose whether to show it to non-admin users. For each other action listed, checking the
Enabled box makes it available as a pipeline job. Checking
Show in Toolbar adds a button to the Files web part toolbar.
File Properties Tab
The
File Properties tab lets you define properties that can be used to tag files. Once a property is defined, users are asked to provided property values when files are uploaded.
- To define a property, select Use Custom File Properties and then click the Edit Properties button.
- To reuse properties defined in the parent folder, select Use Same Settings as Parent.
Tagged files can be retrieved by searching on their property value. For more detail, see
Step 3: Search the Repository.
Toolbar and Grid Settings Tab
The
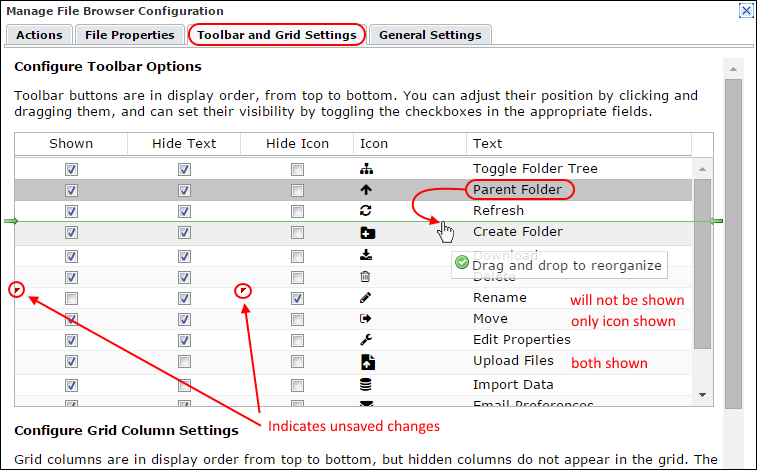
Toolbar and Grid Settings tab controls the appearance of the file management browser.
Configure Toolbar Options: Toolbar buttons are in display order, from top to bottom; drag and drop to rearrange. Available buttons which are not currently displayed are listed at the end. Check boxes to show and hide text and icons independently.
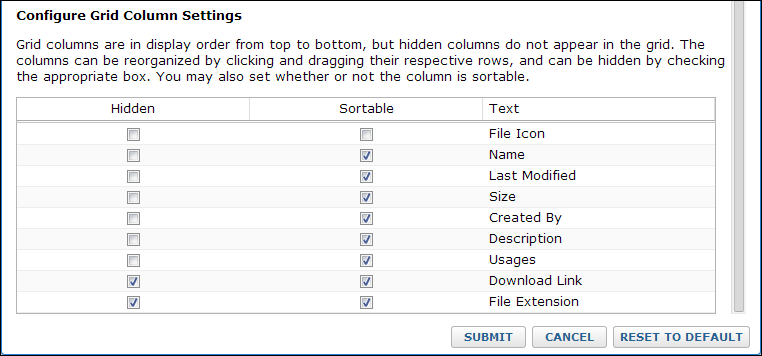
 Configure Grid Columns Settings
 (scroll down): lists grid columns in display order from top to bottom; drag and drop to rearrange. The columns can be reorganized by clicking and dragging their respective rows, and checkboxes can make columns
Hidden or
Sortable.

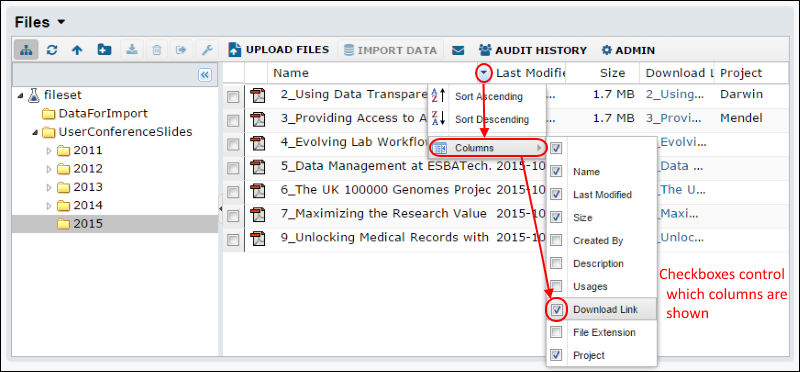
You can also change which columns are displayed directly in the Files web part. Pulldown the arrow in any column label, select
Columns and use checkboxes to show and hide columns. For example, this screenshot shows adding the
Download Link column:
 Local Path to Files
Use the following procedure to find the local path to files that have been uploaded via the Files web part.
- Go to Admin > Site > Admin Console > Files.
- Under Summary View for File Directories, locate and open the folder where your Files web part is located.
- The local path to your files appears in the Directory column. It should end in @files.

General Settings Tab
Select whether to show the file upload panel by default. You may drag and drop files into the file browser region to upload them whether or not the panel is shown.
Configure Default Email Alerts
To control the default email notification for the folder where the Files web part resides, see
Manage Projects and Folders. Email notifications can be sent for file uploads, deletions, changes to metadata properties, etc. Note that project users will have the option to override or accept the folder's default notification setting. Project users can override or accept the folder's default notification setting by clicking the
Email Preferences button in the Files web part toolbar.
 Local Path to FilesUse the following procedure to find the local path to files that have been uploaded via the Files web part.