Beginning with the sample workflow process definition in the
previous step of the Workflow Tutorial, this topic gets you started making customizations and defining your own workflow process definitions.
Customize a Process Definition
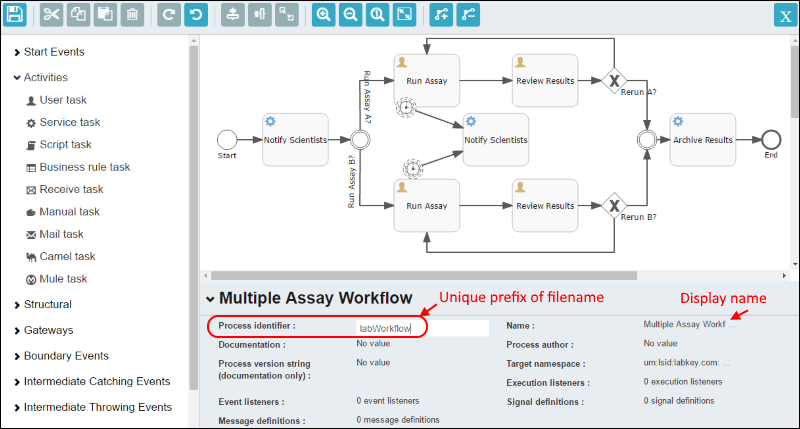
In the Activiti Explorer you can graphically develop your workflow process and elements. Learn how by using our example as a starting place. First, we'll change the process identifier so that the changes you make will not overwrite the tutorial process definition. The process identifier is the first part of the filename.
- Go to http://localhost:8080/activiti-explorer. Log in using the demo user "kermit" with password "kermit" if necessary.
- Click Processes, then Model Workspace.
- This view shows you the current workflow process, titled "Multiple Assay Workflow". If that title is not showing, click Import and import "labWorkflow.bpmn20.xml" again.
- Click Edit.
- Click "labWorkflow" next to Process identifier to activate an entry panel. Edit the string to read "myTutorialWorkflow" or any unique string you like. Remember that this will be part of the file name.

- Click the file icon in the upper left to save the changes, ensuring that any further changes you make will not overwrite the original tutorial workflow.
Next, explore the Activiti Explorer UI and make any changes you like. You can experiment with how these changes are expressed in XML when you export the diagram to a new file named with your new process identifier string.
- To change the name of the process printed above the diagram, and displayed in the Workflow List Webpart within LabKey, edit the "Name" field (which initially reads "Multiple Assay Workflow".
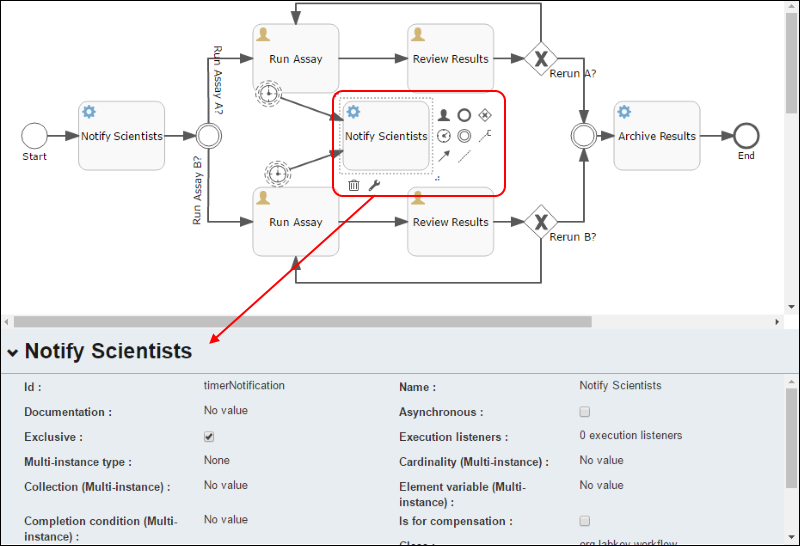
- Click any element in the diagram to see details about it displayed below the diagram, as well as reveal tools for adding additional workflow elements.

- Explore the editing options, and make any changes you like. You are not overwriting the original sample, so don't worry about making irrevocable changes.
- Double clicking on any text label, for instance, will allow you to edit it.
- Add a new element or pathway by clicking and dragging.
- Click the file icon in the upper left to save your revision.
- In the popup, change the Name to read "My Assay Workflow" or another name of your choice.
- Click Save and close editor.
- Notice the process diagram window on the model workspace pane now shows your revisions.
Export a Process XML File
- Using the Model action pulldown, select Export model and a new myTutorialWorkflow.bpmn20.xml file will be downloaded.
Open the downloaded file in a new text editor window so that you can see the changes you made and compare to the original .bpmn20.xml file.
You can also edit the .xml file directly, then reimport it and see the changes in the diagram. For a simple example, edit a text label for a task, then reimport the changed .xml file to the activiti explorer again.
Add Your Own Workflow Process
By working back and forth between the two methods, you can tailor a new workflow to suit your needs. Once you have a final process diagram exported to an .xml file, install it in the /resources/workspace/model directory of the module in which you will run it.
Related Topics
Workflow Process Definition