This example workflow describes the process for developing a perl transformation script. There are two potential use cases:
- transform run data
- transform run properties
This page will walk through the process of creating an assay transformation script for run data, and give an example of a run properties transformation at the end.
Script Engine Setup
Before you can develop or run validation or transform scripts, configure the necessary
Scripting Engines. You only need to set up a scripting engine once per type of script. You will need a copy of Perl running on your machine to set up the engine.
- Select Admin > Site > Admin Console.
- Click Views and Scripting.
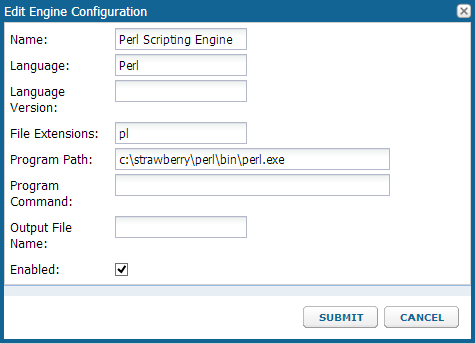
- Click Add > New Perl Engine.
- Fill in as shown, specifying the "pl" extension and full path to the perl executable.

Add a Script to the Assay Design
Create a new empty .pl file in the development location of your choice and include it in your assay design.
- Navigate to the Assay Tutorial.
- Click GenericAssay in the Assay List web part.
- Select Manage Assay Design > copy assay design.
- Click Copy to Current Folder.
- Enter a new name, such as "TransformedAssay".
- Click Add Script and type the full path to the new script file you are creating.
- Check the box for Save Script Data.
- Confirm that the batch, run, and data fields are correct.
- Click Save and Close.
Obtain Test Data
To assist in writing your transform script, you will next obtain sample "runData.tsv" and "runProperties.tsv" files showing the state of your data import 'before' the transform script would be applied. To generate useful test data, you need to import a data run using the new assay design.
- Open and select the following file (if you have already imported this file during the tutorial, you will first need to delete that run):
LabKeyDemoFiles/Assays/Generic/GenericAssay_Run4.xls
- Click Import Data.
- Select the TransformedAssay design you just defined, then click Import.
- Click Next, then Save and Finish.
- When the import completes, select Manage Assay Design > edit assay design.
- You will now see a Download Test Data button that was not present during initial assay design.
- Click it and unzip the downloaded "sampleQCData" package to see the .tsv files.
- Open the "runData.tsv" file to view the current fields.
Date	VisitID	ParticipantID	M3	M2	M1	SpecimenID
12/17/2013	1234	demo value	1234	1234	1234	demo value
12/17/2013	1234	demo value	1234	1234	1234	demo value
12/17/2013	1234	demo value	1234	1234	1234	demo value
12/17/2013	1234	demo value	1234	1234	1234	demo value
12/17/2013	1234	demo value	1234	1234	1234	demo value
Save Script Data
Typically transform and validation script data files are deleted on script completion. For debug purposes, it can be helpful to be able to view the files generated by the server that are passed to the script. When the
Save Script Data checkbox is checked, files will be saved to a subfolder named: "TransformAndValidationFiles", in the same folder as the original script. Beneath that folder are subfolders for the AssayId, and below that a numbered directory for each run. In that nested subdirectory you will find a new "runDataFile.tsv" that will contain values from the run file plugged into the current fields.
participantid	Date	M1	M2	M3
249318596	2008-06-07 00:00	435	1111	15.0
249320107	2008-06-06 00:00	456	2222	13.0
249320107	2008-03-16 00:00	342	3333	15.0
249320489	2008-06-30 00:00	222	4444	14.0
249320897	2008-05-04 00:00	543	5555	32.0
249325717	2008-05-27 00:00	676	6666	12.0
Define the Desired Transformation
The runData.tsv file gives you the basic fields layout. Decide how you need to modify the default data. For example, perhaps for our project we need an adjusted version of the value in the M1 field - we want the doubled value available as an integer.
Add Required Fields to the Assay Design
- Select Manage Assay Design > edit assay design.
- Scroll down to the Data Fields section and click Add Field.
- Enter "AdjustM1", "Adjusted M1", and select type "Integer".
- Click Save and Close.
Write a Script to Transform Run Data
Now you have the information you need to write and refine your transformation script. Open the empty script file and paste the contents of the
Modify Run Data box from this page:
Example Transformation Scripts (perl).
Iterate over the Sample Run
Re-import the same run using the transform script you have defined.
- From the run list, select the run and click Re-import Run.
- Click Next.
- Under Run Data, click Use the data file(s) already uploaded to the server.
- Click Save and Finish.
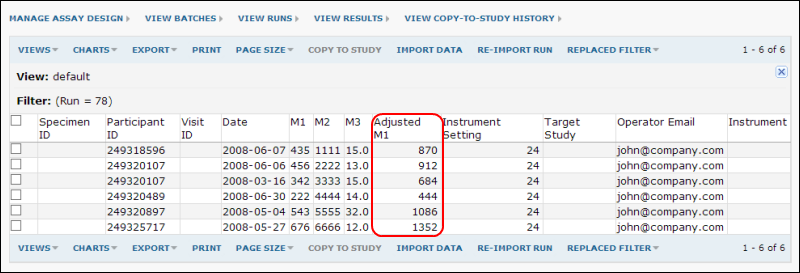
The results now show the new field populated with the
Adjusted M1 value.

Until the results are as desired, you will edit the script and use
Reimport Run to retry.
Once your transformation script is working properly, re-edit the assay design one more time to uncheck the
Save Script Data box - otherwise your script will continue to generate artifacts with every run and could eventually fill your disk.
Debugging Transformation Scripts
If your script has errors that prevent import of the run, you will see red text in the
Run Properties window. If you fail to select the correct data file, for example:

If you have a type mismatch error between your script results and the defined destination field, you will see an error like:

Errors File
If the validation script needs to report an error that is displayed by the server, it adds error records to an error file. The location of the error file is specified as a property entry in the run properties file. The error file is in a tab-delimited format with three columns:
- type: error, warning, info, etc.
- property: (optional) the name of the property that the error occurred on.
- message: the text message that is displayed by the server.
Sample errors file:
| type | property | message |
|---|
| error | runDataFile | A duplicate PTID was found : 669345900 |
| error | assayId | The assay ID is in an invalid format |
