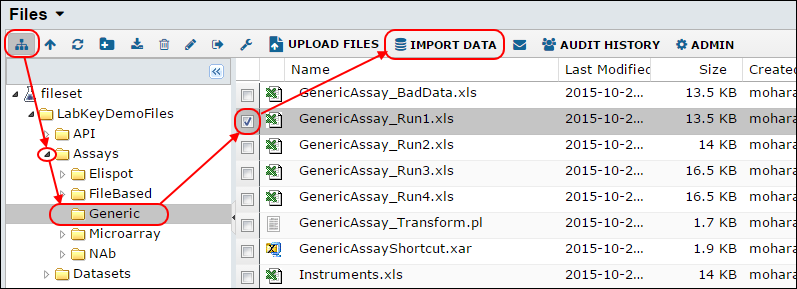
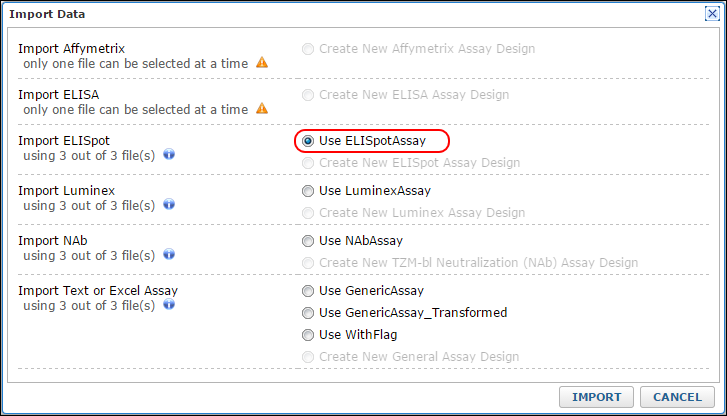
The import process for instrument data using an assay design involves many steps that are consistent for all types of assays. However, the process does vary a bit with the type of instrument data. This page covers the common steps. See a list of assay-specific pages for assay-specific steps is provided
below.
The process involves three basic steps:
Prerequisite: Create an Assay Design
Before you import data into an assay design, you need a target assay design in your project. If you don't already have an assay design in your project, an administrator can either (1)
create a new assay design from scratch or (2) you can
import a pre-existing assay design. Once you have an assay design you can begin the process of uploading and importing the data into the design.
Upload Data Files to LabKey Server
- Add the Files web part to your assay project.
- Upload your data files into the Files web part. See Using the Files Repository for details.
Consider File Naming Conventions
Before uploading data files, consider how your files are named, in order to take advantage of LabKey Server's file grouping feature.
When you import data files into an assay design, LabKey Server tries to group together files that have the same name (but different file extensions). For example, if you are importing an assay data file named
MyAssayRun1.csv, LabKey will group it together with other files (such as JPEGs, CQ files, metadata files, etc.), provided they have the same name as the data record file.
Files grouped together in this way will be rendered together in the graphical flow chart (see below) and they can be exported together as a zip file.
Import Data into an Assay
- In the Files web part, navigate to and select the files you want to import.
- Click Import Data.

- In the popup dialog, select the target assay design and click Import.

Enter Batch Properties
You are now on the page titled
Data Import: Batch Properties. A batch is a group of runs, and batch properties will be used as metadata for all runs imported as part of this group. You can define which batch properties appear on this page when you
design a new assay.
- Enter any assay-specific properties for the batch.
- Click Next.
Enter Run-Specific Properties and Import Data
The next set of properties are collected per-run, and while there are some commonalities, they can vary widely by type of assay, so please see the pages appropriate for your instrument. Review run-specific properties and documentation for importing data appropriate for your assay type:
- Enter run-specific properties and specify the file(s) containing the data.
- For some types of instrument data, there will be a Next link, followed by an additional page (or more) of properties to enter.
- Click Save and Finish (or Save and Import Next File) to initiate the actual import.
Explore the Data
When the import is complete, you'll see the runs page listing all runs imported so far for the given assay design. Each line lists a run and represents a group of data records imported together.
To see and explore the data records for a particular run, click the run's name.

To see a graphical picture of the run and associated files, click the graph icon.

A flow chart of the run is rendered, showing the input data and file outputs. Note that the elements of the flowchart are clickable links.

- Switch tabs above the graph for the Graph Details and Text View of the run.
- Return to the Assay Dashboard by clicking the tab at the top of the page.
- You can reach the runs page by clicking the name of your assay in the Assay List.
- For specific instrument assays, the runs list may show additional columns.
Assay Data and Original Files
In the case of a successful import, the original Excel file will be attached to the run so you can refer back to it. The easiest way to get to it is usually to click on the flow chart icon for the run in the grid view. You'll see all of the related files on that page.
Once you have imported a file you cannot import it, or another file of the same name, using the same method. If you need to repeat an import, either because the data in the file has been updated or to apply an updated import process, use the process covered in
Reimport Assay Runs.
For failed import attempts, the server will leave a copy of the file at yourFolder/assaydata/uploadTemp. The subdirectories under uploadTemp have GUIDs for names -- identify your file based on the created/modified date on the directory itself.
Related Topics
Specific import processes for specific instrument data types: