The
issue tracking tool helps you manage complex tasks, especially tasks that have multiple steps and require input from multiple team members. It is also useful for small tasks that don't require more involved management tools, but can easily fall through the cracks of a collaborative effort.
Life Cyle of an Issue/Bug
Issues have three statuses/phases:
- The open phase - The issue has been identified, but a solution has not yet been applied.
- The resolved phase - A solution has been applied, but it is not yet confirmed.
- The closed phase - The solution is confirmed, so the issue is put to rest.

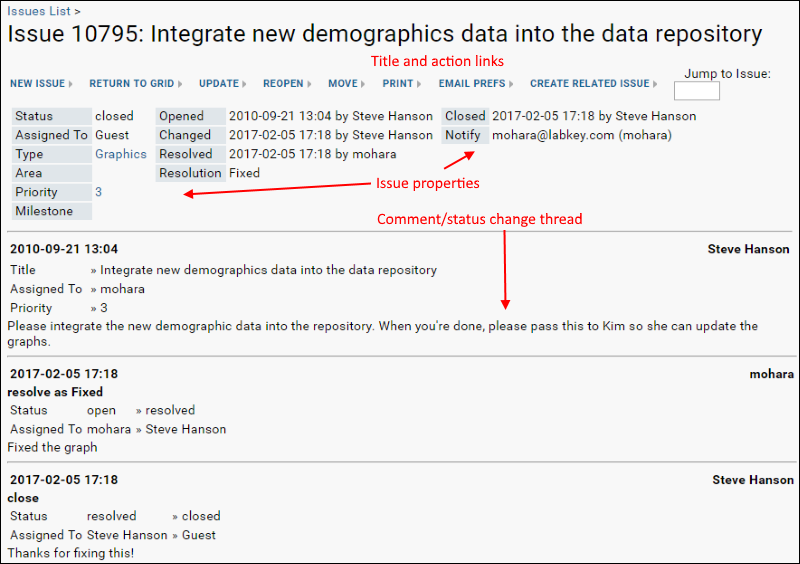
Steve notices a problem and opens an issue which needs attention. Once someone else has resolved it, Steve double checks the work before marking the issue closed.
Notice:
- The issue contains three main areas: a title section (with action links), a properties/status report area, and series of comments.
- Each comment includes the date, the contributing user, life-cycle status updates, and the body of the comment, which can include file attachments.
- This issue has gone through the entire life-cycle: open, resolved, and finally closed.
Set Up and Use an Issue Tracker
First we add the issue tracker to the folder. There can be several different types of issue tracker, and
issue definitions are used to define the fields and settings. In this case we need only a general one that uses default properties.
- Click the Start Page tab to return to the main page.
- From the <Select Web Part> dropdown at the bottom left of the page, select Issues Definitions and click Add.
- Click Insert New Row in the new web part.
- Give the new definition a name, such as "Default Tracker", and leave "General Issue Tracker" selected.
- Click Submit.
- Review the properties and naming conventions on the admin page, but make no changes.
- Click Save.
- Click the Start Page tab to return to the main page.
- From the <Select Web Part> dropdown at the bottom left of the page, select Issues List and click Add.
- Confirm that your new default definition is selected and click Submit.
To represent the team members, we add a project group "Users".
- From the menu in the upper right, select Admin > Folder > Permissions.
- Click the Project Groups tab.
- Unless it already exists, type "Users" in the New Group Name box and click Create New Group.
- In the Add user or group... dropdown, select yourself.
- Click Done in the pop-up.
Next we elevate the Users group to the Editor role. By default, the new group has the Reader role. The
Assigned To dropdown in the default issue tracker will be populated from this group.
- Select Admin > Folder > Permissions.
- If necessary, uncheck Inherit permissions from parent.
- Using the dropdown next to the Editor role, select "Users". This means that anyone in that group can open and edit an issue.
- Click the tab Project Groups.
- Click Users. Notice that Editor is now listed under Effective Roles.
- Click Done.
- Click Save and Finish.
Now you can open a new issue:
- In the Issues List web part, click the New Issue button.
- On the Insert New Issue page:
- In the Title field: "Some Task That Needs to be Completed"
- From the Assign To dropdown, select yourself.
- In the Comment field, enter "Please complete the task."
- Notice that the other required field, Priority, has a default value of 3 already.
- Click Save.
- You will see the details page for your new issue.
- Click the Start Page tab return to the main tutorial page.
Notice that the new issue appears in the
Issues List web part and you can click the title to return to the details. From the detailed view, you can also click links to:
- Update: Add additional information without changing the issue status. For example, you could assign it to someone else using an update.
- Resolve: Mark the issue resolved and assign to someone else, possibly but not necessarily the person who originally opened it, to confirm.
- Close (available for resolved issues): Confirm the resolution of the issue closes the matter.
If you've added other users (real or fictitious ones as part of another tutorial) you could now assign your practice issue to one of them, then
impersonate them to simulate a
multi-user issue tracking process. When finished experimenting with your issue, you can close it:
- Open the detail view of the issue by clicking the title in the issue list.
- Click Resolve.
- By default the Assigned to field will switch to the user who originally opened the issue (you); you may change it if needed, so that a different person can confirm the fix.
- Enter a message like "I fixed it!" and click Save.
- Notice that instead of a resolve link, there is a link reading Close; click it.
- Enter a message if you like ("Well done.") and click Save.
- Your issue is now closed.
- See a live example of a similar issue: Issues List.
- See the LabKey issues list, where the LabKey staff tracks development issues: LabKey Issues List
Related Topics
 Steve notices a problem and opens an issue which needs attention. Once someone else has resolved it, Steve double checks the work before marking the issue closed.Notice: