By default, configuring permissions for a group on a dataset determines the permissions for Reports and Views based on that dataset. However, in some cases you may want to allow users to view aggregated or filtered data in a Report or View, without providing access to the underlying dataset. You can configure additional permissions on the Report or View to grant access to groups who do not have access to the dataset.
The
Report and View Permissions page allows you to explicitly set the permissions required to view an individual Report or View.
Explore Permissions and Project Groups
To explore these features, you will first need to set up a few users and groups.
If you are working on a server where you have administrative permissions, such as your own evaluation installation, but have not already set up site users and site groups, complete the steps on this page:
Secure Your Data.
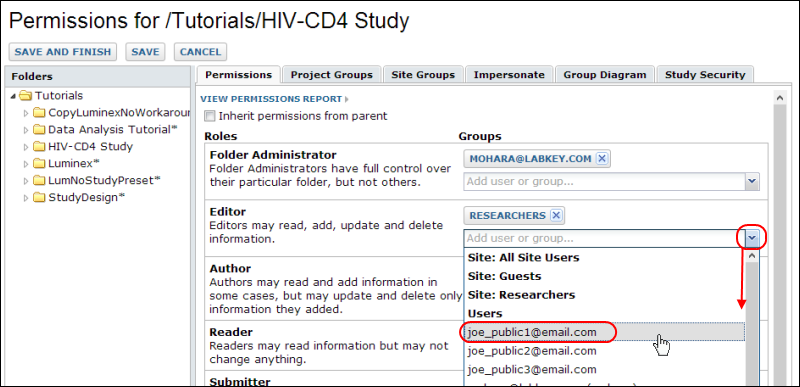
- Navigate to your Study home page and select Admin > Folder > Permissions. - If you created the Researchers site group and gave them Editor permissions, you will see that they also have Editor permissions on the contents of this folder.
For this demonstration, let's imagine two of the three other "joe_public" site users are doing some work within this project and you want to grant them permissions on this project only. In this scenario, both will be reviewing the results and you want to grant them read access to the folder. The "joe_public1" user will be a collaborating Editor, so you grant him editor permissions individually. You could also add additional project users and groups at this level if you like but for demonstrating the permissions features, this is enough.
- In the Editor row, pulldown the Add user or group... box and select joe_public1 from the list as shown:

- Then select the Project Groups tab.
- Type "Reviewers" in the New Group Name box and click Create New Group.

- In the popup window, add joe_public1 and joe_public2 as members, then click Done.
- Return to the Permissions tab and add the new "Reviewers" group to the Reader Role so that they will have access to datasets in the project.
- Click Save and Finish.
View and Set Report Permissions
- From the study home page, do either of the following:
- Select the Manage tab, then click Manage Views.
- Select the Clinical and Assay Data tab, and from the pulldown on the Data Views web part, select Manage Views.
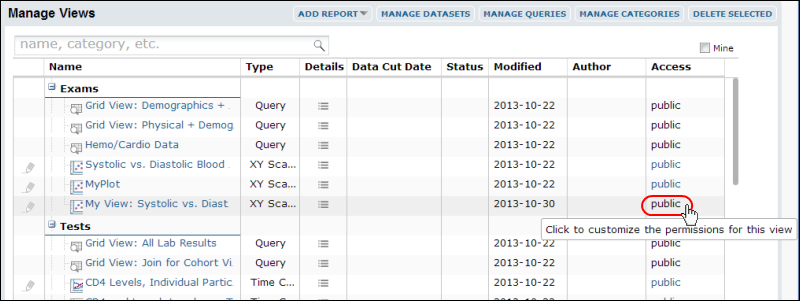
- Scroll down to a report or view of interest, such as "My View: Systolic vs. Diastolic" created as part of the study tutorial.
- Click the link in the Access column for the given row.

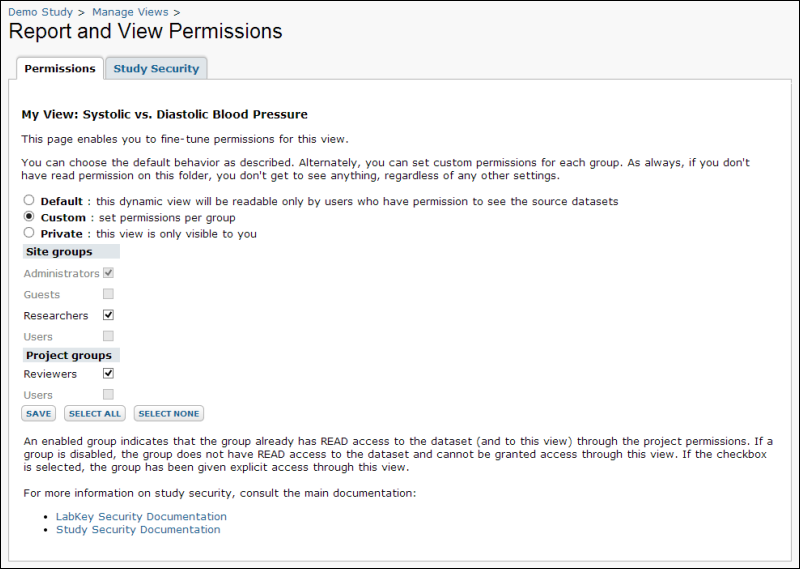
The Report and View Permissions page looks like the following screenshot. There are three options for configuring report and view permissions:
- Default : this dynamic view will be readable only by users who have permission to the source datasets
- Custom : set permissions per group; then check boxes to give access to groups
- Private : this view is only visible to you

In the lists of site and project groups, an enabled group indicates that the group already has READ access to the dataset (and to this report) through the project permissions. If a group is disabled, the group does not have READ access to the dataset and cannot be granted access through this view. If the checkbox is selected, the group has been given explicit access through this view.
Consider the scenario where one of our visualizations, in this case "My View: Systolic vs. Diastolic" is in draft state and we do not want the group of reviewers to be able to see it in the current form.
- Click the Custom button to enable per group selections.
- Uncheck the box for Reviewers.
- Click Save.
- Notice that the link in the Access column now reads "custom".
- To test this setting, impersonate the reviewers group by clicking your account login in the upper right and choosing Impersonate > Groups > Reviewers from the menu that appears.
- Notice that now the Manage Views web part does not include the "My View: Systolic vs. Diastolic" item we just restricted. The Reviewers can still see other views based on the dataset as well as the dataset itself.
- To stop impersonating, click again on your username and choose Stop Impersonating.
To adjust Study-level and per-dataset security settings, use the
Study Security tab. For more about permissions, see
Manage Study Security (Dataset-Level Security).
For a matrix of report and view permissions, see
Matrix of Permissions.


