This topic explains how to set up a new assay request tracker.
To set up a new Assay Request tracker, first you define a new issues list (of type Assay Request Tracker), then you add the tracker user interface.
Define a New Issues List
- First, enable the AssayRequest module in your project or folder. (For details, see Enable a Module in a Folder)
- Go to Admin > Go To Module > Assay Request.
- On the Issue List Definitions page, click Insert New Row.
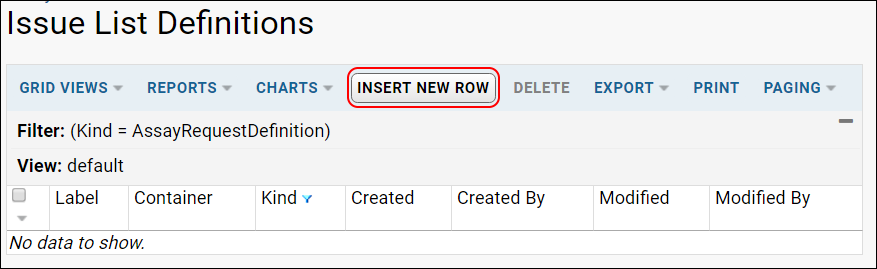
- Under Insert Issue List Definitions:
- Enter a Label, for example "Assay Jobs"
- For Kind select Assay Request Tracker.
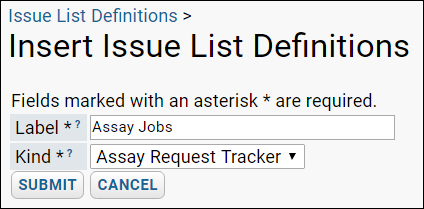
- Click Yes, when prompted by the popup dialog titled Create Issue List Definition?
- You will be taken to the administration and configuration page for your assay request tracker.
- Click Save to use the default configuration. You can return to this page later to refine the configuration.
- Now you have defined a new tracker list. Now you can add it to your folder.
Add the Assay Tracker UI to a Folder
- Go to the folder where you wish to place the assay jobs list.
- Add the web part Issues List.
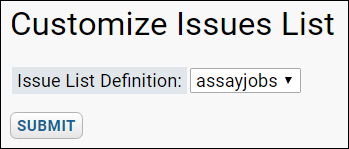
- On the Customize Issues List page, on the Issue List Definition dropdown, select the label of the list you entered previously, for example "assayjobs". Notice that your label has been converted to a single lowercase string without whitespace. Click Submit.
- Your assay tracker is ready for use.
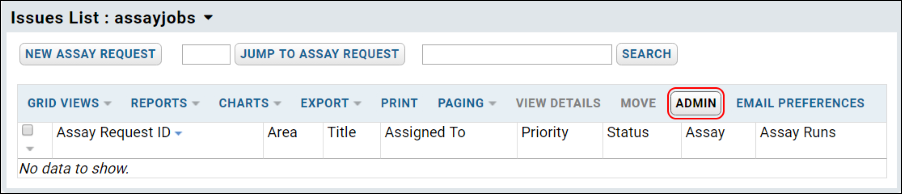
Administration and Configuration
Administrators can customize the assay request tracker in the following ways:
- Set the available values in dropdowns on the request form, including the priority ratings, the request groupings, and resolution states. (For details, see below.)
- Link assay requests, specimens, and result data for easy navigation. (For details, see below.)
- Select the noun used to identify the request or issue. By default the AssayRequest modules uses "Assay Request", but this can be changed as desired. For details, see Administering the Issue Tracker.
- Configure the users who can be assigned requests. For details, see Administering the Issue Tracker.
- Select the default user (if any) to be assigned new requests. For details, see Administering the Issue Tracker.
- Change the display labels for fields, and many other field properties. For details, see Administering the Issue Tracker.
- Customize email notification templates. For details see Customize Email Notifications.
Controlling Dropdown Values
When a new assay request tracker is created, three lists are created that hold the dropdown values for the following fields: 'Area', 'Priority', 'Resolution'.
An administrator can alter these lists to provide dropdown values that best fit their project. To change these lists, go to Admin > Manage Lists. Select one of the lists, and update as desired.
| Dropdown Field | List Name | Description |
|---|
| Area |
list.assayrequests-area-lookup |
Holds different groupings of issues/requests, for example, 'HPLC', 'Sequencing', and 'Viability'. |
| Priority |
list.assayrequests-priority-lookup |
This list holds possible priority rankings for a request/issue.
By default, the list includes numbers 1 through 5, where priority 1 is intended to mean highest priority, and priority 5 the lowest priority.
|
| Resolution |
list.assayrequests-resolution-lookup |
This list holds possible resolution states for a request.
By default three resolution states are included: 'Complete', 'Duplicate', and 'Rejected'.
|
Linking Requests to Assay Data
Each assay request tracker contains a lookup field, named "Assay", that points to the assay designs in scope of the current folder. In particular, the lookup points to the table assay.AssayList, which lists all of the assay designs that reside in the current folder, in the current project, and those in the Shared project. When creating an assay request, this list is presented to the user as a dropdown used to specify which assay is to be run against the samples. To control the items in the Assay dropdown, add or delete assay designs from the current folder (or the current project, or the Shared folder).
Linking Assay Data to Requests
Assay data can also link back to the originating request. To provide links from assay data/designs to the request tracker, add a lookup to the issue tracker:
- Go the Run or Result view on the assay you wish to modify.
- Open the assay designer. From the Run or Result view of the assay data, select Manage Assay Design > Edit Assay Design.
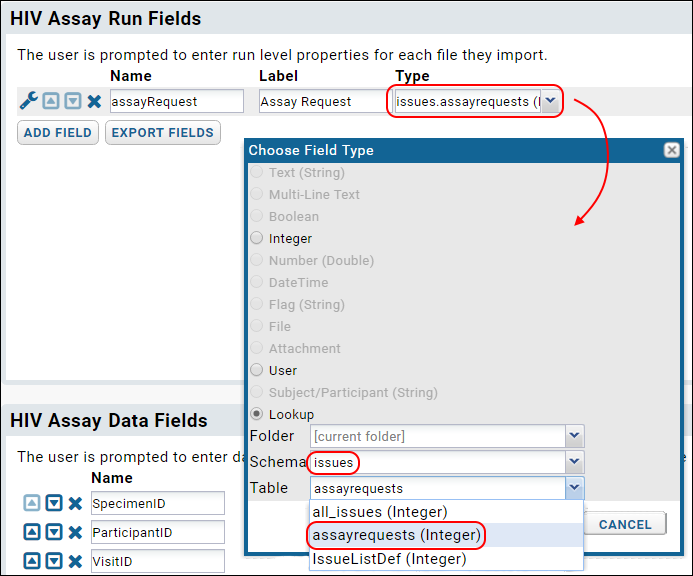
- In the Assay Designer, scroll down to the Run Fields area.
- Add a new run field by clicking Add Field.
- Name the field "assayRequest" and set the data type to 'lookup' by clicking the dropdown under Type.
- In the popup dialog box, select Lookup and then set the target of the lookup as follows:
- Schema: set to issues
- Table: set to assayrequests
Once the lookup column has been added, people working with the assay data, can point to the originating request when importing the assay runs.
Related Topics