In this step we import two different, but connected, data tables:
- Plasma sample inventory: an Excel spreadsheet that describes different vials of plasma specimens.
- Assay result data: an Excel spreadsheet that holds the experimental results of assaying the plasma.
These tables are connected by the fact that the assay data
describes properties of the plasma in the vials. We will capture this relationship in the next step when we link these two tables together using a LabKey Server device called a
lookup. In the current step, we will simply import these tables to the server.
Add Sample Set - Plasma
We will import information about the individual sample vials, such as the tissues stored and the barcode of each vial, like the table shown below.
Sample Set - Plasma| Name | Type | Status | LocationId |
|---|
| vl-100 | Plasma | Received | i-123456 |
| vl-200 | Plasma | Preserved | i-123457 |
| vl-300 | Plasma | Contaminated | i-123458 |
| vl-400 | Plasma | Results Verified | i-123459 |
| vl-500 | Plasma | Results Verified | i-123460 |
| vl-600 | Plasma | Results Verified | i-123461 |
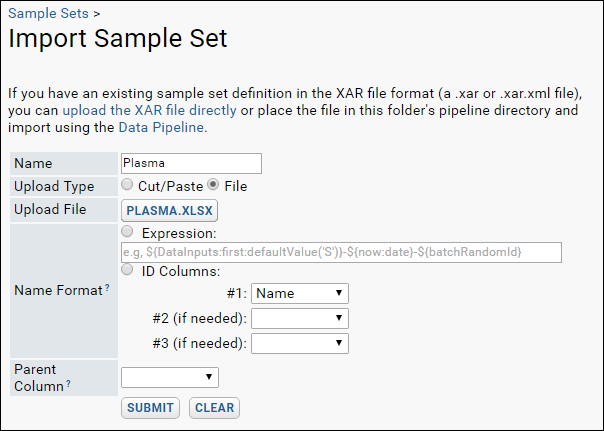
- Download the sample file Plasma.xlsx from this page.
- Click the Vials tab.
- On the Samples Sets panel, click Import Sample Set.
- Provide the name: "Plasma"
- Select File and click Upload TSV, XLS, or XLSX File.
- Navigate to and select the Excel file Plasma.xlsx.
- Click Submit.

Import Assay Data - Immune Scores
Next, we import the data generated by assays performed on these plasma vials. The data includes:
- Participant IDs - The subjects from which the samples were drawn.
- Specimen IDs - Note these values match the Name column in the Plasma table. This fact makes it possible to link these two tables (Assay and Sample Set) together.
- Experimental measurements - Columns M1, M2, M3.
| ParticipantId | SpecimenId | Date | M1 | M2 | M3 |
|---|
| pt-1 | vl-100 | 4/4/2020 | 1 | 0.8 | 0.12 |
| pt-1 | vl-200 | 6/4/2020 | 0.9 | 0.6 | 0.22 |
| pt-1 | vl-300 | 8/4/2020 | 0.8 | 0.7 | 0.32 |
| pt-2 | vl-400 | 4/4/2020 | 0.77 | 0.4 | 0.33 |
| pt-2 | vl-500 | 6/4/2020 | 0.99 | 0.5 | 0.44 |
| pt-2 | vl-600 | 8/4/2020 | 0.98 | 0.55 | 0.41 |
| pt-3 | vl-700 | 4/4/2020 | 0.94 | 0.3 | 0.32 |
| pt-3 | vl-800 | 6/4/2020 | 0.8 | 0.77 | 0.21 |
Follow the instructions below to import the assay data into the server.
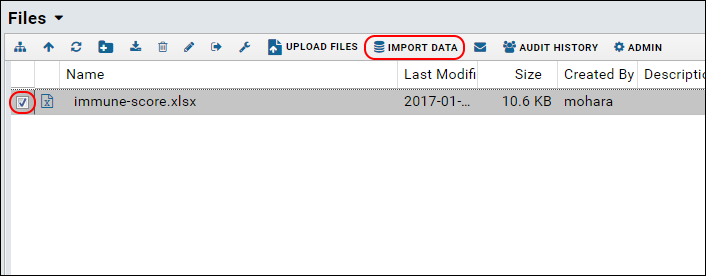
- Download the file immune-score.xlsx from this page. This is the data-bearing file. It holds the data results of your experiment, that is, the values measured by the instrument.
- Click the Experiments tab.
- Drag-and-drop this file into the Files panel.
- In the Files panel select the file immune-score.xlsx and click Import Data.

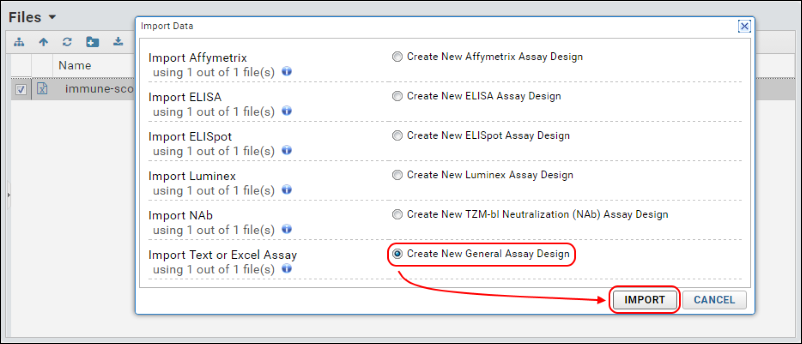
- In the Import Data pop-up dialog, select Create New General Assay Design and click Import.

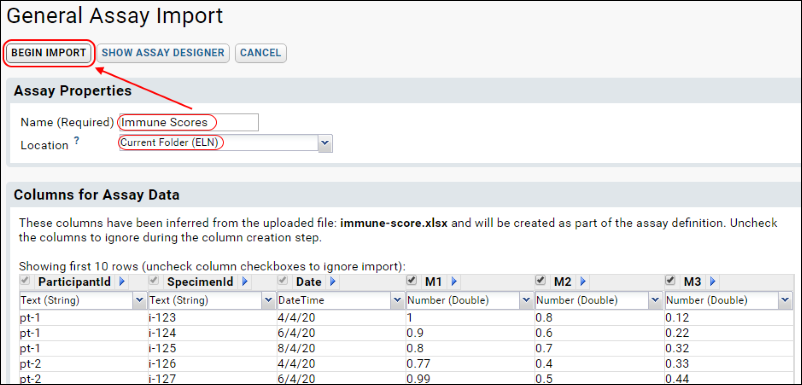
- On the General Assay Import page:
- In the Name field, enter "Immune Scores"
- Set the Location to Current Folder (ELN).
- Click Begin Import.

- On the Data Import: Batch Properties page, do not change any values and click Next.
- On the Data Import: Run Properties and Data File page, do not change any values and click Save and Finish.
Related Topics


