Developers who build LabKey Server from source will not be able to use the Ant build targets starting in 17.2 (July 2017). Instead, the Gradle build framework will be used. This topic is intended for early adopters who want to begin the process of migrating from Ant to Gradle early, before it is required.
For the latest news on the migration to Gradle, see Gradle Developer Discussion Thread.
It is assumed in what follows that you have a standard LabKey SVN enlistment. We use LABKEY_ROOT to refer to the directory into which you check out your enlistment (i.e., the parent of the server directory). (You may also have git modules checked out, but the first step will be to get a build using SVN modules going.)
Create a gradle properties file to contain information about global settings for your gradle build
This step is only for LabKey Software internal staff. If you are not a LabKey employee, skip this step.
EITHER
OR
2. Modify the gradle properties file
ant clean
export PATH=<LABKEY_ROOT>:$PATH and then open a new terminal window.
gradlew deployApp
This will take some time as it needs to pull down many resources to initialize the local caches. Subsequent builds will be much faster.
Gradle uses the <LABKEY_ROOT>/settings.gradle file to determine which projects (modules) are included in the build. (This is an analog of the various .modules files used in the ant build.) To include a different set of projects in your build, you will need to edit this file. By default, only modules in the server/modules directory and the server/test and server/test/modules directories are included in the build. See the file for examples of different ways to include different subsets of the modules.
This feature is currently only for LabKey Software internal staff. If you are not a LabKey employee, skip this section.
N.B. As of 12 January 2017, there is a bug related to the buildFromSource parameter in conjunction with a dev build having to do with the .lib.xml files and client libraries, which means this probably won’t work as advertised here just yet.
Which modules are built from source is controlled by the buildFromSource property. This property can be set at the LABKEY_ROOT level, at the project level, at the global (user) level, or on the command line (with overrides happening in the order given).
The default properties file in LABKEY_ROOT/gradle.properties has the following property defined
buildFromSource=true
This setting will cause a build command to construct all the jars and the .module files that are necessary for a server build. But if you are not changing code, you do not need to build everything from source. The following table illustrates how you can specify the properties to build just the source code you need to build.
|
If you want to... |
.. then ... |
|
build nothing from source |
Set buildFromSource=false In one of:
Then run gradlew deployApp |
|
Build everything from source |
Set buildFromSource=true In one of
Then run gradlew deployApp |
|
Build a single module from source |
Set buildFromSource=false In LABKEY_ROOT/gradle.properties Then EITHER (most efficient) run deployModule command for that module (e.g., gradlew :server:opt:cds:deployModule) OR (Less efficient)
|
|
Build a subset of modules from source |
Set buildFromSource=false In LABKEY_ROOT/gradle.properties Then EITHER (most efficient) run deployModule command for the modules you wish to build (e.g., gradlew :server:opt:cds:deployModule) OR (Less efficient)
|
The following table provides a mapping between the most popular (I assume) ant commands and their Gradle counterparts. Note that while a mapping is provided for the ‘ant clean’ and ‘ant rebuild’ commands to get you oriented, these commands should no longer be used automatically with each new day or each new sync from SVN. Gradle handles checking for needed updates much better and so you do not need to proactively clean as often.
|
Ant Command |
Gradle Command |
Directory |
|
ant build |
gradlew deployApp |
trunk or server |
|
ant clean |
gradlew cleanBuild |
trunk or server |
|
ant rebuild |
gradlew cleanBuild deployApp |
trunk or server |
|
ant pick_pg |
gradlew pickPg |
trunk or server |
|
ant pick_mssql |
gradlew pickMSSQL |
trunk or server |
|
ant dist |
gradlew distribution |
trunk |
|
ant wiki |
gradlew :server:modules:wiki:deployModule |
Any directory |
|
ant wiki |
gradlew deployModule |
server/modules/wiki |
|
ant test |
gradlew :server:test:uiTest |
Any directory |
|
ant drt |
gradlew :server:test:uiTest -Psuite=DRT |
Any directory |
|
ant production |
gradlew deployApp -PdeployMode=prod |
trunk or server |
Here we include a few bits of information that may be useful for learning to use the Gradle command line.
./gradlew -q projects
Now might be a good time to set up an alias if you’re a command-line kind of person who can’t abide output to the screen.
gradlew deployModule
This will build the jar files, and the .module file and then copy it to the build/deploy/modules directory, which will cause Tomcat to refresh.
gradlew announcements:module
And from the server/modules/announcements directory, you can build the wiki module using
gradlew :server:modules:wiki:module
One exception to this is that in directories that have subprojects declared in a build.gradle file, (e.g., the root directory or the server directory), you can run commands such as “deployModule” and “clean” and it will run the corresponding tasks in all the subdirectories. These global tasks are not executable from other directories.
gradlew tasks
gradlew :se:m:an:b
And when you switch back to ant task mode momentarily and type
gradlew pick_pg
Gradle responds with:
* What went wrong:
Task 'pick_pg' not found in project ':server'. Some candidates are: 'pickPg'.
First, you should know that Gradle is generally very good about keeping track of when things have changed and so you can, and should, get out of the habit of wiping things clean and starting from scratch because it just takes more time. If you find that there’s some part of the process that does not recognize when its inputs have changed or its outputs are up-to-date, please file a bug or post to the [developer support board|https://www.labkey.org/home/Support/Developer%20Forum/project-begin.view?] so we can get that corrected. (As of Feburary 2017, there is one known issue with the GWT compiler up-to-date check.)
The gradle tasks also provide much more granularity in cleaning. Generally, for each task that produces an artifact, we try to have a corresponding cleaning task that removes that artifact. This leads to a plethora of cleaning tasks, but there are only a few that you will probably ever want to use. We summarize the most commonly useful ones here.
The two most important tasks for cleaning modules are:
undeployModule - This is the opposite of deployModule. deployModule copies artifacts from the build directories into the staging (LABKEY_ROOT/build/staging) and then the deployment (LABKEY_ROOT/build/deploy) directories, so undeployModule removes the artifacts for this module from the staging and deployment directories. This will cause a restart of a running server since tomcat will recognized that the deployment directory is changed. This command should always be used when switching between feature branches because the artifacts created in a feature branch will have the feature branch name in their version number and thus will look different from artifacts produced from a different branch. If you don’t do the undeployModule, you’ll likely end up with multiple versions of your .module file in the deploy directory and thus in the classpath, which will cause confusion.
|
directory |
gradle command |
result |
|
trunk |
clean |
All build directories for all projects are removed |
|
any |
:server:modules:wiki:undeployModule |
LABKEY_ROOT/build/staging/modules/wiki* and /build/deploy/modules/wiki* will be removed |
|
server/modules/wiki |
undeployModule |
LABKEY_ROOT/build/staging/modules/wiki* and /build/deploy/modules/wiki* will be removed |
clean - This task comes from the standard Gradle lifecycle. Its purpose, generally, is to remove the build directory for a project. For our modules, these are the directories under LABKEY_ROOT/build/modules. Note that this will have little to no effect on a running server instance. It will simply cause gradle to forget about all the building it has previously done so the next time it will start from scratch.
|
directory |
gradle command |
result |
|
trunk |
clean |
All build directories for all projects are removed |
|
any |
:server:modules:wiki:clean |
LABKEY_ROOT/build/modules/wiki is removed. |
|
server/modules/wiki |
clean |
LABKEY_ROOT/build/modules/wiki is removed |
reallyClean - combines undeployModule and clean to remove the build, staging and deployment directories for a module.
cleanBuild - Removes the build directory entirely. This will also stop the tomcat server if it is running. This is the big hammer that you should avoid using unless there seems to be no other way out.
cleanDeploy - Removes the build/deploy directory. This will also stop the tomcat server if it is running.
cleanStaging - Removes the build/staging directory. This does not affect the running server.
Follow these steps in order to make IntelliJ able to find all the source code and elements on the classpath as well as be able to run tests.

Problem: Gradle Sync in IntelliJ has no effect on project structure after the settings.gradle file is updated.
Cause: Name conflict between the gel_test project and the gel_test IntelliJ module that would be created from the gel project’s ‘test’ source set. (IDEA-168284)
Workarounds: Do one of the following
Problem: Running tests within IntelliJ for the first time, you will likely encounter a problem related to not being able to find apache httpmime classes.
Cause: A bug in IntelliJ, related to our project structure which marks some dependencies as “Runtime” instead of “Compile”.
Solution: To fix this, you will need to go to File-> Project Structure -> Modules -> remoteapi -> java -> java_main -> Dependencies. You will see that there are a few dependencies designated as “Runtime” instead of “Compile”. Choose “Compile” and then click “OK”. After that your tests should be runnable. Unfortunately, you’ll need to make this modification every time you manually sync from the Gradle window, but fortunately that shouldn’t be needed all that often.
Problem: My passwords to PostgreSQL and MS SQL Server aren't working.
Solution: Unlike Ant, the Gradle build system will automatically escape any special XML characters, such as quotes and ampersand symbols in the pg.properties / mssql.properties files. When migrating these files from Ant to Gradle, replace any escaped ampersands (&) with plain text ampersands (&).
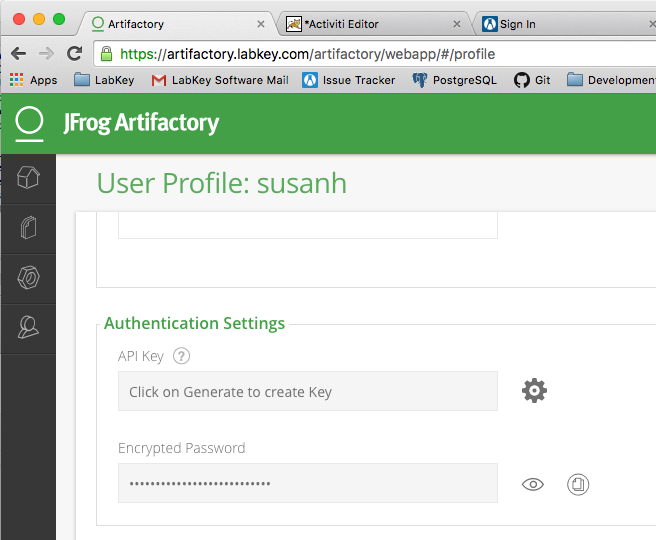
deployMode=dev
# When set to true, Gradle will run the build with remote debugging enabled, listening on port 5005.
# Note that this is the equivalent of adding -Xrunjdwp:transport=dt_socket,server=y,suspend=y,address=5005 to the JVM command line
# and will suspend the virtual machine until a debugger is attached.
#org.gradle.debug=true
#We need to know the tomcat home directory for some of the dependencies in our build process.  IntelliJ does not
#pick up the CATALINA_HOME environment variable, so if working with the IDE, you need to set the tomcat.home
#system property either here as shown below on the command line with -Dtomcat.home=/path/to/tomcat/home
#Regardless of OS, use the forward slash (/) as a file separator in the path (yes, even on Windows)
systemProp.tomcat.home=/path/to/tomcat/installation
artifactory_user=<your user>
# the encrypted password or API key
artifactory_password=<your password or API key>
# uncomment to enable population of VCS revision number and url in module.properties file
# for localhost installation
#includeVcs
#svn_user=<your svn user name>
#svn_password=<your svn password>
| previousnext |
| expand allcollapse all |