This topic explains how to import haplotype assignment data into a genetics/genotyping dashboard. The
Haplotype Assay is part of of the genotyping module. It includes some basic default fields and values and can be customized to suit your specific needs.
Set Up
Follow the steps here to set up your project:
Configure Animal and Haplotype Tables (Optional)
You may want to store additional information in the Animals and Haplotypes tables by adding new fields such as
source, sex, origin, dam, sire, grandDam, grandSire, offspring, comments.
- On the Genotyping Dashboard, in the Settings section, click Admin.
- Click Configure next to either Animal or Haplotype.
- Use the Add Field button to add new custom fields to the Animal/Haplotype table by giving the field a name, label, type, etc.
- Click Save when finished.
Note: any custom field in the Animal table that has an exact name match with a Run property in the Haplotype assay design will be automatically populated with the appropriate value when new animal records are inserted into the table.
Haplotype Assay
The default Haplotype Assay type has several default run fields which are used for mapping the column headers in the data you provide with the expected columns in the database.
| Name | Label | Type | Description |
|---|
| enabled | enabled | Boolean | |
| labAnimalId | Lab Animal ID | Text (String) | |
| clientAnimalId | Client Animal ID | Text (String) | |
| totalReads | Total # Reads Evaluated | Text (String) | |
| identifiedReads | Total # Reads Identified | Text (String) | |
| mhcAHaplotype1 | MHC-A Haplotype 1 | Text (String) | |
| mhcAHaplotype2 | MHC-A Haplotype 2 | Text (String) | |
| mhcBHaplotype1 | MHC-B Haplotype 1 | Text (String) | |
| mhcBHaplotype2 | MHC-B Haplotype 2 | Text (String) | |
| speciesId | Species Name | Integer | Lookup into the genotyping.Species table |
When you create your assay design, you begin with the base type (or template) then may choose to add additional run fields to capture additional information about your assay. For example, you might add fields like:
initials, cohort, geographicOrigin, experimentNumber, seqRunNumber, analysisNumber, haplotypeDefVersionNumber. You should also set the default value for the
enabled run field to be
true.
- Select Admin > Manage Assays.
- Click New Assay Design.
- Choose Haplotype as the assay type, set the folder location to the current folder, and click Next.
- Give the assay design the name of your choice in the Assay Properties section.
- Set the default value for the enabled run field:
- Select by clicking the enabled name.
- Click the Advanced tab on the right.
- Set the Default type to Editable default.
- Click Set Value. A popup will ask you to save changes before setting this value. Click OK.
- Set the default value to true by checking the Initial/Default Value checkbox for the "enabled" row.
- Click Save Defaults to return to editing the assay design.
- To add additional fields, click Add Field in the run or batch sections as needed.
- When you are finished customizing the assay design, click Save & Close.
Add Additional Species
When you import data into a Haplotype Assay, you will select a value for the
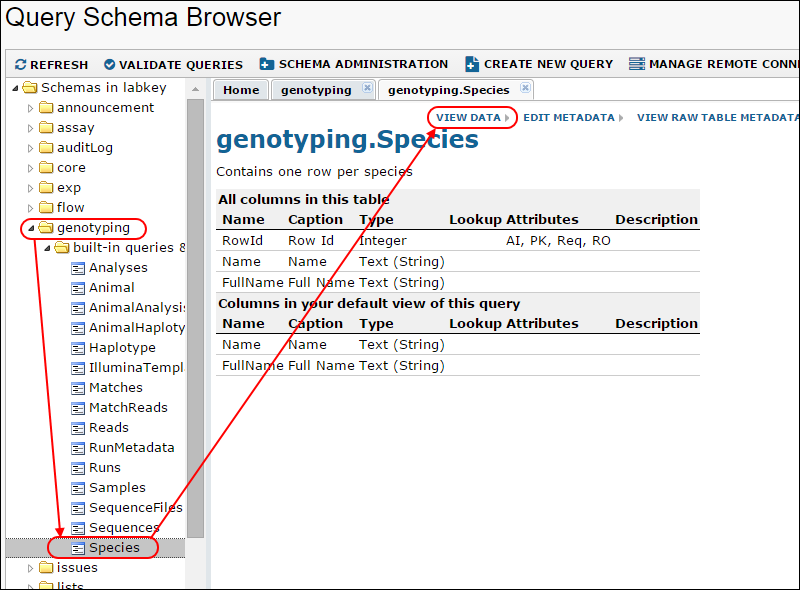
Species Name from a pulldown list which is a lookup into genotyping.Species table. By default, "rhesus macaques" is the only built in value. An administrator can add additional species to the list of options. For example, you might also have data for "cyno" and "pig-tails".
- Select Admin > Developer Links > Schema Browser.
- Click Genotyping.
- Click Species.
- Click View Data.

- Select Insert > Insert New Row.
- Enter "cyno" and click Submit.
- Select Insert > Insert New Row again, enter "pig-tails" and click Submit.
Import Existing Haplotype Assignments
- To import existing haplotype assignment data, go to the Genotyping Dashboard.
- Under Settings, click Admin. Click Haplotype and then Import Data.
- Two files containing sample haplotype assignment data can be downloaded below:
Related Topics