This tutorial shows you how to work with one type of microarray experiment data uploaded from sample MAGE-ML data files.
When you are finished with this tutorial, you will have created a Microarray Dashboard. See an interactive example by clicking
here.Tutorial Steps:
Set Up
Create a Microarray Folder
In this tutorial, you set up a separate subfolder within your demo study for the microarray experiment and associated web parts. You could instead incorporate these web parts directly in a study folder, but that option is not described here.
- Navigate to the home page of the demo study, HIV-CD4 Study.
- Select Admin > Folder > Management and click Create Subfolder.
- Name: "Microarray Staging"
- Type: Select Microarray.
- Click Next.
- On the Permissions page, confirm that Inherit From Parent Folder is checked, and click Finish.
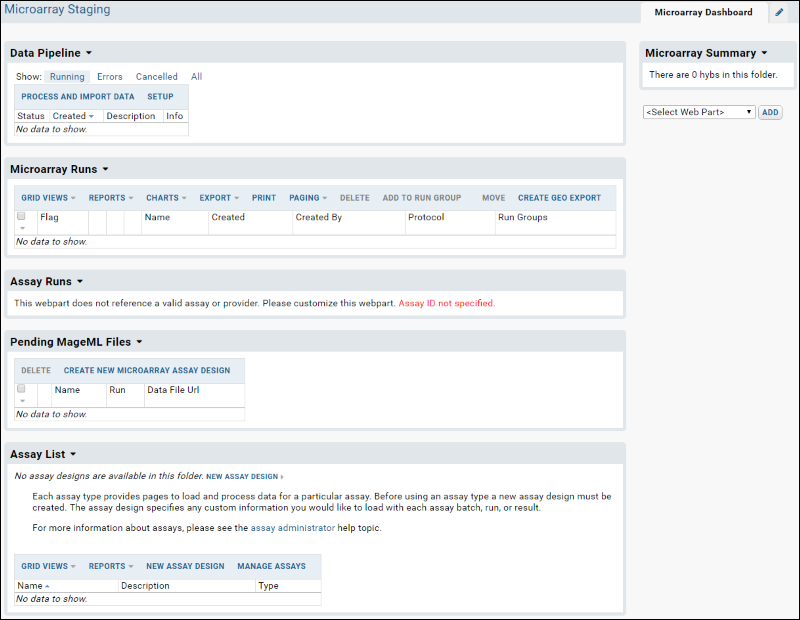
You will now see the
Microarray Dashboard:
Upload Microarray Files via the Pipeline
- In the Data Pipeline web part, click Process and Import Data.
- Drag and drop the unzipped sample file folder [LabKeyDemoFiles]\Assays\Microarray into the pipeline file panel to begin the upload.
Create a Microarray Assay Design
- Click the Microarray Dashboard tab.
- In the Assay List web part, click Manage Assays.
- Click New Assay Design.
- Select Microarray, choose "Current Folder (Microarray Staging)" as the Assay Location and click Next.
- On the "Microarray Assay Designer" page. Enter the name "Microarray Test" and leave all other Assay Properties with their default values.
- Scroll down to the Run Fields section, and for each row below, click Add Field and enter the values given.
| Name | Label | Description |
|---|
| Producer | Producer | /MAGE-ML/Descriptions_assnlist/Description/Annotations_assnlist/
OntologyEntry[@category='Producer']/@value |
| Version | Version | /MAGE-ML/Descriptions_assnlist/Description/Annotations_assnlist/
OntologyEntry[@category='Version']/@value |
| Protocol_Name | Protocol_Name | /MAGE-ML/BioAssay_package/BioAssay_assnlist/MeasuredBioAssay/FeatureExtraction_assn/
FeatureExtraction/ProtocolApplications_assnlist/ProtocolApplication/
SoftwareApplications_assnlist/SoftwareApplication/ParameterValues_assnlist/
ParameterValue[ParameterType_assnref/Parameter_ref/
@identifier='Agilent.BRS:Parameter:Protocol_Name']/@value |
| RunPropWithoutXPath | RunPropWithoutXPath | [leave blank] |
Note: these XPaths are specific to the uploaded demo files. We add run fields both with and without XPaths in order to show how such properties are treated differently in the upload process.
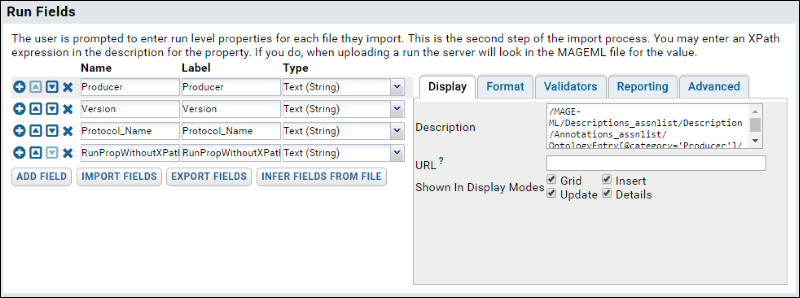
- If you select the Producer field again, the section will look like this:

- When finished, click Save & Close.
Set up a Sample Set
- Click Microarray Dashboard.
- Add a Sample Sets web part, using the web part drop-down menu at the lower left.
- In the new web part, click Import Sample Set
- Name this new sample set "Microarray Sample Set".
- Paste the following three lines into the Sample Set Data text box:
| Name |
|---|
| Microarray 1 |
| Microarray 2 |
- Click Submit at the bottom of the page to finish.
Import Microarray Runs
- Click Microarray Dashboard.
- In the Assay List web part, click the assay design you created above: Microarray Test.
- Click Import Data. You will now see the Microarray directory that you uploaded to your server in an earlier step.
- Double click Microarray to open the folder. This folder contains MAGE-ML files.
- Place check marks next to the files test1_MAGEML.xml and test2_MAGEML.xml.
- Click Import Data.
- In the popup dialog, confirm that Use Microarray Test is selected and click Import. This will start to import the selected files into the "Microarray Test" design that you created earlier.
Specify Properties
You will now see the "Data Import: Batch Properties" page.
Properties that contain XPaths in the descriptions for their fields will be populated automatically from your files. Additional bulk, run or data properties can be populated using one of two methods by selecting one of the two radio buttons:
- Option 1: Enter run properties for each run separately by entering values into a form.
- Option 2: Specify run properties for all runs at once with tab-separated values (TSV).
In this tutorial, we show you both methods.
Option 1: Enter values into a form
- Confirm that "Enter run properties for each run separately by entering values into a form" is selected.
- Click Next to advance to the "Data Import: Run Properties and Data File" page.
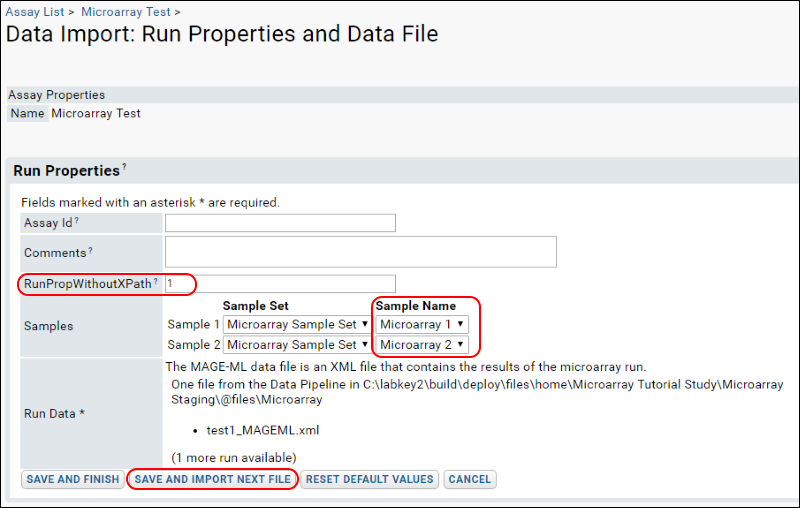
- Enter "1" for the RunPropWithoutXPath.
- For "Sample 1" select "Microarray 1" in the Sample Name column, and for "Sample 2" select "Microarray 2" as shown:

- Click Save and Import Next File.
- Enter "2" for the RunPropWithoutXPath.
- Leave "Microarray 1" selected for "Sample 1" and "Microarray 2" for "Sample 2."
- Select Save and Finish.
You will now see:

Notice the values you entered in the RunPropWithoutXPath column.
Option 2: Populate properties in bulkThis option allows you to populate properties in bulk by using a spreadsheet instead of filling in the form for each file. You will use a set of TSV (tab-separated values) to specify run metadata. The barcode column in the TSV is matched with the barcode value in the MageML file. The sample name columns, configured in the assay design, will be used to look for matching samples by name in all visible sample sets. Any additional run level properties may be specified as separate columns.
- First delete previously imported runs by selecting both checkboxes and clicking Delete and confirming.
- Repeat the steps described in the "Import Microarray Runs" section above.
- This time, select "Specify run properties for all runs at once with tab-separated values (TSV)" on the "Data Import: Batch Properties" page.
- Click Download Excel Template and open it in Excel. This spreadsheet shows the barcodes associated with the two files we have chosen to upload. It allows you to specify the sample set for each dye for each file, plus the RunPropWithoutXPath. The other run properties (Producer, Version, Protocol_Name) are still populated automatically using the XPaths you provided in the assay design.
- Fill in this table with the following information (as shown in the screenshot below and available in the bulkproperties1.xls spreadsheet in your [LabKeyDemoFiles]\Assays\Microarray folder), then paste it into the Run Properties textbox.
| | | | |
|---|
| Barcode | ProbeID_Cy3 | ProbeID_Cy5 | RunPropWithoutXPath |
| 251379110131_A01 | Microarray 1 | Microarray 2 | 1 |
| 251379110137_A01 | Microarray 1 | Microarray 2 | 2 |

Review Run Data
You will now bypass entering any more information and see the "Microarray Test Runs" grid view. You can later reach this grid from the dashboard by clicking on the name of the assay in the Assay List. See a similar grid in this
interactive example.

The following items are numbered in the picture of the runs grid shown above:
- QC Flag icon: click to activate indicating a possible problem with the run.
- Experiment run graph icon: click to see more information about the source sample.
- Name (Assay ID): click for details about all files related to the MAGEML.
- Additional columns: additional metadata for the runs.
- Batch: displays the batch name. Click to see all of the MAGEMLs that were uploaded together as part of one batch.
Integrate Data into a Study (Optional Step)
You can integrate your microarray assay into a study and align it with other data for the particular participant and data collection date. To show you how, we integrate the tutorial data into the
HIV-CD4 Study demo study:
- Click the Microarray Dashboard tab.
- Click Microarray Test in the Assay List web part.
- Select the runs you would like to copy to a study using the checkboxes on the left side of the grid view. For this demo, we select both runs.
- Click Copy to Study.
- Select the demo study, HIV-CD4 Study, as the target study and click Next.
- You will notice 'X's in the match column. To match these runs to specimens present in the demo study, enter participant IDs and visit dates for each run you have selected. Enter these values for both runs:
- ParticipantID: 249320489
- Date: 2008-12-03

- Click Re-validate to confirm that the given participant/visit pairs already exist in the study. You will see green validation markers in the specimen match column, indicating successful matches to Participant/Visit pairs in the demo study:

- To finalize the copy, click Copy to Study.
When the copy is complete, you will see the dataset within your demo study. You can also see a similar dataset in our
interactive example.
As a finishing touch, you can place this new dataset into the "Assays" category of datasets in your study. In addition, change the dataset label so that the name of this dataset is consistent with the other assay datasets in your study.
- Click the Manage tab.
- Click Manage Datasets.
- Click your assay (Microarray Test1).
- Click Edit Definition.
- Category: Type “Assays” for the category.
- Label: Edit the label to read "Microarray Assay"
- Show in Overview: Confirm this box is checked.
- Click Save.
- Click the Clinical and Assay Data tab.
- Notice that your renamed assay dataset has been added to the Assays section.
You can view the finished list of datasets in our interactive example study's "Clinical and Assay Data" tab, as shown
here on labkey.org.
Related Topics