Bulk editing of the selected rows in a data grid can be enabled using XML metadata and the JavaScript API. This topic shows an example of how to develop bulk editing actions using custom buttons. There are several options based on the type of edit you need to enable.
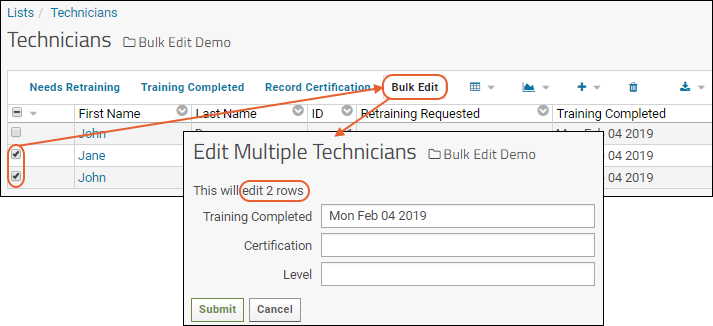
To accomplish a bulk edit, your code will complete these basic steps:
- Collect the specific row IDs you want to edit and save them in an array.
- Isolate which field(s) of these rows you wish to update.
- Use the JavaScript API to update and save the new values for these rows in a loop on the array you created in step 1.
Set Up the Demo
- Download the following List archive file, but do not unzip it: Technicians.lists.zip
- Navigate to, or create, a folder where (1) you have administrator access and (2) where it is appropriate for you to do testing work.
- In that folder, select > Manage Lists.
- In the Available List grid, if you already have a list named "Technicians", either confirm that it can be overwritten with this demo or choose another folder location.
- Click Import List Archive.
- Click Choose File and select the archive file you downloaded.
- Click Import List Archive.
- The list Technicians has been added to the folder.
Next add the example JavaScript to the XML Metadata for this list:
- Select > Developer Links > Schema Browser.
- Click lists to open the schema, then Technicians.
- Click Edit Metadata, then Edit Source.
- Paste the example button code below onto the XML Metadata tab.
- Click Save & Finish.
Your list now includes the new buttons.
Using the Custom Buttons
This demo creates four buttons. These steps walk you through using them with this very short list.
- Select all rows using the checkbox in the header row.
- Click Needs Retraining.
- All rows are updated with today's date and time (using highlight color specified in the XML metadata).
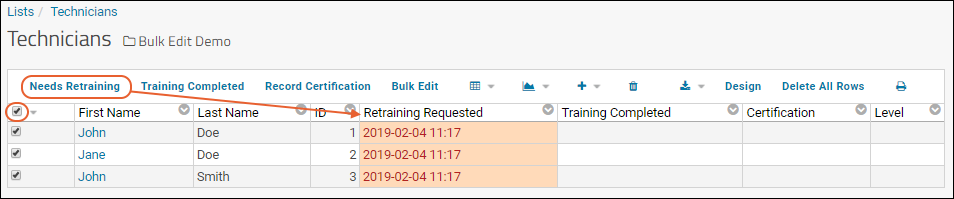
- Next deselect the first row so that only two are selected.
- Click Training Completed.
- The two selected rows show the "Needs Retraining" alert was cleared and the date shows under "Training Completed."

- Next, select only the first two rows ("John" and "Jane Doe") and click Record Certification.
- You will be prompted to enter the certification earned (such as "calibrator") then a level achieved. Notice you are prompted to enter a value between 1 and 4 using placeholder text, but the entry must be an integer, i.e. enter "2" instead of "two".
- After entering both fields, you will see a success message; refresh the browser to see that both rows you selected have been updated with the values you entered. Notice the "Retraining Requested" and "Training Completed" columns were automatically updated as well.

- Finally, select only the second two rows and click Bulk Edit.
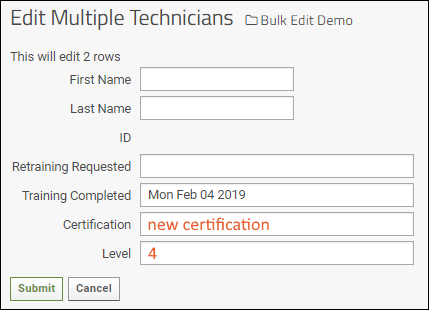
- You will see an Edit Multiple entry panel for your list, with a note about how many rows will be updated.
- You don't want to change all the technician's names, so leave those fields blank.
- You cannot edit the ID (because it is marked read only).
- If all users have the same value already in any field it will be shown, as the "Training Completed" date is if you've completed this walkthrough in the same day.
- Enter a Certification and Level.
- Click Submit.

- You may notice that after the bulk edit is submitted, the rows are no longer selected.
If you would like more data to experiment with, you can use
(Insert data) to add more technicians to the list.
Understanding the XML Metadata
LABKEY.Query.updateRows JavaScript API
The example code for the "Record Certification" button shows how you can offer a user bulk editing of a few fields in a large dataset. You prompt them for the values, then push those new values into all selected rows. There is very limited error handling shown in this example which you would likely need in practice.
For example, while we request a value between 1 and 4 for the "Level" field, you can in fact enter any integer. To address this, you could use the user interface to edit the list design and
create a range validator for that field to constrain the input.
ActionURL.buildURL()
The ActionURL static class builds a URL from a controller and an action.
Learn more
here. The API documentation is
here.
Navigating to the query/updateQueryRows user interface
Using updateQueryRows from the query controller as shown in the example for the "Bulk Edit" button, the server will show the user an input form like they would see if editing a single row. When submitted, it updates
all the selected rows with any entries made. In practice, you want to be sure that you are only offering the user bulk update for fields that make sense (i.e. not name or ID fields).
Example Code
This should be pasted on the XML Metadata tab of the metadata source editor for the Technicians list.
<tables xmlns="http://labkey.org/data/xml">
<table tableName="Technicians" tableDbType="NOT_IN_DB">
<columns>
<column columnName="Key">
<isUserEditable>false</isUserEditable>
</column>
<column columnName="ID">
<isReadOnly>true</isReadOnly>
</column>
<column columnName="RequestRetraining">
<columnTitle>Retraining Requested</columnTitle>
<formatString>yyyy-MM-dd HH:mm</formatString>
<conditionalFormats>
<conditionalFormat>
<filters>
<filter operator="isnonblank" value="true"/>
</filters>
<textColor>B22222</textColor>
<backgroundColor>FFDAB9</backgroundColor>
</conditionalFormat>
</conditionalFormats>
</column>
<column columnName="TrainingCompleted">
<formatString>DATE</formatString>
</column>
</columns>
<buttonBarOptions position="both" includeStandardButtons="true">
<!-- The "Needs Retraining" button sets the "Request Retraining" column for the selected rows
with the current date and highlight color (the "Training Completed" column is cleared). -->
<item text="Needs Retraining" requiresSelection="true">
<onClick>
var checked = dataRegion.getChecked();
var sql = 'SELECT Key FROM lists.Technicians WHERE Key IN (';
var separator = '';
for (var i = 0; i < checked.length; i++) {
sql += separator + checked[i];
separator = ', ';
}
sql += ')';
LABKEY.Query.executeSql({schemaName: 'lists', sql: sql, success: function(data) {
var updateRows = [];
for (var j = 0; j < data.rows.length; j++) {
updateRows.push({Key: data.rows[j].Key, requestRetraining: new Date(), trainingCompleted: '' });
}
LABKEY.Query.updateRows({ schemaName: 'lists', queryName: 'Technicians', rows: updateRows, success: function() { location.reload(); }});
}});
</onClick>
</item>
<!-- The "Training Completed" button enters the current date in the Training Completed column
and clears the Request Retraining column. -->
<item text="Training Completed" requiresSelection="true">
<onClick>
var checked = dataRegion.getChecked();
var sql = 'SELECT Key FROM lists.Technicians WHERE Key IN (';
var separator = '';
for (var i = 0; i < checked.length; i++) {
sql += separator + checked[i];
separator = ', ';
}
sql += ')';
LABKEY.Query.executeSql({schemaName: 'lists', sql: sql, success: function(data) {
var updateRows = [];
for (var j = 0; j < data.rows.length; j++) {
updateRows.push({Key: data.rows[j].Key, requestRetraining: '', trainingCompleted: new Date().toDateString() });
}
LABKEY.Query.updateRows({ schemaName: 'lists', queryName: 'Technicians', rows: updateRows, success: function() { location.reload(); }});
}});
</onClick>
</item>
<!-- The "Record Certification" button asks the user for the name of the certification and level
earned. All selected rows will be updated with these values, the training date will be set,
and the request column will be cleared.
In this example, we use a named "successfulUpdate" function to alert the user and reload the page. -->
<item text="Record Certification">
<onClick>
var certif = prompt("Please enter certification earned:", "");
var level = prompt("Please enter level completed:", "range: 1-4");
var selectedValues = [];
for (i=0; i < document.getElementsByName(".select").length; i++){
if (document.getElementsByName(".select")[i].checked){
selectedValues.push(document.getElementsByName(".select")[i].value);
}
}
LABKEY.Query.selectRows({
requiredVersion: 9.1,
schemaName: 'lists',
queryName: 'Technicians',
filterArray: [LABKEY.Filter.create('Key', selectedValues.join(';'), LABKEY.Filter.Types.IN)],
success: onSuccess
});
function successfulUpdate(){
alert('All Rows Successfully Updated! (refresh the page...)');
location.reload();
}
function onSuccess(results){
var data='';
var updatedRows = [];
for (j=0; j < results.rows.length; j++){
updatedRows.push({'Key': results.rows[j].Key.value, 'Certification': certif, 'Level': level, requestRetraining: '', trainingCompleted: new Date().toDateString()});
}
LABKEY.Query.updateRows({
schemaName: 'lists',
queryName: 'Technicians',
rows: updatedRows,
success: successfulUpdate
});
}
</onClick>
</item>
<!-- The "Bulk Edit" button will only work when at least two rows are selected. It will open a
data entry panel for all columns in the list. Any values entered will be pushed to the
matching in all selected rows. Data in columns that are not updated in the bulk entry form
will be unchanged. -->
<item text="Bulk Edit" permission="UPDATE" requiresSelection="true" requiresSelectionMinCount="2">
<onClick>
var url = LABKEY.ActionURL.buildURL('query', 'updateQueryRows.view', null, {
schemaName: dataRegion.schemaName,
'query.queryName': dataRegion.queryName,
dataRegionSelectionKey: dataRegion.selectionKey
});
var form = dataRegion.form;
if (form && verifySelected.call(this, form, url, 'POST', 'rows')) {
submitForm(form);
}
document.onclose
return false;
</onClick>
</item>
</buttonBarOptions>
</table>
</tables>
Related Topics

