Message boards let you post team announcements and set up threaded conversations among users. They can be made available to the general public or restricted to a select set of users. Announcements might include planned site outage announcements, new results in a study, organizational and personnel changes, introducing new features for users, etc.
Individual announcements in the message board can also include threaded discussions contributed by users for asking questions and receiving public (or private) answers. This topic covers creating and using a basic message board.
Message Board Tutorial
To use this topic as a tutorial, it is good practice to use a new folder where you have administrator access and it is suitable to do testing. For example:
- Log in to your server and navigate to your "Tutorials" project, "Collaboration Tutorial" subfolder. Create them if necessary, accepting default types and settings.
- If you don't already have a server to work on where you can create projects and folders, start here.
- If you don't know how to create projects and folders, review this topic.
Create Message Board
Begin in the folder where have administrator permissions and you want to create the message board. Each container can only contain a single board for messages. If you need separate sets of conversations, place them in different folders.
If your page does not already have a
Messages web part:
- Enter > Page Admin Mode.
- Add a Messages web part.
- You can use the (triangle) web part menu to move it up the page if you like.
- Click Exit Admin Mode.
Learn more about the options available on the
(triangle) menu in
this topic.
Post New Messages
To post a new message, the user must have the "Author" role or higher. Users without the necessary permission will not see the
New button.
- In the Messages web part, click New.
- Enter the Title (Required).
- Enter the Body of the message. The default format is Markdown. You can simply type into the "Source" tab, or use Markdown formatting syntax. A brief syntax guide is included at the bottom of the screen. Use the "Preview" tab to see what your message will look like.
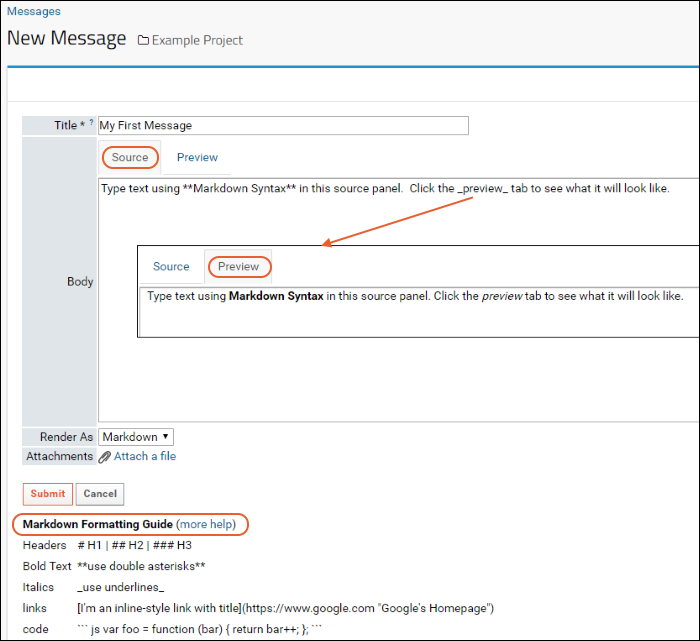
- Use the Render As drop-down menu to change how the body text can be entered (if you don't see this option, an administrator has disabled the format picker). Options are:
- To add an attachment, click Attach a file. Attachments should not exceed 250MB per message.
- Click Submit to post your message.
Additional fields may be available if your administrator chose to include them.
If you are using this topic as a tutorial for learning to use a new message board, create a few messages and reply to a few of them so that you have some content to work with in the next sections.
View, Respond-to, Edit, and Delete Messages
Message board users with authorization can post new messages, respond to continue conversations, subscribe to conversations, and configure their own notification preferences. Users with Editor or higher permissions can also edit existing messages.
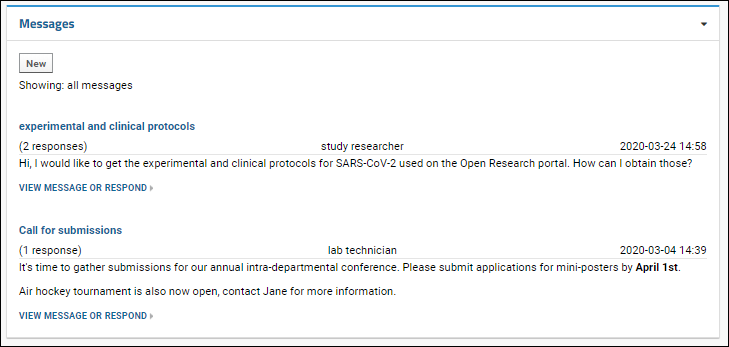
The beginning of the message text is displayed in the
Messages web part - you can expand the text within the web part by clicking
More. To open the message for other features, click
View Message or Respond. You can also open the message by clicking the title in a
Message List web part.
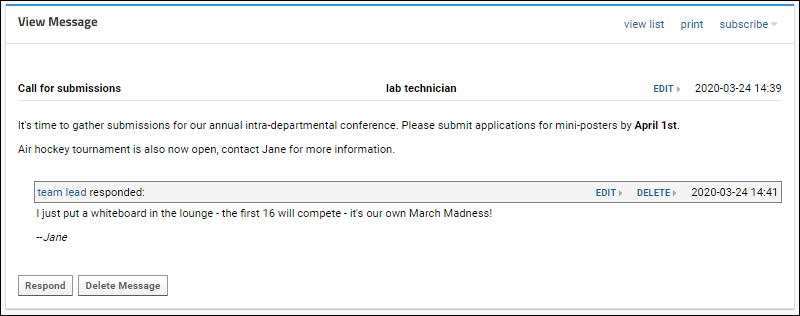
The original message is followed by any responses; all are marked with the username and date of the post. Click
Respond to add a response message of your own. If you have sufficient permissions, you will also have one or more of these additional options:
- Edit: each message you have written shows an edit link if you need to make corrections. If you are an administrator, you can edit messages written by others.
- View list: view the messages on this board in list format
- Print: print (to a new browser window)
- Unsubscribe/Subscribe: change your email preferences for this message. See below.
- Delete Message: Delete the original message and all replies.
Subscribe and Unsubscribe to Messages
When you add a message, you are automatically subscribed to receive responses to a message when you post it. In the message view shown above, you can click
Unsubscribe if you do not want to be notified of responses. When viewing another user's posted message, click
Subscribe in the upper right to enable notifications for the specific thread, or the entire forum. Choosing "forum" will take you to the page for
configuring email preferences.

Configure Email Preferences
The message board administrator can specify
default email notification policy for the project or folder. Each user can choose their own notifications, potentially overriding the default settings, as follows:
To set your email preferences:
- Return to the Messages web part by clicking the [Folder Name] link near the top of the page.
- Click the (triangle) at the top right of the Messages web part.
- Select Email Preferences.
- Choose which messages should trigger emails (none, mine, or all) and whether you prefer each individual message or a daily digest.
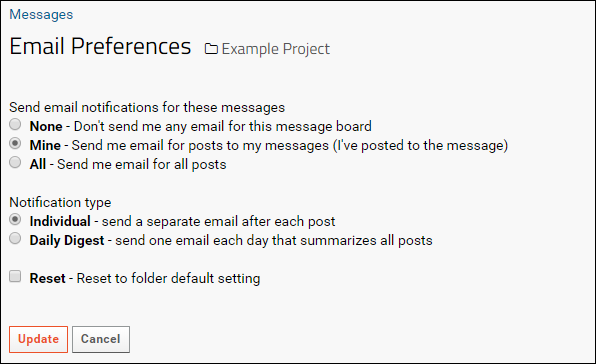
Check the box if you want to
Reset to the folder default setting.
You can also enable notifications for specific conversations or for the message board as a whole using the
Subscribe option while viewing a specific message.
Additional Message Fields (Optional)
The following message fields are turned off by default but you will see them if they have been
activated by an administrator:
Status, Assigned To, Notify, and
Expires.
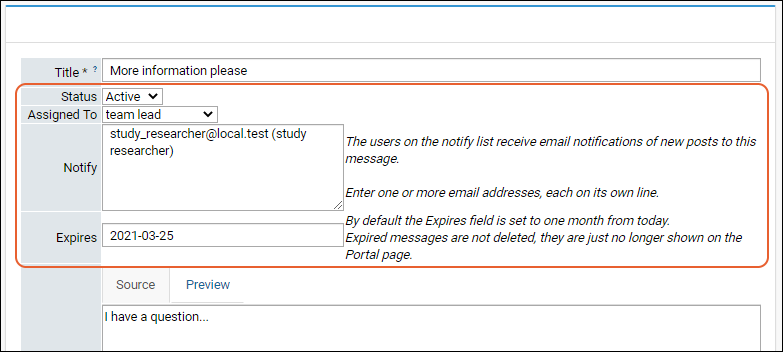 Status
: Track whether messages are "Active", i.e. requiring further work or attention, or "Closed". Once a message is closed, it is no longer displayed on the Messages or Messages List web parts.
Assigned To: Assign an issue to a particular team member for further work, useful for sharing multi-part tasks or managing workflow procedures.
Notify: List of users to receive email notification whenever there are new postings to the message. The Notify field is especially useful when someone needs to keep track of an evolving discussion.
Expires: Set the date on which the message will disappear, by default one month from the day of posting. Once the expiration date has passed, the message will no longer appear in either the Messages or Messages List web parts, but it will still appear in the unfiltered message list. You can use this feature to display only the most relevant or urgent messages, while still preserving all messages. If you leave the
Expires field blank, the message will never expire.
Related Topics