Premium Feature — Available in the Professional and Enterprise Editions of LabKey Server. Also available as an Add-on to the Starter Edition.
Learn more or
contact LabKey.
AWS Glue is a serverless ETL engine that can integrate data across many sources, including LabKey Server. LabKey Server implements the Postgres network wire protocol and emulates the database's responses, allowing supported tools to connect via standard Postgres ODBC and JDBC drivers. Clients connect to LabKey Server, not the backend database, ensuring consistent handling of data and standard LabKey user permissions. This means that you can use the Postgres JDBC driver that is preconfigured within Glue to connect to LabKey as a data source.
Prerequisites
The
connectors module must be deployed on your LabKey Server, and
External Tool Connections must be enabled and accepting connections.
Overview of AWS Glue Setup
Your AWS Glue jobs need to run from a private subnet that is allowed to connect to your data sources (Intranet or Internet) via a NAT Gateway.
- Create a VPC and set a tag name to help identify the resources being provisioned.
- Create a NAT Gateway to let your Glue jobs connect to the outside world.
- Identify a security group that allows all incoming and outgoing connections. It may be automatically created for you.
- Create an IAM role with AWS Service as the Trusted Entity Type and select Glue from the "Use Cases for Other AWS Services" drop down. It should have the permission policies "AWSGlueServiceRole" and "AmazonS3FullAccess".
Create JDBC Connection
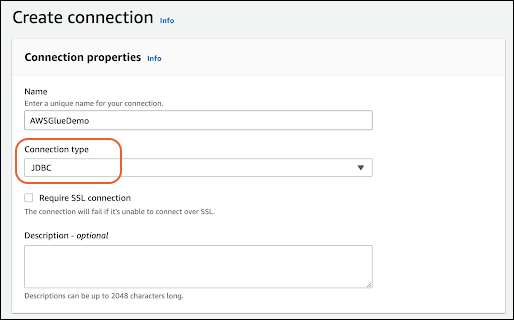
From the main AWS Glue landing page, set up the Connection (under Data Catalog).
- Name: Enter a unique name.
- Connection Type: Choose JDBC.

- JDBC URL: Use the appropriate hostname, port, and container path based on your server's External Tool Connections configuration. Users can check the proper settings via the (username) > External Tool Access menu. It will start with: For example:
jdbc:postgresql:odbc.labkey.com:5437/home/subfolder
- Fill in your credentials. API keys are supported.
- In the Network Options section:
- Choose the VPC you are using, its private subnet, and a security group that allows incoming and outgoing traffic. In this UI, you'll only see the uniqueID for the resources, so cross-reference with the VPC section of the AWS Console.
Create a Target "Database"
The target database is where data lands when doing an ETL or a schema crawl.
- From the AWS Glue main console, click the Databases link under the Data Catalog menu.
- Click Add Database.
- The Name you provide must be all lower case.
- Click Create Database.
AWS Glue Crawler
A crawler connects to a data source and examines its available schemas and tables, making them available to create ETL jobs.
- From the AWS Glue landing page, click Crawlers under Data Catalog.
- Click Create Crawler.
- Give it a Name and click Next.
- Select the "Not yet" option for whether the data is already mapped to Glue tables.
- Click Add a Data Source.
- Data Source: Choose "JDBC" and select the Connection you created earlier.
- Include Path: Point it at the desired container (exposed as a database)/schema/table. For example, to tell it to crawl all tables in the /Home project's core schema, use "home/core/%". Because the crawler uses slashes to separate the database/schema/table names, use a backslash to separate LabKey folders if you are not targeting a top-level project. For example, "home
subfolder/core/%" will reference the /home/subfolder folder.
- Click Add a JDBC Data Source.
- Click Next.
- Choose the IAM role you created earlier. The list of roles should be filtered to just those that have Glue permissions.
- Click Next.
- Choose the target database that you created earlier. Leave the Frequency set to "On demand".
- Click Next.
- Review your selections, then click Create Crawler.
Run the Crawler
If you just created the crawler, you'll be on its details page. If not, go to the AWS Glue console main menu, click the Crawlers link under the Data Catalog section, and click on your crawler.
Click
Run Crawler in the upper right.
You can confirm that it visits the tables in the target schema by checking the Cloudwatch logs.
Create an ETL Job
First, create an
S3 Bucket to hold the files that Glue creates. Make sure it is created in the same AWS region as your VPC.
- Go to the main S3 Console and click Create Bucket.
- Give it a name and either accept other default values or provide values as appropriate.
- Click Create Bucket.
Next, create a
Glue Job:
- Go back to the main Glue page.
- Click Jobs under the Data Integration and ETL heading.
- Keep it simple by using the "Visual with a source and target" option.
- Choose "PostgreSQL" as the source type and Amazon S3 as the target.
- Click Create.
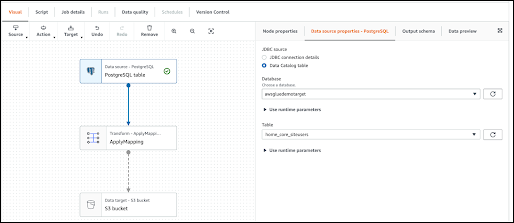
You should see a simple flowchart representing your job.

- Click on the first node, labeled as "PostgreSQL table".
- Under the Node Properties tab on the right, choose "Data Catalog table" as the JDBC source.
- Select your "database" from the dropdown and then a table within it.
- Click on the middle node, ApplyMapping.
- Under the Transform tab on the right, it should show all of the columns in the table.
- Click on the final step in the flowchart, S3 Bucket.
- Select the Data Target Properties - S3 tab on the right.
- Choose your preferred output format.
- Click Browse S3. You should see the bucket you created. Select it, but don't click into it, because it will be empty unless you created a directory structure separately.
Now you can name and run your new job:
- In the header, rename the job from "Untitled job" to your desired name.
- Under the Job details table, choose the AIM Role you created.
- Click Save, then click Run.
You can now navigate to the job details panel. After a few minutes, the job should complete successfully. When you go to your S3 bucket, the files created will be present.
Related Topics
