The
knitr visualization package can be used with R in either HTML or Markdown pages to create dynamic reports. This topic will help you get started with some examples of how to interweave R and knitr.
Topics
Install R and knitr
- If you haven't already installed R, follow these instructions: Install R.
- Open the R graphical user interface. On Windows, a typical location would be: C:\Program Files\R\R-3.0.2\bin\i386\Rgui.exe
- Select Packages > Install package(s).... Select a mirror site, and select the knitr package.
- OR enter the following: install.packages('knitr', dependencies=TRUE)
- Select a mirror site and wait for the knitr installation to complete.
Develop knitr Reports
- Go to the dataset you wish to visualize.
- Select (Charts/Reports) > Create R Report.
- On the Source tab, enter your HTML or Markdown page with knitr code. (Scroll down for example pages.)
- Specify which source to process with knitr. Under knitr Options, select HTML or Markdown.

- Select the Report tab to see the results.
Advanced Markdown Options
If you are using
rmarkdown v2 and check the box to "Use advanced rmarkdown output_options (pandoc only)", you can enter a list of param=value pairs in the box provided. Enter the bolded portion of the following example, which will be enclosed in an "output_options=list()" call.
output_options=list(
param1=value1,
param2=value2
)
Supported options include those in the "html_document" output format. Learn more in the
rmarkdown documentation here .
Sample param=value options you can include:
- css: Specify a custom stylesheet to use.
- fig_width and fig_height: Control the size of figures included.
- fig_caption: Control whether figures are captioned.
- highlight: Specify a syntax highlighting style, such as pygments, monochrome, haddock, or default. NULL will prevent syntax highlighting.
- theme: Specify the Bootstrap theme to apply to the page.
- toc: Set to TRUE to include a table of contents.
- toc_float: Set to TRUE to float the table of contents to the left.
If the box is unchecked, or if you check the box but provide no param=value pairs, rmarkdown will use the default output format:
html_document(
keep_md=TRUE,
self_contained=FALSE,
fig_caption=TRUE,
theme=NULL,
css=NULL,
smart=TRUE,
highlight="default")
Note that pandoc is only supported for
rmarkdown v2, and some formats supported by pandoc are not supported here.
If you notice report issues, such as graphs showing as small thumbnails, or HTML not rendering as expected in R reports, you may need to upgrade your server's version of pandoc.
R/knitr Scripts in Modules
R script knitr reports are also available as custom module reports. The script file must have either a .rhtml or .rmd extension, for HTML or markdown documents, respectively. For a file-based module, place the .rhtml/.rmd file in the same location as .r files, as shown below. For module details, see
Map of Module Files.
MODULE_NAME
 reports/
   schemas/
     SCHEMA_NAME/
       QUERY_NAME/
         MyRScript.r -- R report
         MyRScript.rhtml -- R/knitr report
         MyRScript.rmd -- R/knitr report
Declaring Script Dependencies
To fully utilize the report designer (called the "R Report Builder" in the LabKey user interface), you can declare JavaScript or CSS dependencies for knitr reports. This ensures that the dependencies are downloaded before R scripts are run on the "reports" tab in the designer. If these dependencies are not specified then any JavaScript in the knitr report may not run correctly in the context of the script designer. Note that reports that are run in the context of the Reports
web part will still render correctly without needing to explicitly define dependencies.
Reports can either be created via the LabKey Server UI in the report designer directly or included as files in a module. Reports created in the UI are editable via the Source tab of the designer. Open
Knitr Options to see a text box where a semi-colon delimited list of dependencies can be entered. Dependencies can be external (via HTTP) or local references relative to the labkeyWebapp path on the server. In addition, the name of a client library may be used. If the reference does not have a .js or .css extension then it will be assumed to be a client library (somelibrary.lib.xml). The .lib.xml extension is not required. Like local references, the path to the client library is relative to the labkeyWebapp path.
File based reports in a module cannot be edited in the designer although the "source" tab will display them. However you can still add a dependencies list via the report's metadata file. Dependencies can be added to these reports by including a <dependencies> section underneath the <R> element. A sample metadata file:
<?xml version="1.0" encoding="UTF-8"?>
<ReportDescriptor xmlns="http://labkey.org/query/xml">
    <label>My Knitr Report</label>
    <description>Relies on dependencies to display in the designer correctly.</description>
    <reportType>
        <R>
            <dependencies>
                <dependency path="http://external.com/jquery/jquery-1.9.0.min.js"/>
                <dependency path="knitr/local.js"/>
                <dependency path="knitr/local.css"/>
            </dependencies>
        </R>
    </reportType>
</ReportDescriptor>
The metadata file must be named <reportname>.report.xml and be placed alongside the report of the same name under (modulename/resources/reports/schemas/...).
HTML Example
To use this example:
- Install the R package ggplot2
- Install the Demo Study.
- Create an R report on the dataset "Physical Exam"
- Copy and paste the knitr code below into the Source tab of the R Report Builder.
- Scroll down to the Knitr Options node, open the node, and select HTML.
- Click the Report tab to see the knitr report.
<table>
   <tr>
      <td align='center'>
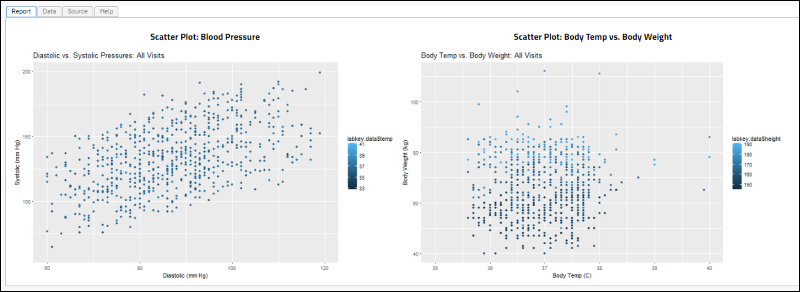
         <h2>Scatter Plot: Blood Pressure</h2>
         <!--begin.rcode echo=FALSE, warning=FALSE
           library(ggplot2);
           opts_chunk$set(fig.width=10, fig.height=6)
         end.rcode-->
         <!--begin.rcode blood-pressure-scatter, warning=FALSE, message=FALSE, echo=FALSE, fig.align='center'
         qplot(labkey.data$diastolicbp, labkey.data$systolicbp,
         main="Diastolic vs. Systolic Pressures: All Visits",
         ylab="Systolic (mm Hg)", xlab="Diastolic (mm Hg)", ylim =c(60, 200), xlim=c(60,120), color=labkey.data$temp);
         end.rcode-->
      </td>
      <td align='center'>
         <h2>Scatter Plot: Body Temp vs. Body Weight</h2>
         <!--begin.rcode temp-weight-scatter, warning=FALSE, message=FALSE, echo=FALSE, fig.align='center'
         qplot(labkey.data$temp, labkey.data$weight,
         main="Body Temp vs. Body Weight: All Visits",
         xlab="Body Temp (C)", ylab="Body Weight (kg)", xlim=c(35,40), color=labkey.data$height);
         end.rcode-->
      </td>
   </tr>
</table>
The rendered knitr report:

Markdown v2
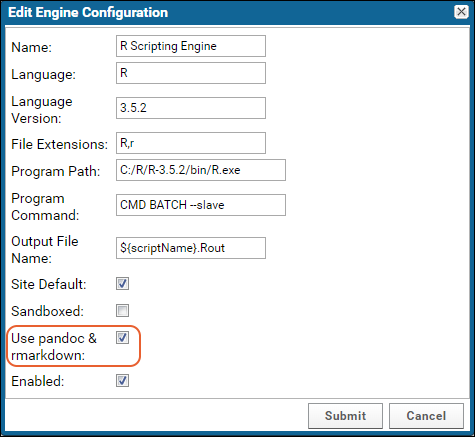
Administrators can enable Markdown v2 when enlisting an R engine through the
Views and Scripting Configuration page. When enabled, Markdown v2 will be used when rendering knitr R reports. If not enabled, Markdown v1 is used to execute the reports.

Independent installation is required of the following:
This will then enable using the Rmarkdown v2 syntax for R reports. The system does not currently perform any verification of the user's setup. If the configuration is enabled when enlisting the R engine, but the packages are not properly setup, the intended report rendering will fail.
Syntax differences are noted here:
http://rmarkdown.rstudio.com/authoring_migrating_from_v1.html
Markdown v1 Example
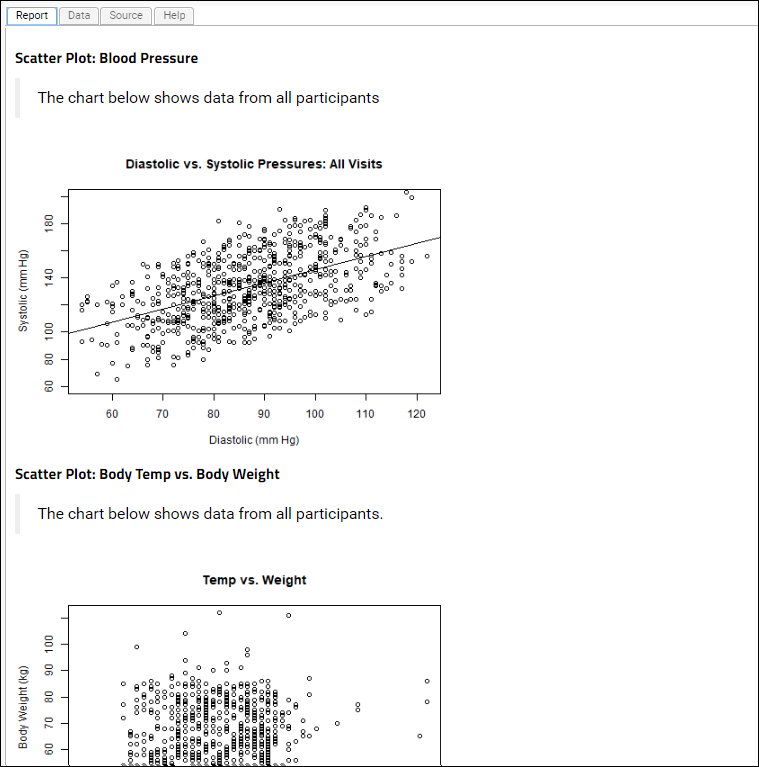
# Scatter Plot: Blood Pressure
# The chart below shows data from all participants

```{r setup, echo=FALSE}
# set global chunk options: images will be 7x5 inches
opts_chunk$set(fig.width=7, fig.height=5)
```

```{r graphic1, echo=FALSE}
plot(labkey.data$diastolicbp, labkey.data$systolicbp,
main="Diastolic vs. Systolic Pressures: All Visits",
ylab="Systolic (mm Hg)", xlab="Diastolic (mm Hg)", ylim =c(60, 200));
abline(lsfit(labkey.data$diastolicbp, labkey.data$systolicbp));
```
Another example
# Scatter Plot: Body Temp vs. Body Weight
# The chart below shows data from all participants.

```{r graphic2, echo=FALSE}
plot(labkey.data$temp, labkey.data$weight,
main="Temp vs. Weight",
xlab="Body Temp (C)", ylab="Body Weight (kg)", xlim=c(35,40));
```

Related Topics
Premium Resource AvailableSubscribers to premium editions of LabKey Server can learn how to incorporate a plotly graph with the example code in this topic:
Learn more about premium editions 
 Independent installation is required of the following: