Using LabKey Studies, you can integrate and manage data about participants over time. Cohort and observational studies are a typical use case. Learn more in this topic.
This topic is intended to be used alongside a
LabKey Trial Server. You should have another browser window open to view the
Example Project > Research Study folder.
Tour
The "Research Study" folder contains a simple fictional study. There are 5 tabs in the default LabKey study folder; the main landing page is the
Overview tab where you will see three web parts:
- 1. Learn About LabKey Study Folders: a panel of descriptive information (not part of a default Study folder)
- 2. Study Data Tools: commonly used tools and settings.
- 3. Study Overview: displays study properties and quick links to study navigation and management options.
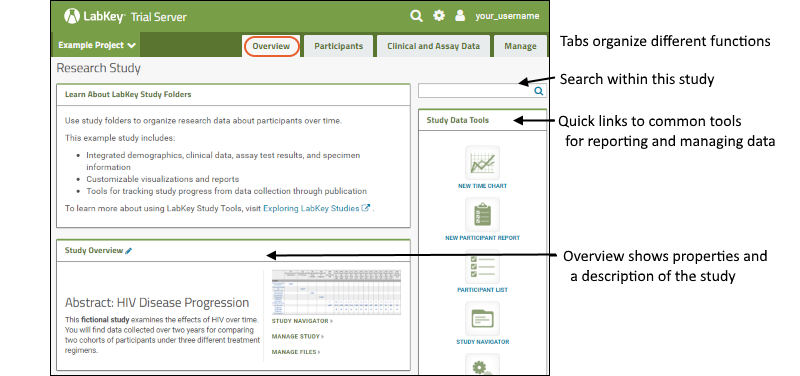
A study has five tabs by default. Each encapsulates functions within the study making it easier to find what you need. Click the tab name to navigate to it. Returning to the
Research Study folder returns you to the Overview tab.
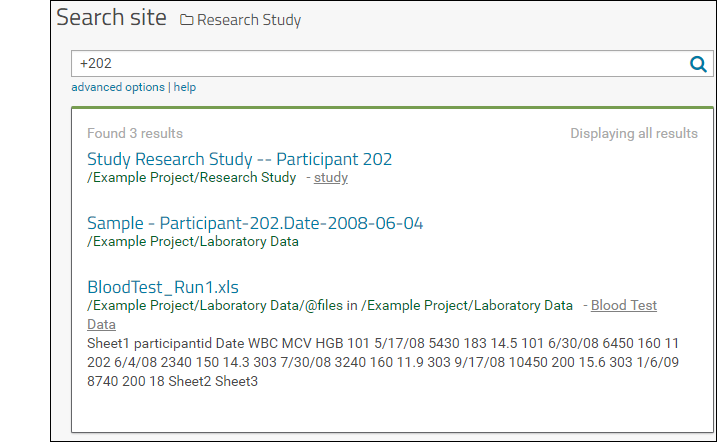
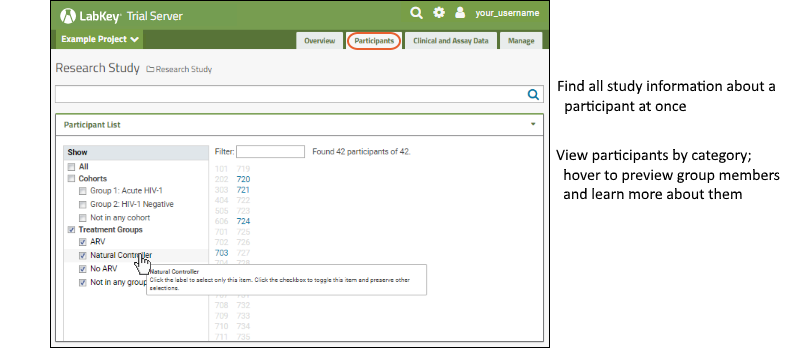
Participants: View and filter the participant list by cohort; search for information about individuals.
 Clinical and Assay Data
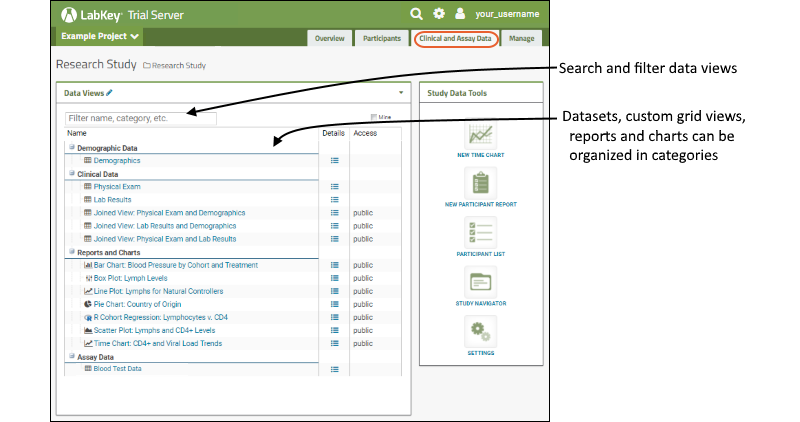
: Review data and visualizations available; create new joined grids, charts, charts and reports.
The
Data Views web part lists several datasets, joined views, and reports and charts.
- Hover over a name to see a preview and some metadata about it.
- Click a name or use the (Details) link to open an item.
- The Access column indicates whether special permissions have been set for an item. Remember that only users granted "Read" access to this folder can see any content here, so seeing "public" means only that it is shared with all folder users. Other options are "private" (only visible to the creator) and custom (shared with specific individuals). See Configure Permissions for Reports & Views for more information.
Datasets:
- Demographic datasets contain a single row per participant for the entire study.
- Clinical datasets can contain many rows per participant, but only one per participant and date combination.
- Assay datasets, typically results from instrument tests, can contain many rows per participant and date.
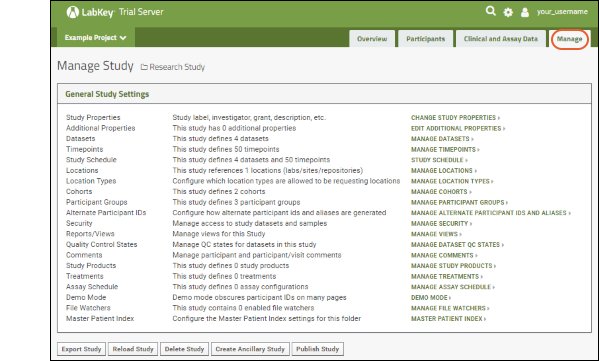
Manage: Only administrators can access this dashboard for managing the study.
Try It Now
This example study includes a simplified research scenario. Let's explore some key feature areas on each tab:
Display Study Properties
The
Study Overview web part shows properties and introductory information about your study.
- Click the Overview tab.
- Click the (pencil) icon on the Study Overview web part.
- Review and change study properties:

- Label: By default, the folder name, here "Research Study," is used. You can edit to make it more descriptive, such as "HIV Study".
- Investigator: Enter your own name to personalize this example.
- Grant/Species: If you enter the grant name and/or species under study, they will be displayed. These fields also enable searches across many study folders to locate related research. Enter a grant name to see how it is shown.
- Description/Render Type: Our example shows some simple HTML formatted text. You can include as much or as little information here as you like. Select a different Render Type to use Markdown, Wiki syntax, or just plain text.
- Protocol Documents: Attach documents if you like - links to download will be included in the web part.
- Timepoint Type: Studies can use several methods of tracking time; this decision is fixed at the time of study creation and cannot be modified here. See Visits and Dates to learn more.
- Start/End Date: See and change the timeframe of your study if necessary. Note that participants can also have individual start dates. Changing the start date for a study in progress should be done with caution.
- Subject Noun: By default, study subjects are called "participants" but you can change that here to "subject," "mouse," "yeast," or whatever noun you choose. Try changing these nouns to "Subject" and "Subjects".
- Subject Column Name: Enter the name of the column in your datasets that contains IDs for your study subjects. You do not need to change this field to match the subject nouns you use.
- When finished, click Submit and see how this information is displayed. Notice the "Participants" tab name is changed.
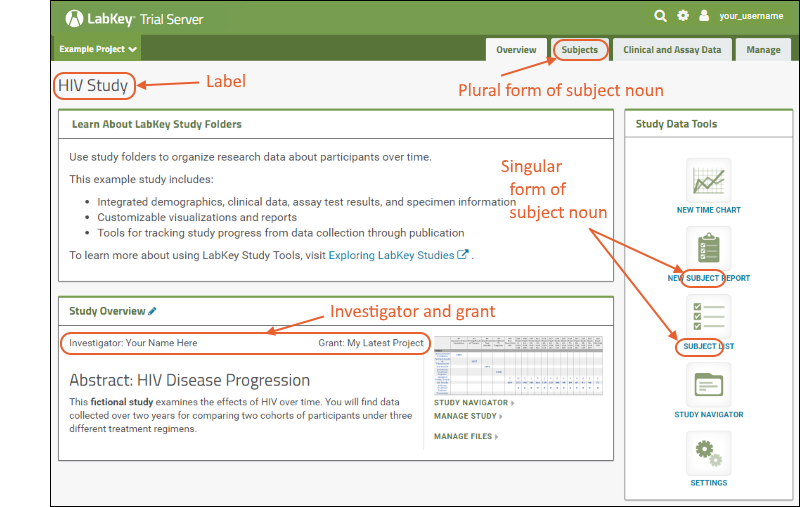
- Reopen the editor and change the subject noun back to "Participant[s]" to restore the original tab and tool names for this walkthrough.
Track Overall Progress
- Return to the Overview tab if you navigated away.
- Click the Study Navigator link or the small graphic in the Study Overview web part.
- The Study Navigator shows you at a glance how much data is available in your study and when it was collected.
- Rows represent datasets, columns represent timepoints.

- Use the Participant's current cohort dropdown to see collection by cohort.
- Use the checkboxes to switch between seeing counts of participants or rows or both.
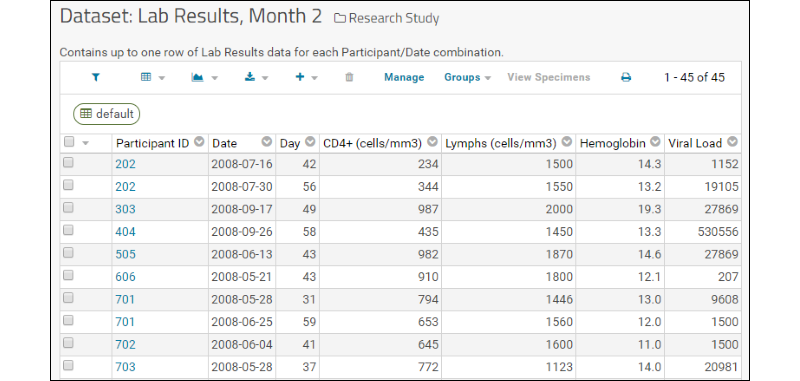
- Click the number at the intersection of any row and column to see the data. For example, Lab Results in month two look like this:
View Participant Data
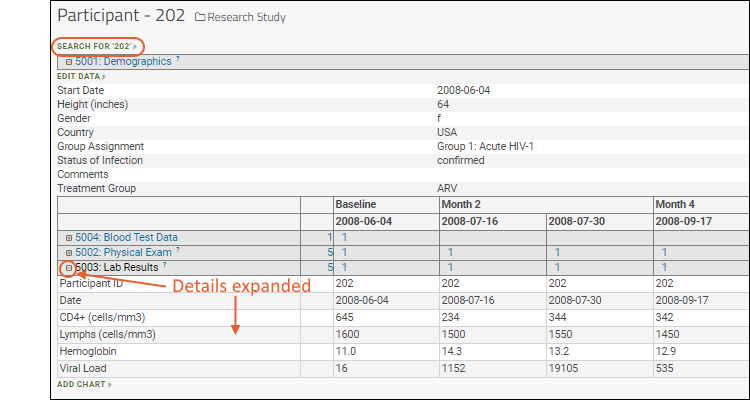
Within a study you can dive deep for all the information about a single participant of interest.
Integrate Data Aligned by Participant and Date
Study datasets can be combined to give a broad picture of trends within groups over time.
- Click the Clinical and Assay Data tab.
- There are three primary datasets here: Demographics, Physical Exam, and Lab Results.
- Click "Joined View: Physical Exam and Demographics" to open an integrated custom grid.
This grid includes columns from two datasets. To see how it was created:
- Select (Grid Views) > Customize Grid.
- Scroll down on the Available Fields side to Datasets and click the to expand it. Listed are the two other datasets.
- Expand the "Demographics" node by clicking the .
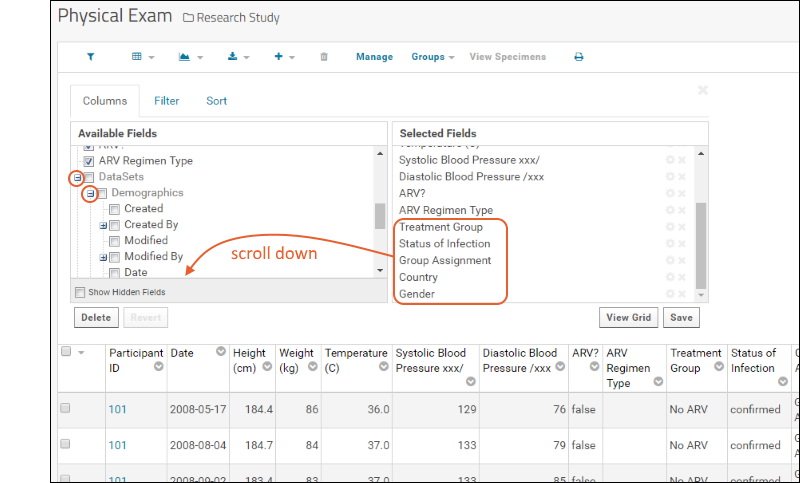
- Scroll down and notice the checked fields like Country and Group Assignment which appear in our joined view.
- Scroll down on the Selected Fields side to see these fields shown.
- You can use checkboxes to add more fields to what is shown in the grid, drag and drop to rearrange columns in your view, and use the and icons for selected fields to edit display titles or delete them from the view.
- Click View Data when finished to see your changes.
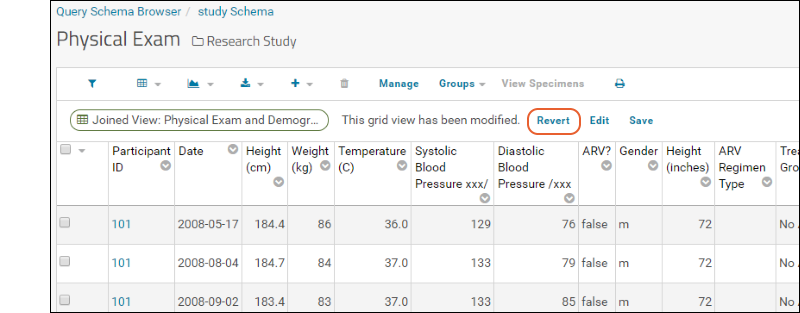
- Notice the message indicating you have unsaved changes. Click Revert to discard them.
Customize Visualizations and Reports
In
Exploring Laboratory Data we show you how to create charts and plots based on single columns or tables. With the integration of diverse data in a study, you can easily create visualization and reports across many tables, backed by live data. Our example study includes a few examples.
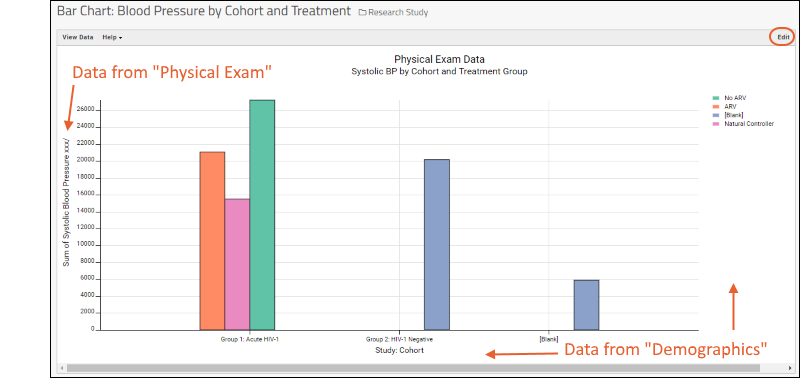
- On the Clinical and Assay Data tab, click Bar Chart: Blood Pressure by Cohort and Treatment.
- Here we see plotted a measure from the "Physical Exam" dataset (Systolic Blood Pressure) against cohort and treatment group data from the "Demographics" dataset.
- Click Edit in the upper right to open the plot for editing.
- Click Chart Type to open the chart wizard.

- Columns on the right can be dragged and dropped into the plot attribute boxes in the middle.
- Select a different plot type using the options to the left. The plot editor will make a best effort to retain plot attribute column selections, though not all attributes apply to each chart type.
- Click Box.
- Notice that the X and Y axis selections are preserved.
- Drag the column "Study: Cohort" to the "Color" box.
- Drag the column "Gender" to the "Shape" box.

- Click Apply to see the new box plot. At present, only the outliers make use of the color and shape selections.

- Click Chart Layout.
- Give the plot a new title, like "Systolic - Box Plot"
- Change Show Points to All.
- Check the box to Jitter Points; otherwise points will be shown in a single column.
- Scroll down to see the controls for plot line and fill colors.
- Choose a different Color Palette from which the point colors will be selected. Shown here, "Dark".
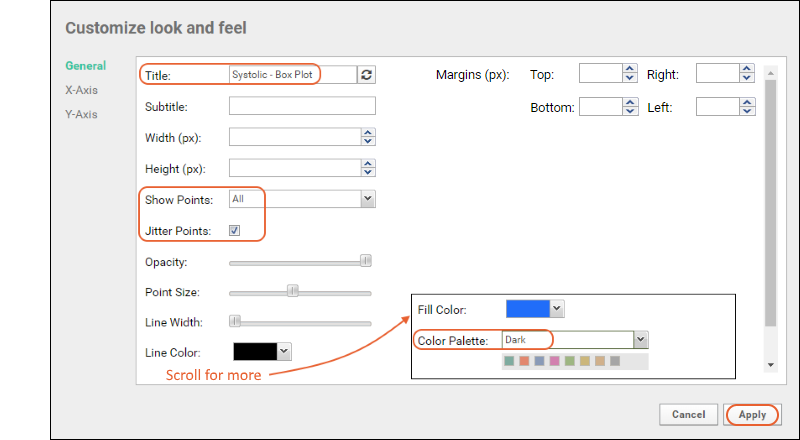
- Click Apply to see the revised box plot.

- Click Save As to save this as a new visualization and preserve the original bar chart.
- Give the new report a name and click Save in the popup.
Manage Your Study
On the
Manage tab, you can control many aspects of your study. For example, click
Manage Cohorts to review how cohorts were assigned and what the other options are:

- Assignment Mode: Cohorts can be simple (fixed) or advanced, meaning they can change during the study.
- Assignment Type: You can manually assign participants to cohorts, or have assignments made automatically based on a dataset.
- Automatic Participant/Cohort Assignment: Choose the dataset and column to use for assigning cohorts.
Optional
- You can experiment by changing which column is used to define cohorts: For instance, choose "Country" and click Update Assignments.
- Notice the new entries under Defined Cohorts and new assignments in the Participant-Cohort Assignments web part.
- Click the Participants tab.
- Now you see under Cohorts that both the original cohorts and new ones are listed. Using the hover behavior, notice that the original "Group 1 and Group 2" cohorts are now empty and participants can quickly be filtered by country.
- Go back in your browser window or click the Manage tab and Manage Cohorts to return to the cohort page.
- Under Defined Cohorts you can click Delete Unused, then return to the Participants tab to see they are gone.
- Click the Clinical and Assay Data tab. Click Bar Chart: Blood Pressure by Cohort and Treatment and you will see it has been automatically updated to reflect the new cohort division by country.
- Return the original cohorts before moving on:
- On the Manage tab, click Manage Cohorts.
- Restore the original assignments based on the Demographics/Group Assignment field.
- Click Update Assignments.
- Under Defined Cohorts, click Delete Unused.
What Else Can I Do?
Manage Dataset Security
Access to read and edit information in folders is generally controlled by the LabKey role based security model. Within a study, you gain the additional option of dataset level security.
- On the Manage tab, click Manage Security.
- Review the Study Security Type: Datasets can be read-only or editable, under either type of security:
- Basic security: folder permissions determine access to all datasets
- Custom security: folder permissions can be set by dataset for each group with folder access
- Change the type to Custom security with editable datasets. Notice the warning message that this can change who can view and modify data.
- Click Update Type.
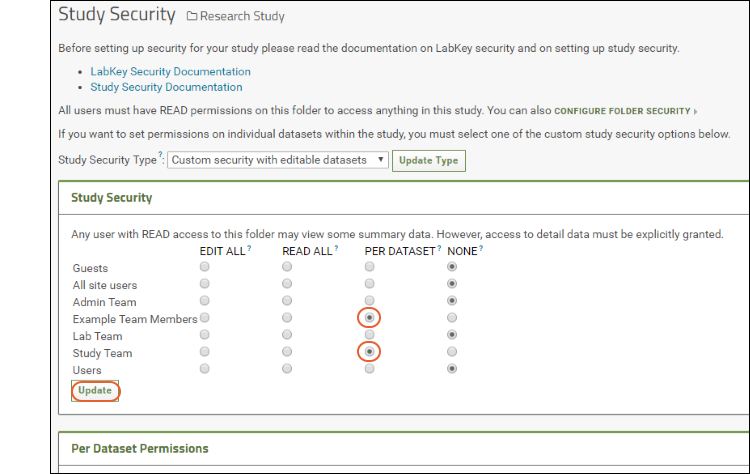
- When you change to using 'custom' security, two additional web parts are added to the page:
- Study Security: Use radio buttons to grant access to groups. Click Update after changing. In the screenshot below, we're changing the "Study Team" and "Example Team Members" groups to "Per Dataset" permissions.
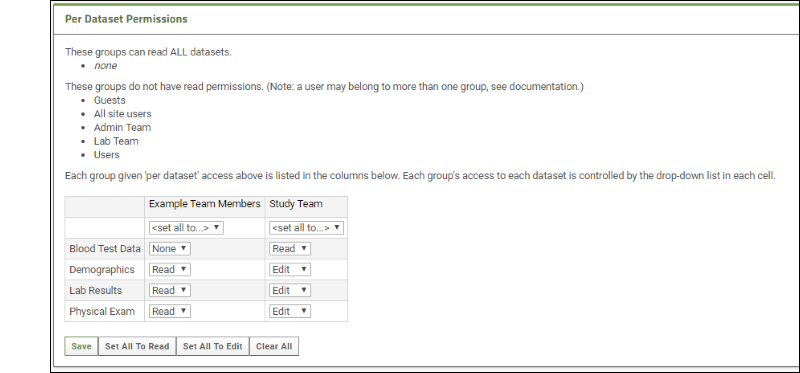
- Per Dataset Permissions: Once any group is given per-dataset permissions using the radio buttons, you will have the option to individually set permission levels for each group for each dataset.
- Click Save when finished, or to revert to the configuration before this step, set all for "Example Team Members" to read, and set all for "Study Team" to edit.
Learn About Protecting PHI
When displaying or exporting data, Protected Health Information (PHI) that could be used to identify an individual can be protected in several ways.
Alternate Participant IDs and AliasesIf you want to share data without revealing participant IDs, you can use a system of alternates or aliases so that you can still show a consistent ID for any set of data, but it is not the actual participant ID.
- On the Manage tab, click Manage Alternate Participant IDs and Aliases.
- Alternate participant IDs allow you to use a consistent prefix and randomized set of the number of digits you choose.
- Dates are also offset by a random amount for each participant. Visit-date information could potentially isolate the individual, so this option obscures that without losing the elapsed time between visits which might be relevant to your study.
- Participant Aliases lets you specify a dataset containing specific aliases to use. For instance, you might use a shared set of aliases across all studies to connect related results without positively identifying individuals.
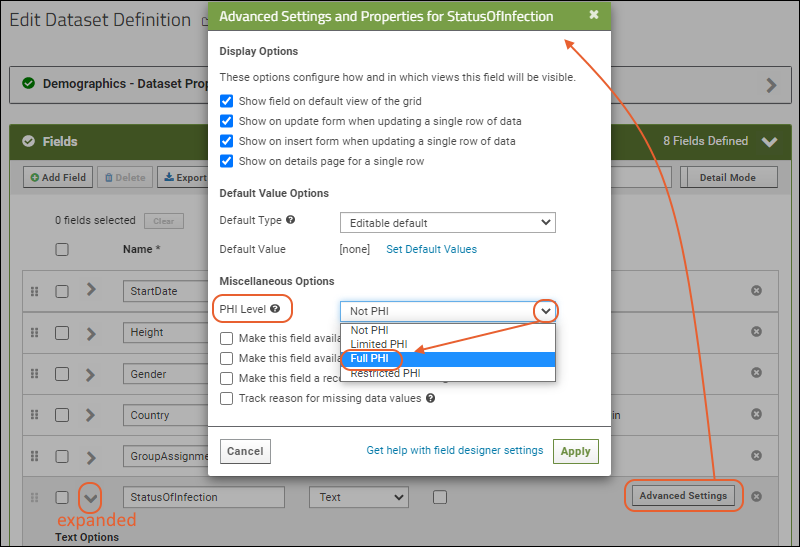
Mark Data as PHIThere are four levels to consider regarding protection of PHI, based on how much information a user will be authorized to see. For PHI protection to be enforced, you must BOTH mark data as PHI and implement viewing and export restrictions on your project. Data in columns can be marked as:
- Restricted: The most sensitive information not shared with unauthorized users, even those authorized for Full PHI.
- Full PHI: Only shared when users have permission to see all PHI. The user can see everything except restricted information.
- Limited PHI: Some information that is less sensitive can be visible here.
- Not PHI: All readers can see this information.
Learn more in this topic:
Protecting PHI Data
Note that these column markings are not sufficient to protect data from view to users with read access to the folder. The levels must be enforced with UI implementation, perhaps including users declaring their PHI level and agreeing to a custom terms of use. For more information on a LabKey implementation of this behavior, see
Compliance Features.
To export or publish data at a given PHI level:
- From the Manage tab, click Export Study.
- On the export page, notice one of the Options is Include PHI Columns. Select what you want included in your export:
- Restricted, Full, and Limited PHI (default): Include all columns.
- Full and Limited PHI: Exclude only the Restricted PHI columns.
- Limited PHI: Exclude the Full PHI and Restricted columns.
- Uncheck the checkbox to exclude all PHI columns.
- If you marked the demographics column as "Full PHI" above, select "Limited PHI"to exclude it. You can also simply uncheck the Include PHI Columns checkbox.
- Click Export.
- Examine the downloaded archive and observe that the file named "ARCHIVE_NAME.folder.zip/study/datasets/dataset5001.tsv" does not include the data you marked as PHI.
Publish the Study
Publishing a LabKey study allows you to select all or part of your results and create a new published version.
- Click the Manage tab.
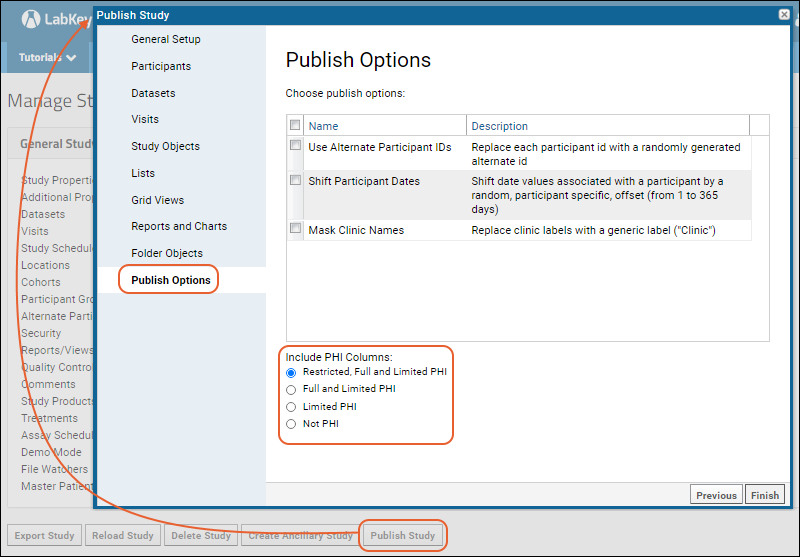
- Click Publish Study (at the bottom).
- The Publish Study Wizard will guide you through selecting what to publish.
- By default, the new study will be called "New Study" and placed in a subdirectory of the current study folder.
- Select the participants, datasets, timepoints, and other objects to include. On the Datasets step, you can elect to have the study refresh data if you like, either manually or nightly.
- The last page of the publish wizard offers Publish Options including obscuring information that could identify individuals and opting for the level of PHI you want to publish.
- Click Finish at the end of the wizard to create the new study folder with the selected information.
Explore the new study, now available on the projects menu.
More Tutorials
Other tutorials using "Study" folders that you can run on your LabKey Trial Server:
To avoid overwriting this Example Project content with new tutorial content, you could create a new "Tutorials" project to work in. See
Exploring Project Creation for a walkthrough.
Explore More on your LabKey Trial Server


