Various metrics can be used to track quality and investigate trends in different types of data. In Luminex assays and Panorama folders, Levey-Jennings plots offer built in support. Quality Control (QC) Trend Reports are a way to perform this type of quality control on other types of data, such as Standard and file-based assay data.
QC Trend Reports are enabled on servers with the
Premium module installed.
Options for Defining QC Trend Reports
Open the UI for defining the QC trend report in one of three ways.
Option 1. Associate with a Standard or File-based Assay
If you will be running your QC Trend Reports over assay data, you can define them from the assay grid header menu. This option is supported for either the Standard Assay, or a file-based assay. Associate QC Trend Reports with assays as follows:
- Select > Manage Assays.
- In the Assay List, click the name of your assay.
- Select Manage Assay Design > Create QC trend report.

Continue to
define your QC trend report.
Option 2. Use for Other Types of Data
You can also define a QC Trend Report from the
(Charts) menu of a data grid:
- Open the (Charts and Reports) menu.
- Select Create QC Trend Report.

Using this method will typically prepopulate the schema and query you are viewing when you open the QC Trend Report editor. Note that you must manually specify the
Assay if you are using the report on assay data but creating it from the charts menu.
Continue to
define your QC trend report.
Option 3. Define in Schema Browser
If neither of the above options is suitable, you can also manually define the report in the schema browser as follows:
- Select > Go To Module > Query.
- Choose the "qctrendreport" schema.
- Select the "QCTrendReport" query (it will be alphabetized with any existing QC trend reports).
- Click View Data.

- You'll see a listing of existing QC trend reports.
- Click (Insert New Row).
Continue to
define your QC trend report.
Define QC Trend Report
QC Trend reports are defined using a two-panel wizard.

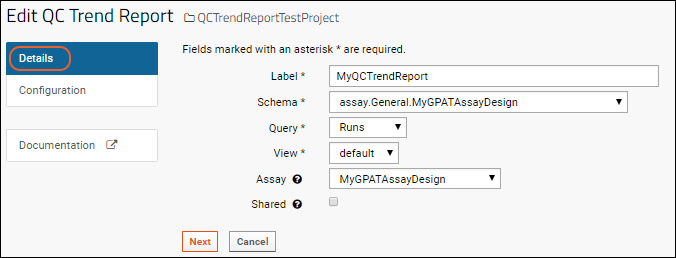
Details
Provide the name and other details.
- Enter a Label, which must be unique to the folder.
- Select a Schema from the dropdown. This will populate the "Query" dropdown. If you started this report from a grid of data, the schema and query will be prepopulated with defaults.
- Select the Query within the selected schema.
- Select the View from any defined on that query.
- If the Report should be associated with a specific Assay, select it here.
- When attached to an assay, the report will be available via the "View QC Trend Report" menu in assay data headers.
- If the assay design is defined in the "/Shared" project, you will also see this report available in other containers where the assay design is used.
- Check the Shared box to share the report with other users granted access to this folder. See the Shared Reports section below for details.
- Click Next to continue.
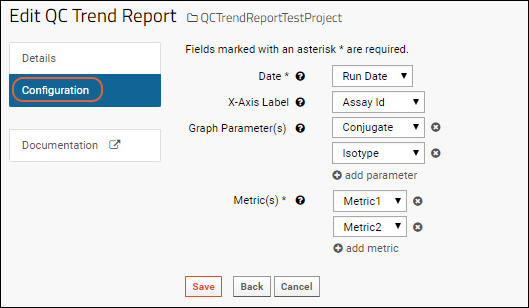
Configuration
Select columns to use in the trend report:

Select the following:
- Date: Choose among columns of type "Date" in the selected query and view. Used for sorting and joining rows in the report and with guide sets.
- X-Axis Label: This column will be used for the tick mark display along the x-axis.
- Graph Parameter(s): Select one or more columns to be used for grouping/filtering in the trend report. They will be shown in the UI in the order selected here.
- When a user is generating a report, values selected for the first parameter will limit the values available for subsequent parameter(s) to only combinations that are valid.
- Metric(s): Define the metrics to be tracked by the trend report. Options are the columns of type "Numeric", i.e. integers and floating point numbers.
- Click Save.
You can now
use your QC Trend Report.
Defining Metrics
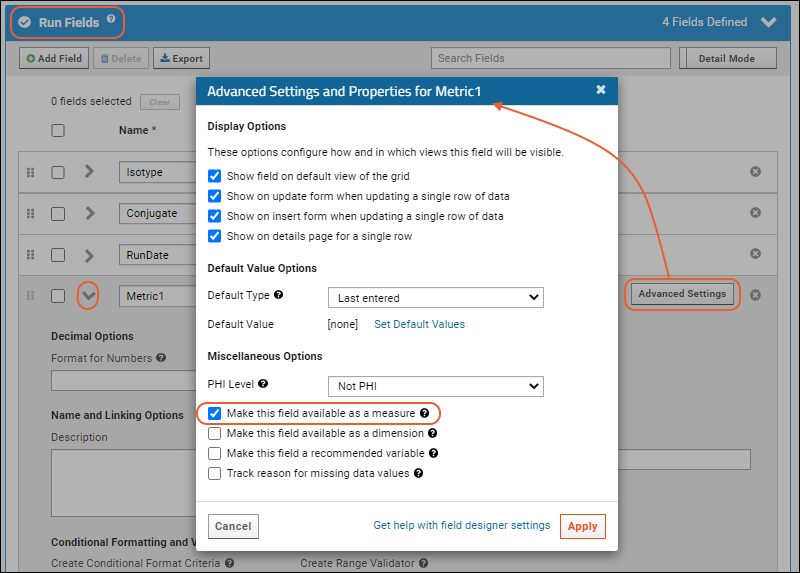
To define a metric for use in a QC trend report:
- Edit the desired field in the table definition.
- Select the field to use as a metric.
- For assays, there are both "Run" fields and "Data" fields. Metrics should be defined in the Run Fields section.
- Click the section to open it.
- Expand the desired field (shown here "Metric1").
- Click Advanced Settings.
- Check the box for Make this field available as a measure.
- Click Apply and then Save.

Learn more about setting measures and dimensions
here.
Edit QC Trend Reports
To edit a QC trend report, first open the grid for the report. For reports associated with assays, the report grid will be available on the
View QC Trend Reports menu for that assay.
- To edit, click the (Configure) icon above the report grid.

For other reports, reach the assay report page using the query schema browser:
- Select > Go To Module > Query.
- Choose the "qctrendreport" schema.
- Select the "QCTrendReport" query.
- Note that each QC Trend Report you have defined will be represented by a folder, each of which contains another "QCTrendReport" query. You want the top level "QCTrendReport" query.
- Click View Data to see a list of the existing queries in the Label column.
- Click the Label for your QC Trend report to open the report grid.
- Use the (Configure) icon to edit.
Delete QC Trend Reports
To delete a QC trend report, click the
(delete) icon above the report grid.
Share Reports with Other Users
When you define a QC Trend report, you will be able to see it on the
(Charts and Reports) menu for the appropriate dataset, or on the
View QC Trend Report menu above assay run data. To make the report available to others, check the
Shared box.
The following table shows the container permission roles required to perform various tasks on a shared vs. non-shared report.
| Role(s) | Can view? | Can create? | Can update? | Can share? | Can set as assay report? | Can delete? |
|---|
| Reader | private + shared | yes | private | no | no | private |
| Reader + Assay Designer | private + shared | yes | private | no | yes | private |
| Author | private + shared | yes | private | no | no | private |
| Author + Assay Designer | private + shared | yes | private | no | yes | private |
| Editor | private + shared | yes | private + shared non-assay | yes | no | private + shared non-assay |
| Editor + Assay Designer | private + shared | yes | private + shared | yes | yes | private + shared |
| Admin | private + shared | yes | private + shared | yes | yes | private + shared |
Related Topics
 Learn more about setting measures and dimensions here.