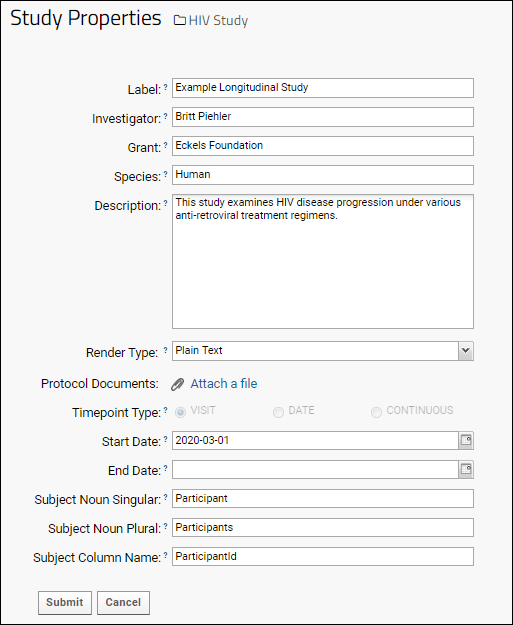
The default set of study properties provide basic information including a name, description, how to identify study subjects and track time, and the option to attach protocol documents. Administrators set some of these properties during
study creation, and can edit all the study properties from the Manage tab.
Additional custom study properties can be added to the definition of a study at the project level, allowing you to store and use information about multiple studies in a given project beyond the built in study properties. Additional properties are exported and imported as part of folder archives.
Note that while study properties are defined from within a study folder, they will be created at the
project level and thus defined within every study folder in that project. Within each folder, the value of the property can be set. This supports a consistent schema for cross-study queries and reports within a project.
Only a project administrator can add or delete custom study properties, and changes made to the properties available will be reflected in every study folder within the project.
Default Study Properties
See and set defined study properties either by clicking the pencil icon in the
Overview web part or by clicking
Edit Study Properties from the Manage tab.

- Label: By default, the folder name is used with the word "Study" added.
- Investigator: Enter a name to display in the overview.
- Grant/Species: If you enter the grant name and/or species under study, they will be displayed. These fields also enable searches across many study folders to locate related research.
- Description/Render Type: Our example shows some simple text. You can include as much or as little information here as you like. Select a different Render Type to use HTML, Markdown, Wiki syntax, or just plain text.
- Protocol Documents: Click Attach a file to upload one or more documents. Links to download them will be included in the Study Overview web part.
- Timepoint Type: How data is sequenced in the study. See Visits and Dates to learn more.
- Start/End Date: See and change the timeframe of your study if necessary. Note that participants can also have individual start dates. Changing the start date for a study in progress should be done with caution.
- Subject Noun: By default, study subjects are called "participants" but you can change that here to "subject," "mouse," "yeast," or whatever noun you choose.
- Subject Column Name: Enter the name of the column in your datasets that contains IDs for your study subjects. You do not need to change this field to match the subject nouns you use.
Click
Submit to save changes here.
Define Custom Study Properties
To define additional custom properties:
- Open the Manage tab.
- Click Define Custom Study Properties.
- If there are no custom properties defined yet, and you have a prepared JSON file containing field definitions to use, you can select it here. Otherwise click Manually Define Fields.
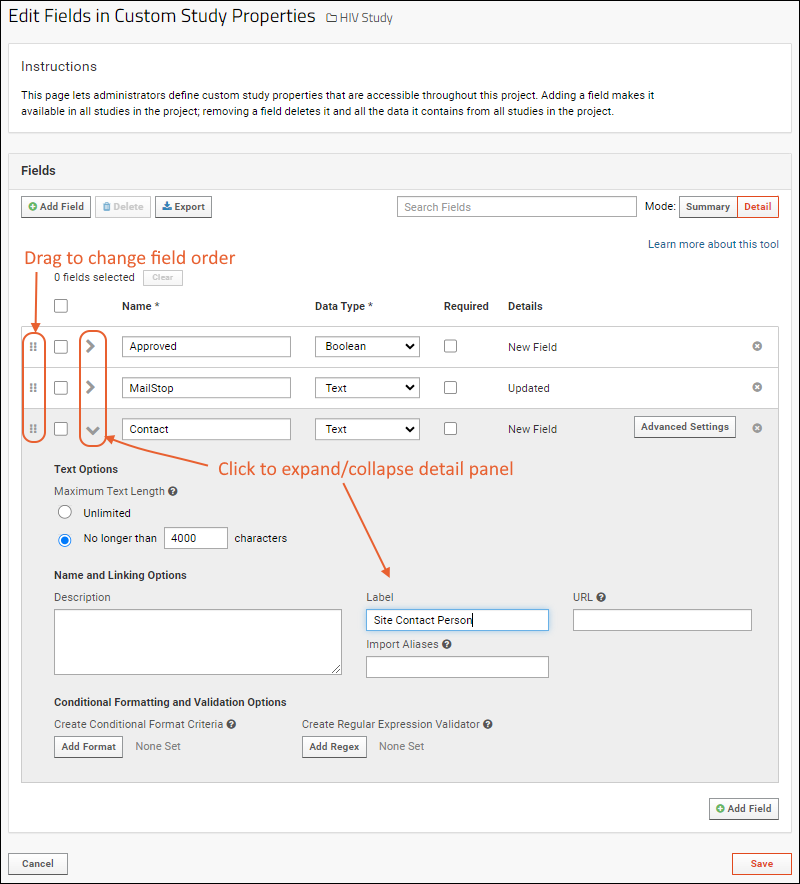
- Click Add Field and specify the Name and Data Type for each field required.
- To use a Label other than the field name itself, expand the panel and enter the label text.
- Reorder custom fields by dragging and dropping them using the six block "handle" on the left.
- Delete unneeded fields by expanding the panel and clicking Remove Field.
- Click Save when finished.
For example, you might add additional administrative properties like these:

Once added you will be able to set values for them via the
Study Properties link from the
Manage tab. Custom properties appear at the end of the list after the built in
study properties.

Related Topics